Thursday, April 29, 2010

Vintage Alarm Clocks

Recently I've found myself absolutely in love with vintage alarm clocks. I don't know what it is, but something has drawn me to them. Maybe it's because I hate waking up to the combination of B's cell phone and my old digital, black clock radio.


I particularly love this one that I found here.

Etsy has all kinds of shops bursting with these beauties as well...


This little number was is listed by ClockworkUniverse for $11.00. Non-working, but I picture it sitting atop a small pile of books in a bookshelf.


This copper plated working piece is the first one I loved, listed by Magark for just $9.95.

I've definitely seen more than a few that I love, but I'm continuing my search for one that I really want to take home with me.

How about you? Are you a fan of vintage alarm clocks? Or are you partial to some other sort of vintage piece?
SHARE:

Wednesday, April 28, 2010

Beautiful Basquiat Patina

My recent closet renovation has inspired a new project. It's nothing I plan to start right away, as I have way too many other projects on the go, but I found this fabric the other day that I fell in love with and I know exactly what I plan to use it for.


Gorgeous right? An absolute steal on Fabric.com too! It was on sale for only $4.98 a yard! It's called Robert Allen Basquiat Patina. I've ordered it, along with another fabric that I plan to use, but it will be a while before I get them (as they weren't shipped to Canada). I'm okay with it though. Still lots to do around here before I can focus my attention on this project. It's going to be a good one, and I still have lots of stuff I need to gather before I can start.

Don't you just love when you find the perfect piece that inspires a project?

(Is it just me - or is the fabric a more colourful version of the beautiful blog header that Brittany created for me?)
SHARE:

Tuesday, April 27, 2010

SPOTTED!

Well... striped actually! This playful orange zebra print, La Playa De Cebra large coal beach bag by Kate Spade - at the Winners at 110 Bloor Street in Toronto.


The bag originally retailed at $325, but they have it at an awesome $129.99! Would've been mine if I had the extra cash right now. Okay - that's a lie. The Classic Noel Medium Serena in Brown that I spotted while out shopping this weekend would've come home with me. B rationalized that one new bag was good enough for this weekend. Maybe next time.
SHARE:

Friday, April 23, 2010

Shipping Up To Boston

By the time this article is posted, B and I will already be in Beantown! Well kind of. We got in the car late last night to make our way to visit with B's family in his hometown, outside of the city. We will however be spending some time right in Boston, doing some things I've always wanted to do, and also going to see at concert at the Berklee Performance Center. Since we are on the road again, thought it would be a great opportunity to share some of my favorite photos from past trips to Boston and B's hometown! Enjoy, and I'll catch up with you when we're back!

Downtown Boston - February 2008

Spring in Boston Common - May 2008

More Boston Common - May 2008

Boston - May 2008

An old abandoned building in B's hometown - August 2008

A walk in Allston - August 2008

A beautiful park in B's hometown - October 2008

Definitely time to update my photos of the city and B's hometown! Happy weekend everyone!
SHARE:

Wednesday, April 21, 2010

Great Weekend Find

Even though B and I spent a lot of time this past weekend couped up in the house finishing up my closet (for the moment) and working on the basement, I managed to sneak out for a little while on Sunday afternoon to do a little shopping.

It has been a long time since I managed to get out to Home Sense on my own and just wander around, without someone rushing me through the store. The trip was successful, as I stumbled across something I've been searching for, for a while for my laundry room (which will one day be complete), and these:


A while ago I blogged about how I spotted these adorable drawer pulls at Anthro, and how much I loved them. Unfortunately, at $10 a piece, they were not in my budget - especially when I had no project in mind that I could use them for.

I was beyond thrilled, when walking around Home Sense I spotted these near the front cash, in a pack of four... for $10! YES PLEASE! Of course, when I got home and showed B my wonderful find his first question was "What are you going to use them for?". "I'll find something". That's all that matters, right?

Isn't it the greatest feeling in the world to find something you've fallen in love with for a great deal?
SHARE:

Tuesday, April 20, 2010

Ork City

I'm sure you're all familiar with Ork Posters. If you're not, then you will be!

I discovered them last fall, and fell in love with the Boston city poster. Thought it would be a great way to keep B's hometown close to us, in our casa here in Toronto.


I considered ordering the Boston one to frame and give to B as a Christmas gift, then decided to hold out when I learned they were working on a Toronto poster. I signed up for the email list so that I would be notified when the poster was complete. Well, the email finally came!


So many neighbourhoods in our lovely city! I love it! Especially this screen print in the sephia and brown tone. It gives it a real vintage look. I plan on holding off on ordering them until the basement is done. I'd like to incorporate them into a gallery wall I am planning down there.

Are you a fan of Ork?
SHARE:

Sunday, April 18, 2010

The Lovely Bones - My Closet Reveal

After four weeks of having to shuffle through piles of clothes on the guest bed every morning to dress myself, I finally have a more functional and organized closet structure! Let's take a quick trip down memory lane and peak at my previous closet monstrosity, shall we?


Pretty bad, right? Looking at this actually makes me pretty happy that it collapsed, as it gave us a reason to give it some new life. And give it new life we did!

We started out by knocking out the back wall and building a cubby that would add some extra storage. It gave me endless amounts of joy to see us making use of that long forgotten space in behind the closet, and create a new home for my most beautiful shoes!

The next step was to paint the walls white, and get rid of that awful colour (whatever it was). Just removing that awful almondy colour from the wall really made the space a whole lot brighter, and seem so much bigger!

After painting, work once again ground to a halt as B and I stood back to check out the space and really plan out how my clothing rails would fit. Finally after much discussion, we headed out to buy all of the necessary pieces, and B got to work measuring, cutting and priming all of the wood for the new closet structure. Nothing much happened for a bit, then last Sunday, I arrived home from Brunch with a girlfriend to discover this:


What a wonderful, hardworking man my B is! Of course, as the afternoon wore on, I left B to his own devices and had continued on my quest to work on another project I have been working on (to be shared soon... I hope). However, by that evening, I was inside painting all of the wood, anxious to get my clothes back into their proper place.

Late last week the flooring went in, and over the course of the weekend trim was installed and painted, and my closet is finally being used again!


We're still trying to decide how to handle storage above the clothes rail on that second side of the closet. We have a general idea, but right now we are determined to make some serious progress in the basement. I also want to find some nice curtains to cover the opening of the closet, but I'm in no rush.

So just to recap, we went from this:


To this:


In FOUR weeks! Not too bad right? I love it!

Have you done a major overhaul of a storage space in your house? How were you creative with storage in an awkwardly shaped or small space? Would love to hear what some other people have done!
SHARE:

Ravishing Raspberry

I haven't given our basement reno much attention on the blog recently. Why? Well, the main reason was that for a while it was kind of at a stand still. Then, there was a period were B was working on plumbing and electrical, so there really wasn't a whole lot to blog about. Alas, things are back on track and I am excited as I see our basement bathroom moving along. Keep your eyes out for a basement bathroom progress photo soon.

Now, with that out of the way, let's get to the real reason I found it necessary to write a post at 11:57pm on a Saturday night. An inspiration photo I found today. B and I were out at Home Depot, picking up some things for both the closet reno (which I plan to reveal on Monday) and the basement reno, when I picked up the April 2010 issue of Better Homes and Gardens. As we waited in line I started to flip through the pages and came across this:


Um, HELLO! There was just something about that beautiful raspberry coloured chair that jumped off the page at me! The wallpaper, is what sold me, as the light blue is so close to the colour we have used in my laundry / office / craft space in the basement. THAT raspberry is the colour I want on my chair! I originally planned on using one of the two chairs I've blogged about recovering, but I've decided I will save those for the main living area in the basement.

Who know's if I will actually go with this colour for my office chair (which I have yet to find, as I seem to be on the hunt for that exact chair at the moment), but I just had to share this photo! It seriously got me thinking, especially as I have spent a considerable amount of time this last half of the week thinking about my little personal space! One day it'll be mine to use... one day!
SHARE:

Friday, April 16, 2010

All in the Family

Quite a while before B even moved North to Canada, my Aunt had inquired as to whether I would like to have my Grandmother's old dining room set. I didn't have to think too long before I agreed to take it on. Not only does it hold memories, as it once belong to my Dad's mother, but it also spent a great deal of time at my Aunt's house, where many family meals and gathering's take place. It had been part of the family for so long, it just made sense to keep it there. On top of that - free furniture? Yes please! Even better, it's absolutely solid! For nothing we got a large table with a leaf, six chairs and a dining room hutch. The only catch? It needed a little TLC.

Now, the downside to this post - I wasn't very forward thinking, and neglected to take a before photo of the dining set. To give you a basic idea, I came across this photo of a set that had been available at a Habitat for Humanity Restore in our area. It looks pretty similar to my grandmother's set.


So, as nice as it was, it really didn't fit with my taste. The other issue was that the fabric on the chairs needed to be changed, and a lot of the finish on the table itself was lifting, so I knew it was time for a complete overhaul.

The whole process started quite a long time ago. July of 2008 to be exact. The set had been sitting my parents garage for quite some time when I decided to start looking at the chairs and come up with a plan for them.

Here's some "detailed" before shots of the chairs on that day, oh so long ago:


The detailing at the top of the chair was just not me, so I knew that there would need to be a solution to cover it all up. That day in particular though, was more a matter of how to get the upholstered piece out of the back of the chair. These chairs were seriously good quality, so it took some creativity on my/my mom/my father's part to get that piece out of the first chair. In the end we used an exacto knife, a screwdriver, a hammer and eventually a jigsaw to get the fabric, foam and wood panel out of the middle of that chair, and after a few hours, it eventually looked like this:


*Phew*! I'm exhausted just remembering that evening. I also remember wondering "How long with this stupid project take, if getting the back out of ONE chair took a whole evening?". Well, let's just say it was finally finished around October of 2009 (which is when the chairs were done... the table was completed much earlier). Thankfully, I had the help of B (who did the majority of the sanding and all of the staining of the table and chairs) and my Mother, who I worked diligently with to come up with a creative solution for recovering the chairs.

It took a lot of out of ALL of us, and if I remember correctly, my parents actually brought the last two chairs with them when they came to Thanksgiving dinner at our place back in October! It was well worth all of the effort and time though, as our dining table now looks like this...


The hutch from the set is a whole other story. Our house is not nearly big enough to make use of it, so it sits in our garage, unused and not refinished - waiting for the day we move to a bigger home.

Not too sure what the interest would be in putting up some more detailed posts on the process of restaining and reupholstering these pieces. As much as I could write something, there would be no pictures of the process. If you're interested in more info though, please let me know!
SHARE:

Wednesday, April 14, 2010

Love for the iPod

Dear Kate Spade,

Thank you for designing this beauty that will keep my cute little silver Nano safe from any further harm. I've been looking for the perfect cover, and to no one's surprise, I found it in your online shop. I can hardly wait to see it adorning my sweet little iPod.

Thank you,
Kerry


SHARE:

Tuesday, April 13, 2010

Chair Fabric: Final Pick

It's been a while since I visited, talked or even thought about my second hand chairs that I got for $40. Rightly so, with all of the projects taking over our lives on the home front. I'd posted a while ago, with a few options I'd found on the Designer Fabrics website and was considering using for the seats of these fabulous finds.


Despite how much I liked those fabrics, I wasn't really in love with any of them. So yesterday, when Mrs. Chic posted a coupon from Calico Corners, I figured it was worth a look. Sure enough, while browsing through the Indoor/Outdoor Fabric section, I spotted this:


It was love at first site! It's called Garden Gate Outdoor, and I think it will be PERFECT on my chairs! Before I go ahead with the order, I just want to make sure that that width will work with the seats. I am not against having a little extra laying around either - I'm sure I could make use of it! What do you think - fabulous find?
SHARE:

Monday, April 12, 2010

Veg Out

I've had a bit of an extended absence from blogging - mainly because we've spent the last few days trying to complete a number of projects around the house. With everything that we got done, I'll break our projects up into a variety of posts that I'll share throughout the week.

I wanted to start out with a small project that we started Saturday afternoon. Nothing huge, but a project B and I are both very excited about. We're finally ready to do something with the mess of an area next to our old garage in the back yard (which will also hopefully get a face lift this summer!)


Yeah - I know. Gross right?? Not for long!

After running a few errands on Saturday, B and I headed out back ready to clean up the area that will soon become our own little vegetable garden! Well - B did, and I started on another project that I'll share later this week!

First things first, the little tree's back there had to go (sadly). They were growing through the fence since they were sapplings, so it appears that the fence had actually become part of the tree. We also needed to create more sunlight for our new little veggie patch.


B got to work, cutting and chopping, and later I was in charge of cutting up the trees into manageable sizes for bundling.

With the trees out, B got to work lifting out and moving all of the old patio stones that covered the whole area. Once they were piled up, we laid out some wood to mark out the area that our veggie garden will occupy. A nice large area to allow us to grow all kind of delicious things!


Not too bad right... with the exception of all that junk piled up along the left hand side. Not an issue... B took care of that too!


You can tell by the difference in lighting in all of the pictures that it was a project that took much longer than it took for me to write this post. We're not quite done, I'd like to make the area a little more private from the neighbours - and we plan on changing out the metal fence and gate in the yard with a nice wood one... at some point in the future! We also have some more soil to buy and mix in before we begin planting. I can already taste all of the delicious veggie's we'll be growing and using this summer. I'll keep you posted on our progress!

This was probably the "least exciting" project we tackled this weekend. I have a few more coming this week that I am very excited to share with everyone - so keep an eye out for what's to come this week!
SHARE:

Thursday, April 8, 2010

Welcome Baby Janveau!

You may remember that a while ago I posted about planning a baby shower for one of my best friends? Today was the big day! She welcomed her beautiful little man into the world. I was anxious all day waiting for that text message to arrive! I just about burst with happiness and excitement when I finally heard from her sister (and almost burst into tears a few times too)! I so wish I could be in Ottawa with her right now... but soon enough! For now, I'll just say I am thinking of her, daddy and the new little man! Here's a sneak peek (care of our friend Taylor):


Isn't he just perfect? All 6lb 7oz of him? I love you already Baby B Janveau. I can't wait to hold you! V, you know I love you and I can't wait to share in your happiness and watch your little family grow! Congrats to you and MJ! We'll see you soon!
SHARE:

The New Look

I'm so excited today to finally have the new blog look up! I was getting tired of the usual blogger template with no colour. Don't get me wrong, I love white, but it just wasn't cutting it anymore! 

My beautiful new header was designed by the wonderful Brittany from Pink Peacock Designs, and I think that she perfectly captured what I was looking for, for my little ol' blog! I was also thrilled that she was able to change the layout from two columns to three! She was so quick, and an absolute pleasure to work with, and I definitely recommend her if you're looking for a little blog makeover! Oh yes, and she is also the lovely designer behind that cute little piece of art work that I have hanging in the guest bedroom! Isn't she talented?

So - what's the verdict? Are you loving my new look?
SHARE:

Monday, April 5, 2010

The Closet Fireplace?

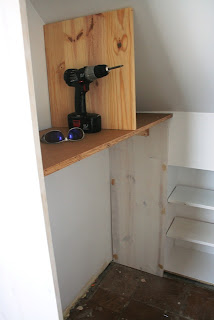
Nothing much has been going on around here recently... at least nothing worth blogging about. Closet progress has been incredibly slow, but yesterday we finally got around to sanding it all down and getting the primer on... yup, that's all we've done. Which means the closet now looks like this...


Kind of like we're going to just pop in a gas fireplace insert and call it a day, huh? That could be interesting.

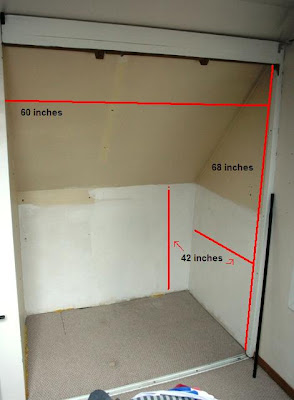
With the closet slowly moving along B suggested tonight that we head over to IKEA to get some closet inspiration. While walking around the closet section, I stumbled across the Komplement birch clothes rail, which was marked "Now or Never", and priced at $4 each. B and I figured it was a great deal, and after being directed by the associate to the "As Is" section, we booked it there hoping to grab 3 of the last 4 they had on hand. We lucked out - not only were all 4 still there, but they were marked down even further to $1.90 a piece - so we grabbed all 4! We also managed to find the perfect shelf for one side of the closet on sale for $7.90. Not bad. We picked up all those piece for the closet, and a new candle, all for $20.33! We left feeling pretty happy with ourselves (especially with frozen yogurt in hand). So here is the plan for the closet...


Those are the measurements of my closet space (obviously!). As you can see, working  with the width of the closet makes no sense, and we'll actually utilize the space better by using the depth instead. Therefore the plan is to run our clothing rails along the 2 sides of the closet (42 inch lengths) rather than across the front (60 inches). Of course, that also leaves our fireplace cubby storage more accessible.

I have some plans to make space for longer hanging items like dresses and robes, and also to create some sort of storage space on top of the clothing rails to hold other linens, shoes and purses. I just need to figure out where exactly everything will go once all of our organization solutions are in place. I'm hoping that by this weekend I can share our final product! Fingers are crossed... I've had enough of shuffling through piles of clothes on the guest bed to get dressed.

I hope you all enjoyed your Easter weekend!
SHARE:
Related Posts with Thumbnails
© Life on Misneach Ridge
Blogger Designs by pipdig