Trending

Tuesday, August 9, 2011

You May Call Us Crazy...

... but on Sunday afternoon while Halle took a little nap, B and I wanted to accomplish some stuff at home, so back down to the laundry room we went (yes instead of resting and relaxing). There were quite a few projects we wanted to finally finish, and first on that list was to put up the large LACK shelf we had picked up from IKEA the Tuesday before Halle was born.


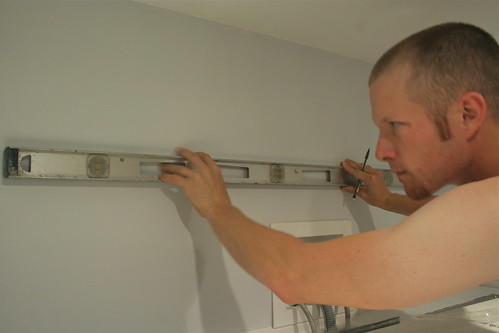
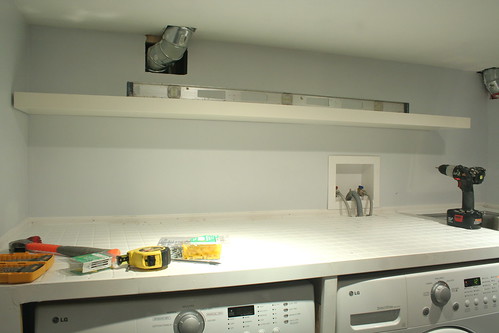
B started out by measuring how far we wanted the shelf off the countertop, and then used his level to get a straight line of where we would mount it.


August 7, 2011
Check out that concentration!

We then used that straight line to line up the back of the shelf and B marked where we would have to put the anchors and screws...

August 7, 2011

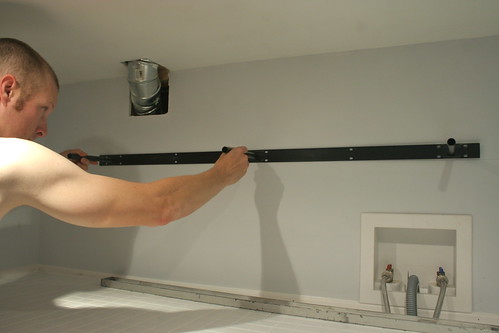
As you would expect he then drilled the holes we would need to mount the back of the shelf, and put in some drywall anchors to make sure my shelf was secure...

August 7, 2011

From there it was a matter of screwing in the back plate for the shelf and sliding it into place. It looked great when it was up - level and all!

August 7, 2011

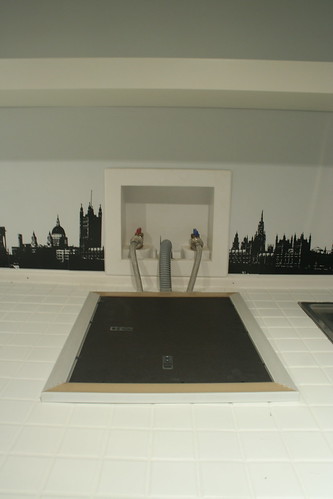
We weren't quite done yet though... we had some fun to add to my space. A couple of Christmas' ago, B had bought me a wall decal of the London skyline. Not everyone is a fan of wall decals, but I'm really happy with how this one looks...

August 7, 2011

I'm using the "Count Your Lucky Stars" print from Brittany's shop to hide the water valves on the back wall. I haven't decided if it's too much though. Thoughts?

August 7, 2011

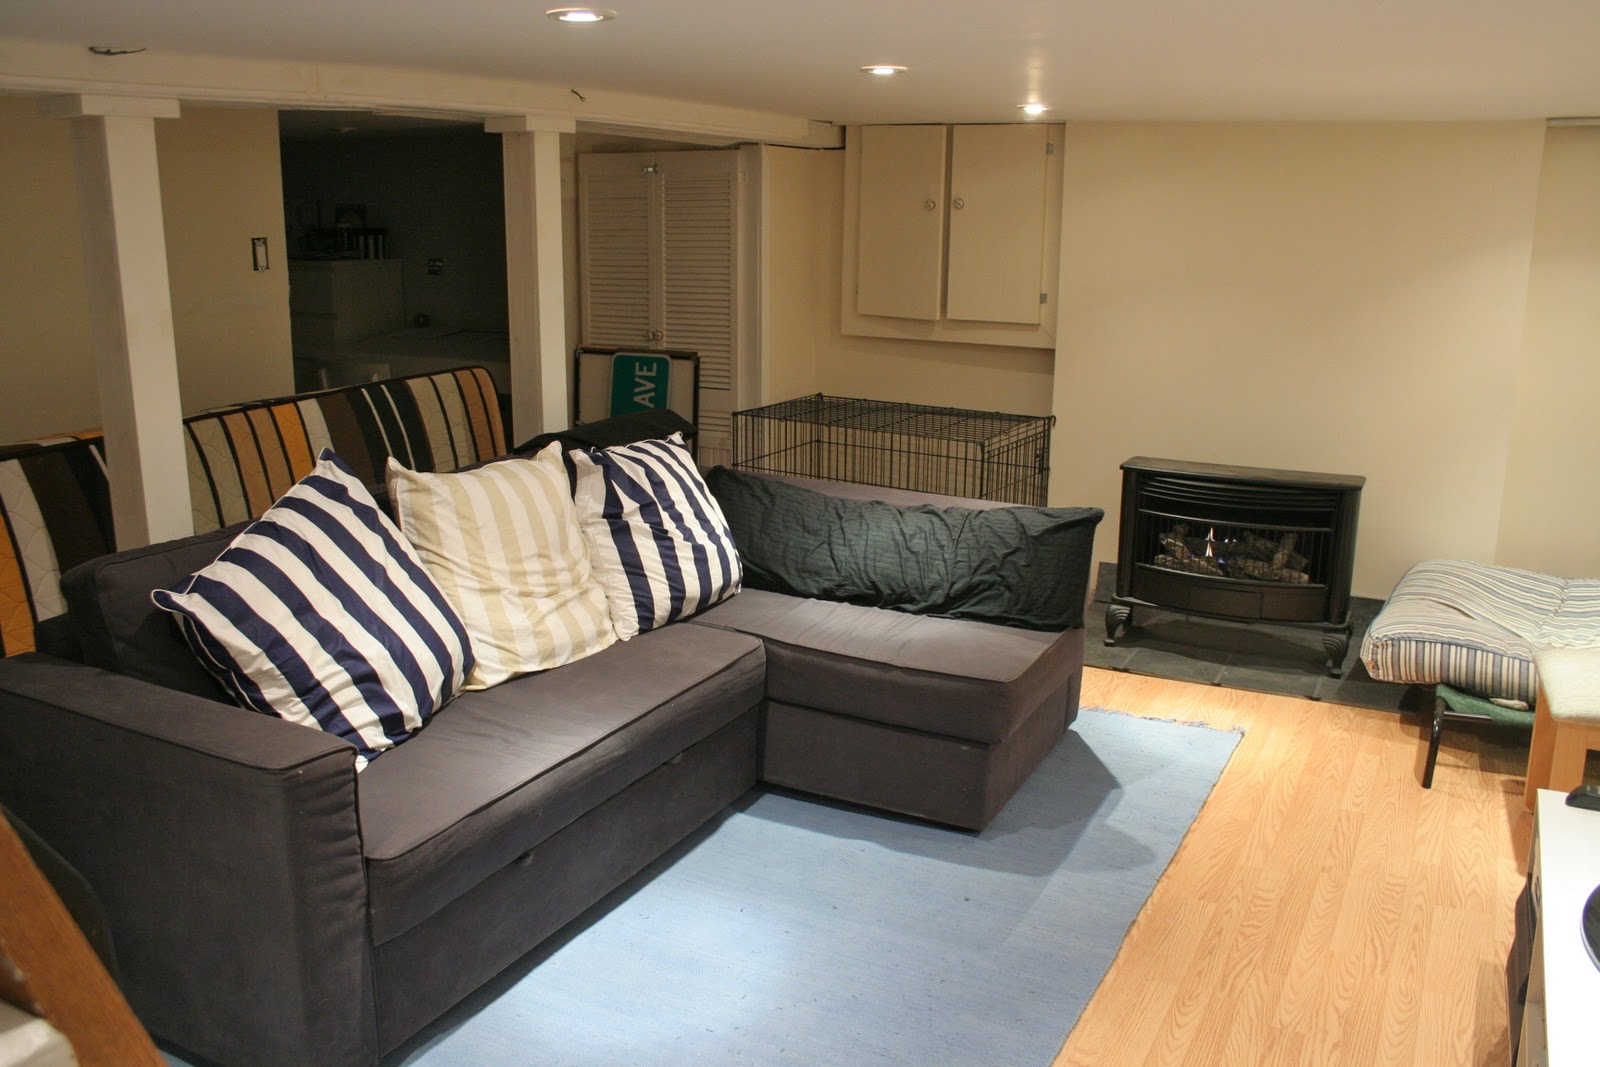
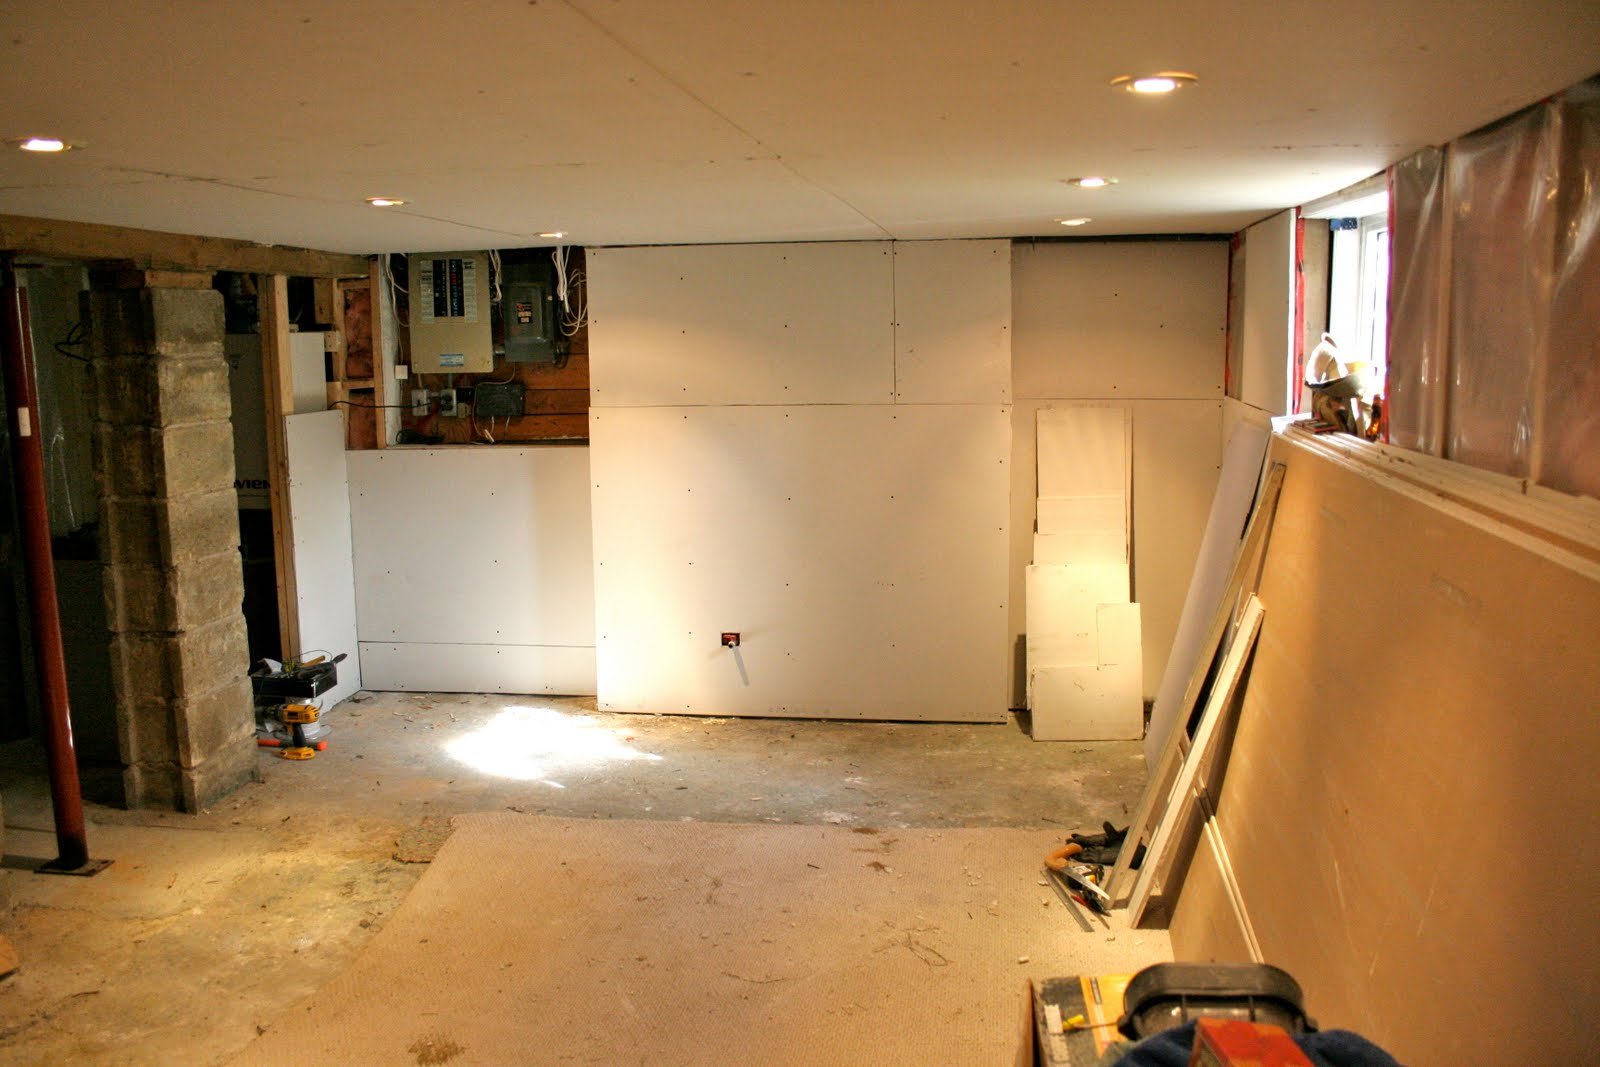
We were working on a couple of other projects down there at the same time, but I'll have to share those another day. Both will help to hide some really unattractive aspects of the room, and I know they'll make a huge difference! We're doing our best to finish off this space ASAP, as we do have a new, big renovation coming this fall... so stayed tuned for more info on that soon!

What projects have you been working on around the home recently?
SHARE:

Tuesday, March 8, 2011

An Unexpected Purchase

I'm back after a little break yesteday! We had a great weekend celebrating my brothers fiancee's birthday on Saturday night, and then I attended a bridal shower on Sunday afternoon for a family friend. Hope all of your weekends were great as well! Today I wanted to share with you, an unplanned purchase that B and I made just recently...

The other week, B and I had to make a quick trip to IKEA to pick up our new bed frame and some bed side lighting for our master bedroom. We decided that we'd take this trip to actually stroll through the show room (normally we can skip it, we're only a couple of blocks away so most trips we just drop in to grab what we need). On top of wanting to look at their children's section, we also wanted to take a look at the Manstad Sofa Bed.


The size and price point were perfect for a basement couch, and it would provide us with the double bed we would need for guests now that we'll be guest room-less. Even better is the storage under the chaise area of the sofa. Perfect for storing extra bed linens and blankets in our low storage home (and trust me it stores all of our extra bed linens, a couple pillows and all of our throw blankets!).

Of course, we weren't ready to buy - we just wanted to take a look. So, after sitting on it, and testing out the pull-out bed in the showroom, we agreed that we both liked it but were not quite ready to pull the trigger, so on we went to pick up our bed frame and lights.

At the end of our trip, we made our usual stop into the "As-Is" section and low and behold, what do we find but a Manstad Couch marked down to $650 (this sounded extra great last week as they hadn't lowered the price point to $799 yet... it was still $999). There was not a thing wrong with the couch, other than it was floor model with some dust and dirt we could easily clean off with a quick vaccum and my parents trusty carpet shampoo'er (which has a furniture attachment). The next thing we knew we were in line with three huge carts holding our new bed frame and couch. I'm sure we were quite the sight taking our carts out to the truck and then driving home with everything strapped into the bed of B's pickup. In the end, it was all worth it to get our new sofa bed into the basement!


It's a drastic improvement over the old day bed that used to be down there... (just ignore the retro mattress behind the sofa... it needs to go back to my parents place...)


If you look closely, you'll also notice that we have finally added our slate tile under the gas fireplace! There's definitely still some work to do down there, but we love finally having a proper sofa in the basement. I figure that it'll be a great place to hang out with the peanut when it's pulled out into it's bed form.

Have you made any large, unexpected purchases recently?
SHARE:

Thursday, January 27, 2011

The Final Decision

Thank you ALL so much for your feedback on yesterday's post! For the most part it seems we've got it right... maybe a tad longer and narrower, which is what I had been thinking too. We'll just have to measure where we were, and then see how close we can get when buying a canvas! Thanks again - I appreciate all your help!

Today I wanted to talk about one of the least blogged about spaces in our home. The little reading nook that B has created for me in the basement. B created it using some over the fridge cabinets from Ikea (inspired by Aubrey + Lindsay), and nestled it between the basement stairs and our bathroom.


The only difference between October and now, is that there is less stuff piled on top of our foam pad. I've been agonizing over finding the perfect fabric, and then, just the other week, I found it! I ordered a sample from Tonic Living, and when it arrived I knew it was perfect! Even B agreed it was great (he didn't exactly say that as B doesn't get excited about fabric, but he said "okay"... which is pretty much the same thing to me)! Just to be sure, I checked it out in the basement against our walls (Sarah Richardson's Pearl), and again, we had a match!
I wasted no time at all and ordered 4 yards of fabric on Monday so that we (and by we I mean myself and my Mom) can get rolling on the seat cover. Customer service was SO GREAT! There was an issue when my order was placed (that I wasn't even aware of) and I got an email making sure I wanted to place my order. Everything was confirmed and completed the same day and my fabric was in my hands by YESTERDAY! Incredible right? Love Tonic Living!

Anyway, so why was this fabric "the one"?


I loved all of the colours in it - the yellow, green, blue, white and brown was perfect. I could use so many colours to finish decorating the basement (and I'll have so many options for pillows), plus it's kind of playful for a space that will soon become a play / hangout area for us and the little peanut.
I'm also in love with this sign from Old New Again, I'm just not sure I'm ready to pay $54 for it! Maybe a DIY project to tackle with the scroll saw B picked up for me a while ago off craigslist (and I have yet to use).

I just cannot wait to have my own little space to curl up with a good book or magazine, and snuggle into some beautiful throw pillows (that I still need to find)... or maybe just curl up with the peanut and read he / she a book!

Do you have a special space that you like to curl up to read and / or relax? What makes it so special to you?
SHARE:

Wednesday, November 3, 2010

All Desked Out

Recently I've been talking about a new project that B and I are undertaking at home, and believe it or not, it has nothing to with our front entrance construction! We're actually back down below trying to finish up work in my laundry room / craft room, and B has been busy building me a new desk. Lucky girl, right?

The last time I showed you my craft space, we had my old desk from my parents home filling in for the time being...


Not bad, I mean it was a place to do homework and blog from, but I wanted something larger and that worked well for what I needed it for - blogging, drafting, crafting, etc. The whole idea for B building me a desk started when I spotted this one in the latest IKEA catalogue...


{via}
It's the VIKA VEINE (can't find it on their website, strange, no?). I loved that it had a space for me to blog and work from, and could close up keeping everything stored inside, making room for things like drafting floor plans without having to pack everything else up. The inside of the top of the desk was also lined with a fabric, with some elastics to hold pictures, pens, etc. It seemed like the perfect desk... until we saw it in the store and realized it wasn't that sturdy or large... and also had a price tag around $200. In the end, B concluded building me a similar desk would be a much smarter option. So away he went...


The legs we bought from IKEA, but the rest of the desk was completely constructed by my oh-so talented other half! Isn't he great? The best part? The top that lifts is slightly angled much like a true drafting table. 


The whole thing has been painted (all white, with the front panel in a bright yellow. I'm undecided on whether I love the yellow or not), with the exception of the inside of the top of the desk...


They aren't pictured here, but there will be two pistons on either side of the desk that will hold it open. Actually, they are the exact same pistons that B used on the cover for the bed of his pick-up truck. Those bad boys are heavy duty. We had to use a window latch at the bottom of my desk to hold it closed. Yes, my desk will open automatically when unlatched. Fancy!

As for the top of the desk, I thought about using magnetic paint, chalkboard paint and a combination of both, but in the end decided to use cork. I won't be covering it with any fancy fabric, because this will be my inspiration board and I would prefer my beautiful images, fabric samples etc to stand out  and not be overpowered by a pattern. So, we bought some cork the other night, now we just need to adhere it to the top of my desk.


I'm so thrilled that B opted to go the custom route with this project! I already love my new desk and I haven't even had a chance to use it yet (still blogging from the basement day bed for now). B plans to share a full recap of building the desk soon, and I'll share a full reveal when the whole desk project is complete, I just couldn't wait any longer to debut it.

Do you have a special place to work from, or a custom piece that was built just for you? 
SHARE:

Tuesday, August 31, 2010

Making Decisions

The basement is still a work in progress. From little things like trim and flooring transition, to bigger decisions like what to do with our fireplace and how to tackle the decor, there is a lot going on in my head right now. One thing in particular I've been having a hard time committing to is the fabric that I would like to use for the seating bench that B put in (inspired by the one in Aubrey + Lindsay's kitchen!).

I knew I wanted something on the neutral side so that I could change up the look of the room with paint, throw pillows and other decor items pretty easily. I had seen so many nice colourful fabrics, but in the end I kept thinking I wouldn't want to have another cover sewn for the bench anytime soon (as I am sure my mother will also not want to sew more than one).

Finally, this past Sunday, as I was sitting back looking through some new issues of magazines, I stumbled across this ad for Thom Filicia for Kravet:


I loved the faux bois fabric immediately... I just wasn't set on the yellow! Thus, began my search. After a bit of digging, I found the same fabric in a different colour...


Yup! That's it! That's EXACTLY what I want to cover the seat bench cushion with. No doubt in my mind. This wasn't the only fabric in that ad that I fell for though. It's not exactly clear, but behind that ikat pillow, is one with flocks of birds flying all around. Lovely for some throw pillows in our basement, especially in the blue - don't you think?


Griffith.516 WILL be mine! Now just to find the right place in the city to buy it for a decent price!? I may also have to have a chat with some of my teachers this coming term about getting my hands on this lovely Kravet fabric.

In the meantime - any suggestions from my wonderful readers about picking up Kravet fabric for a good price? (I can ship to the US!) Or have you come across any fabrics that you just absolutely love right now? Spill!
SHARE:

Wednesday, August 18, 2010

The Fireplace Dilemma

As you know, we've been renovating our basement. You probably also know that I've been pretty slow to share any more progress. WELL, that would be because there has been very minimal progress since my last post. We're at a bit of a standstill. For one, I think we're still a little burnt out from that week that we went full force and accomplished a lot last month. We're also just giving our bank account a bit of a rest. 

Now, I think we're just about ready to get back at it, but the one thing we're a little caught on, is what we want to do with around the gas fireplace that B purchased to keep our basement toasty. Right now it currently looks like this...


I love that it looks like a wood burning stove, but I want to do something rather than just have it stand on some tiles.


Though we are pretty sure we'll use some sort of tile on the ground (or maybe a nice concrete slab like the one B poured for our shower bench), we're trying to decide what to do on that wall behind the fireplace.

My first thought was to get some lovely stacked stone veneer and run it up the wall behind the fireplace. I'm leaning more towards a white or ivory. Something that would bring some texture and interest to the room, and act as a focal point.


The other thing that we have considered (and is in the lead as it's the most cost effective) would be to purchase or build a wood mantel to frame around the fireplace. Kind of like this...


My only concern with the last option, is because the gas fireplace that we bought is so wide, I'm afraid that the mantel would just sit behind it, rather than really frame it in. We also need to be sure to be safe, and do it right if we do decide to move ahead with this mantel idea. If we do it properly though, I think that it could turn into a really great focal point in the room and make it look really cozy.

I'm interested in what other people think though? How would you tackle the wood burning stove? Do you like one of the two options I'm considering, or would you go for something completely different?
SHARE:

Monday, July 12, 2010

Weekend Recap (aka Basement Progress)

As of Saturday morning, B and I were officially on holiday (we both took this week off of work). We'll be throwing an open house party on the 17th to celebrate the one year anniversary of getting the keys to our first home, and we can't wait to share all of our hard work with our family and friends. And what hard work it has been. I believe that after this weekend, I am still sleeping as I write this. I think rather than rambling on, I'll share our progress through photos...


Saturday we got up and it was time to start prepping the bathroom floor for tile...


Harley believed it was his responsibility to oversee the work being done...


Our flooring went in... and was a bit of a headache... and is still a bit of a headache. Promise me, if you put in mosaic flooring that you hire a pro... we're kind of wishing we did.

B had also poured the concrete slab for the shower bench, and we got into place very early this morning (oh say... 3am-ish). So this is where the bathroom is right about now (sneak peak of my bold colour choice...)


I still remember when this was just a giant, muddy hole!

Bathroom aside, we also had a lot to accomplish in the living area. After getting all of the painting completed last week, we were ready to prep the floor (scrap uneven areas and fill holes in the concrete) and get our laminate down.

This is what we started with....


Harley had to help B lay down the under pad of course....


After some late nights... the basement was looking like this around 3:30 this morning...


So that's where we are... with quite a bit left to do, but we're feeling accomplished and pretty proud of what we've done. Of course, we never would've been there if my fantastic father didn't come by on Saturday to help with the tile. It was a headache, like I said, but he made it a million times more bearable! He's the best!

We work hard... but we play hard also. We got some great seats to the Blue Jays and Red Sox game yesterday. It was a gorgeous sunny day, and we enjoyed a great game (only scoring runs were home runs) and lots of beer. I also had the chance to meet up with an old friend from Ottawa who I haven't seen in a few years in between innings (thank god for facebook haha). 


Hope you all had a great weekend as well... and keep your eyes out for more basement progress! Back to work I go!
SHARE:

Wednesday, July 7, 2010

Sarah's Shades!

Last night we got the first coat of paint on the basement living room walls! YIPPEE! That said, I won't be revealing it to you quite yet. Rather, I needed to share with you my review of the paint we picked.

When we started the process of picking a paint colour, I already knew what direction I wanted to go with the basement. B told me he would swing by Lowe's and pick up paint samples he liked (in the hue I was thinking) and would let me pick the final colour. I asked specifically if he was going to Lowe's to grab some chips of Sarah Richardson's new hues that she has released in collaboration with Para Paints.


After looking at a number of paint chips at home, we finally settled on the colour Pearl.


According to Sarah's advice on her website, Pearl goes great with soft blues and greens. Something we had been thinking of... but I'm also leaning towards throwing in some bolder blues. You'll see when it's all come together.

After settling on Pearl (via paint chip), B headed back to Lowe's to get us a sample can. Downside? The Para paints aren't offered in sample cans, so we colour matched a Valspar and brought home a sample of "Muslin Wrap". It was a little bit more yellow than Sarah's colour, but we were okay with it, so we knew Pearl was our perfect match. Even better was that Sarah's paint only cost us $29 (CDN) for a can, while Valspar paint will run you over $30 (CDN). Thanks for making your fantastic colours so affordable Sarah!

Last night was the big night. I cracked open Sarah's "Pearl" paint and was so happy to not be slapped in the face with your typical, harsh paint smell. There is still a scent to the paint, but because it is low VOC it is far less obnoxious. It really makes the whole painting experience that much better.

The best part though? The coverage of the paint is FANTASTIC! With only one thin coat of Behr's drywall primer on our new walls, we got awesome coverage with our first coat of paint! Thanks Sarah and Para! It was an absolute dream to paint with, and is the perfect light colour to brighten up our space, but still bring in a bit of colour on the walls. The rest of our colour I plan to obtain through colourful toss pillows, an area rug and some accessories. I also have one furniture piece in mind that I hope to paint.

We're still working away feverishly to finish up the basement so we can share it with you and our family and friends... but also so that we can take some time to relax and enjoy the rest of the summer before we move onto our next reno.

Now time for me to get back to it. Still so much to do...
SHARE:

Tuesday, July 6, 2010

Excuse Our Absence...

I have a ton of content to share, but no time to share it! We spent a large portion of our weekend working away in the basement. More done than I could possibly share right now... I may just wait until the big reveal. We're speeding towards having a bunch of guests next week during our "staycation" (We can't WAIT!), and we are thrilled to show them what we've done! We're also having an open house on the 17th and have invited tons of family and friends to see the work we've done since we got the keys last July 17th!

For now, I'll leave you with a sneak peak of some of the work that's been done in the last little while (pictures care of B)... and I'll be back soon with some more exciting ones (hopefully)!

Basement stairs before - there were no risers in these bad boys...


Basement stairs after risers are in and new closet is framed and drywalled. Seating bench to the right, inspired by Aubrey + Lindsay's Kitchen seating bench!

One shower wall completed - late Friday night/early Saturday morning! Lots more completed since this photo was taken!

We're so thrilled with our progress, and I can't wait to share the finished product! Keep your eyes out. It will hopefully be coming VERY soon! Hope you all enjoyed a fantastic weekend, whether you were celebrating Canada or the US (we did both!)
SHARE:

Tuesday, June 22, 2010

The Basement Keeps Progressing

This past weekend B spent a lot of time working in the basement and boy did it pay off. When I say "a lot of time", it almost seems like an understatement. After spending all day Saturday down below with a good friend putting up the new ceiling drywall, he headed back down around midnight (after our date night) and continued to work until about 3:30 in the morning. Mind you, it was well worth it as our basement now looks like this...


Thanks B for being so wonderful and hard working!!


See where that small square of dirty old carpet ends closest to the drywalled area? That's where the original wall was in that basement that concealed the furnace and water heater. Crazy how much space we've gained from doing this! 


I was also excited that on Sunday, B and my Dad got to talking and it seems that they plan on working together this coming weekend to get the shower enclosure all tiled. I'm starting to see the light at the end of this tunnel! I cannot WAIT to have this basement finished!


I'll leave the rest of the updates to B. Apologies for the short post, but all of my own time and effort is currently being put into finishing up my final project.
SHARE:

Tuesday, June 8, 2010

The Saga Continues - The Basement Living Area

Basement work never ends (which I guess is kind of a good thing, since we'd like to complete this renovation eventually!). So, as we continue work on the basement bathroom, work has also commenced on the living area of our basement. Just a quick reminder of what the living area originally looked like...


Basement stairs

Living area

Living area again - to the left is the old hallway to the old bathroom, laundry and guest room

B took Monday off to continue working on the installation of our multi-zone heat pump (keep your eyes out for a post on that soon), and by the time I arrived home from class on Monday evening I was in for a big surprise. I mean, the basement had already undergone SOME demo, but this is the big stuff. 


Disaster, right? I figure, it has to get worse before it gets better. I was actually surprised at how excited I was too see the amount of destruction down there!

I'm quite happy about how much space we will gain by getting rid of that rusty old furnace and reclaiming that space that was once used mainly as a room for the furnace, old central vac system and old water heater! Also, notice that bulk head in the before shots? Gone, as B has already ripped out the old duct work (someone picked it up after he posted it for free on craigslist!). It'll definitely make a huge difference in head room / how big the basement looks!

We're closing in on the 6 month anniversary of us starting the basement reno (December 27th), and also the one year anniversary of us moving into the house (July 17th). That means, we're hoping to really start getting work done down there so this whole thing can be finished up before then! Also means, you can expect a lot of "What We've Completed in the Last Year" posts. Watch for them starting the month of July! 
SHARE:
Related Posts with Thumbnails
© Life on Misneach Ridge
Blogger Designs by pipdig