Trending

Monday, August 10, 2015

Nolan's Custom Closet

We are creeping up on Nolan turning 3 months, and still his nursery is not complete. We mostly just need to hang his bookshelves, remove some bins and bring his chair in. Hopefully I can share a complete nursery reveal soon, but in the meantime, I wanted to share the custom storage I had B build for his closet.

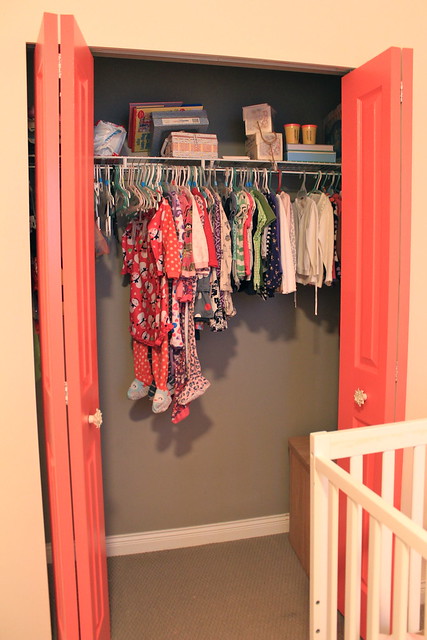
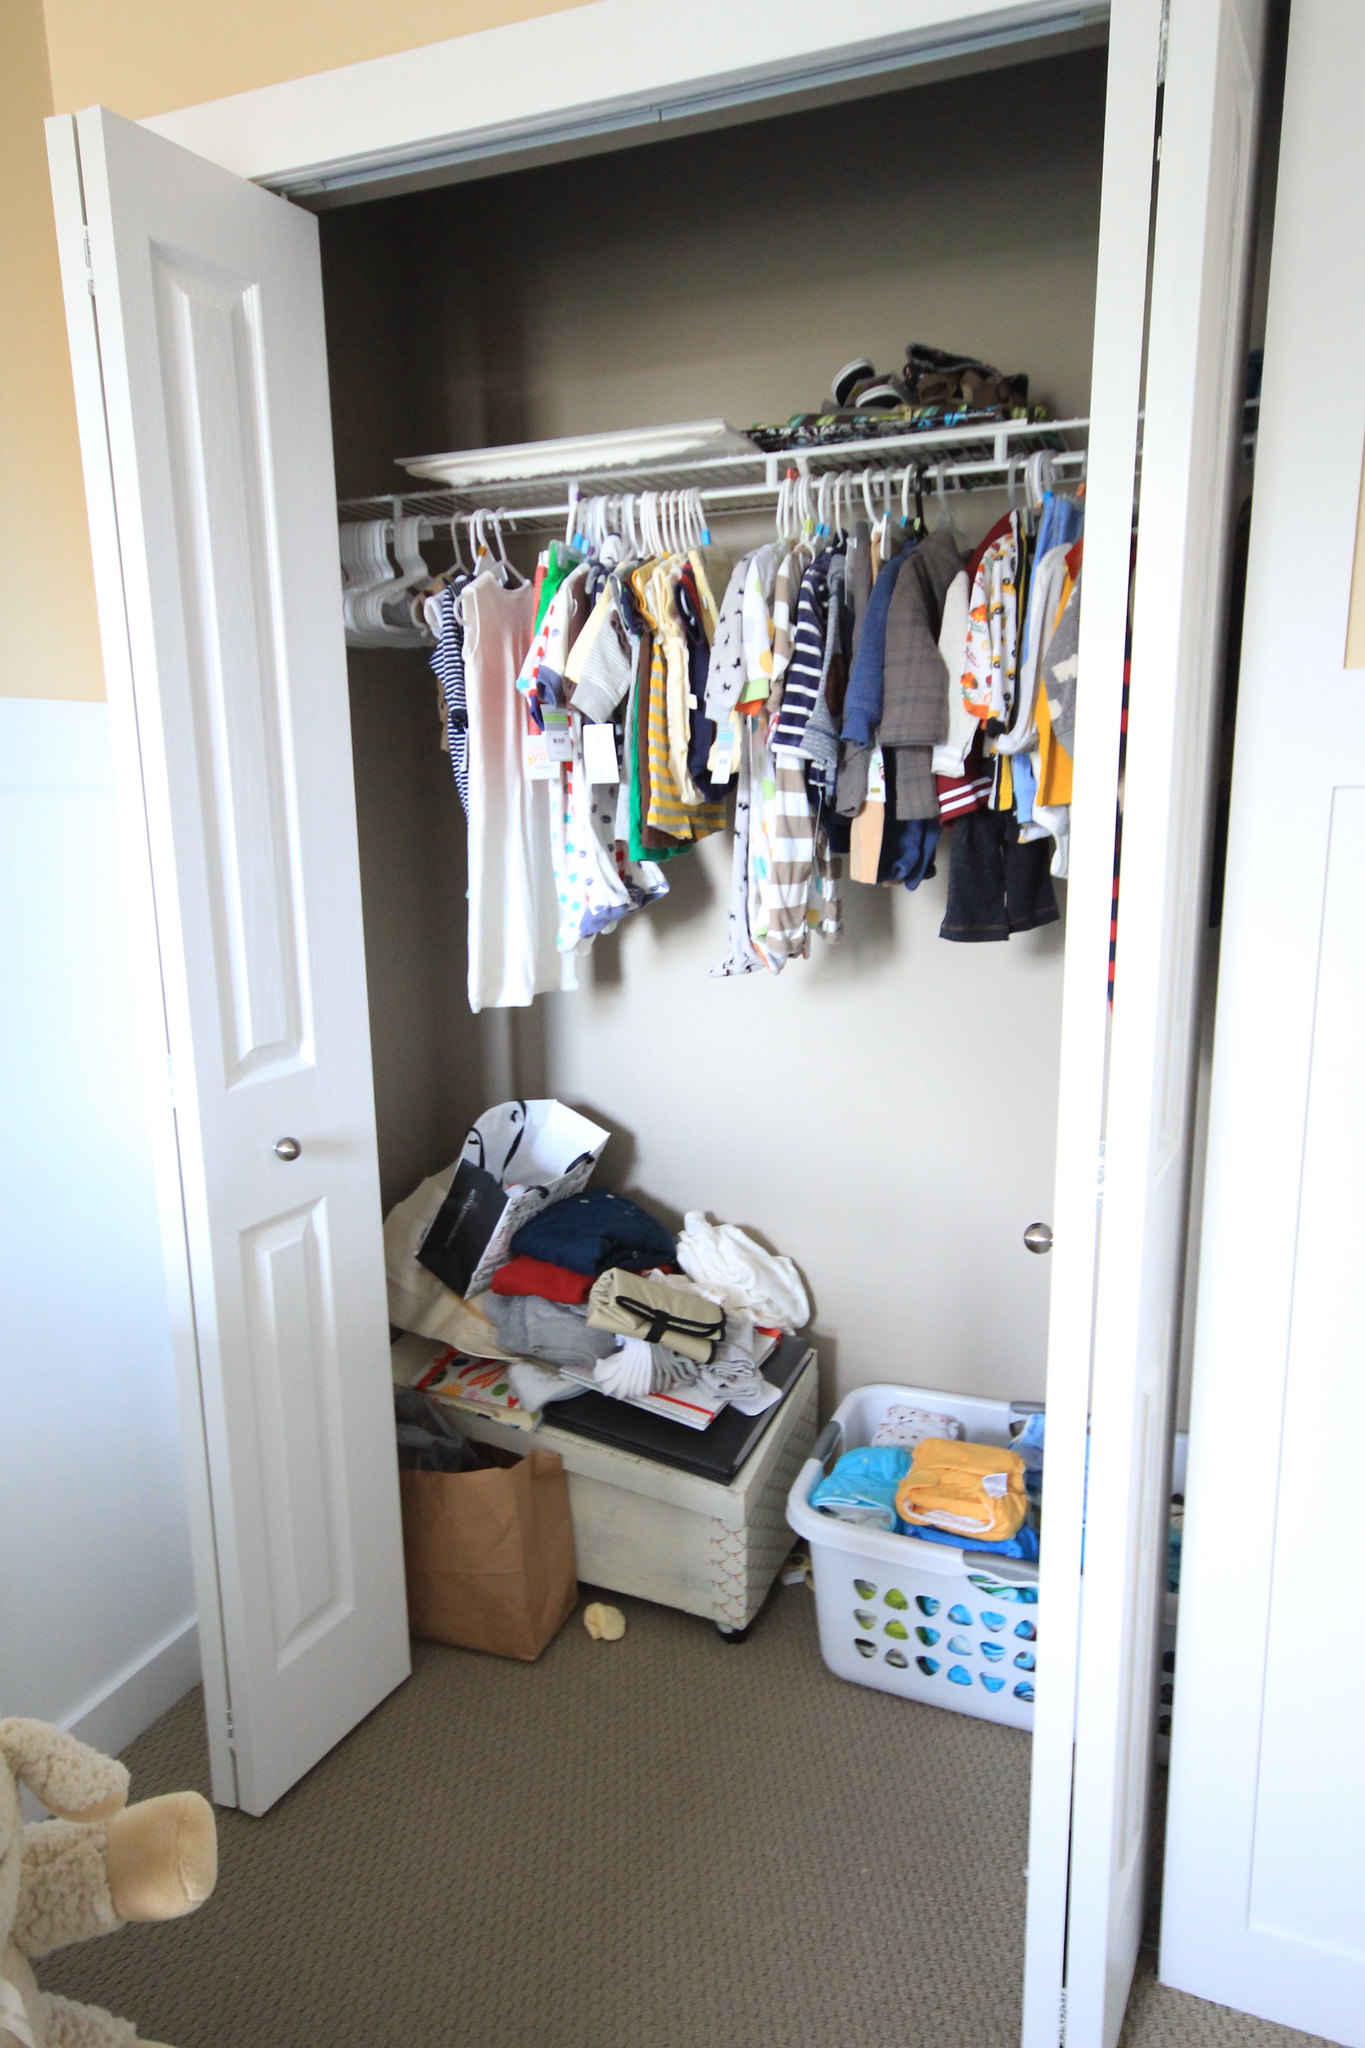
Last March we had tackled Halle's closet, using a lot of what we had to make the space more functional and tidy (you can read about her closet transformation here). A year on, we were so happy with how her closet worked, I knew I wanted something similar for Nolan's closet. What we started out with was quite simple, which didn't provide a variety of storage options for us...


Baby's Nursery - March 26, 2015

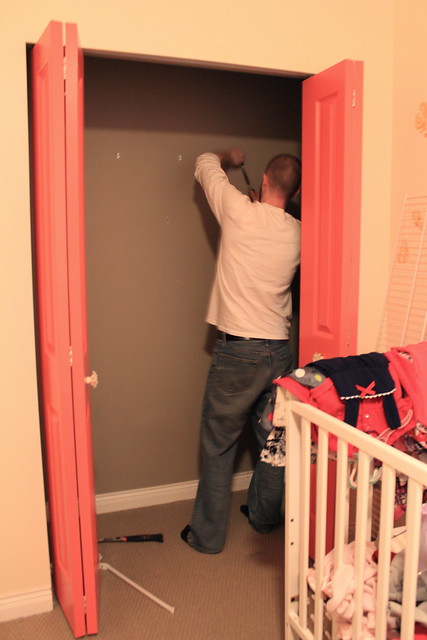
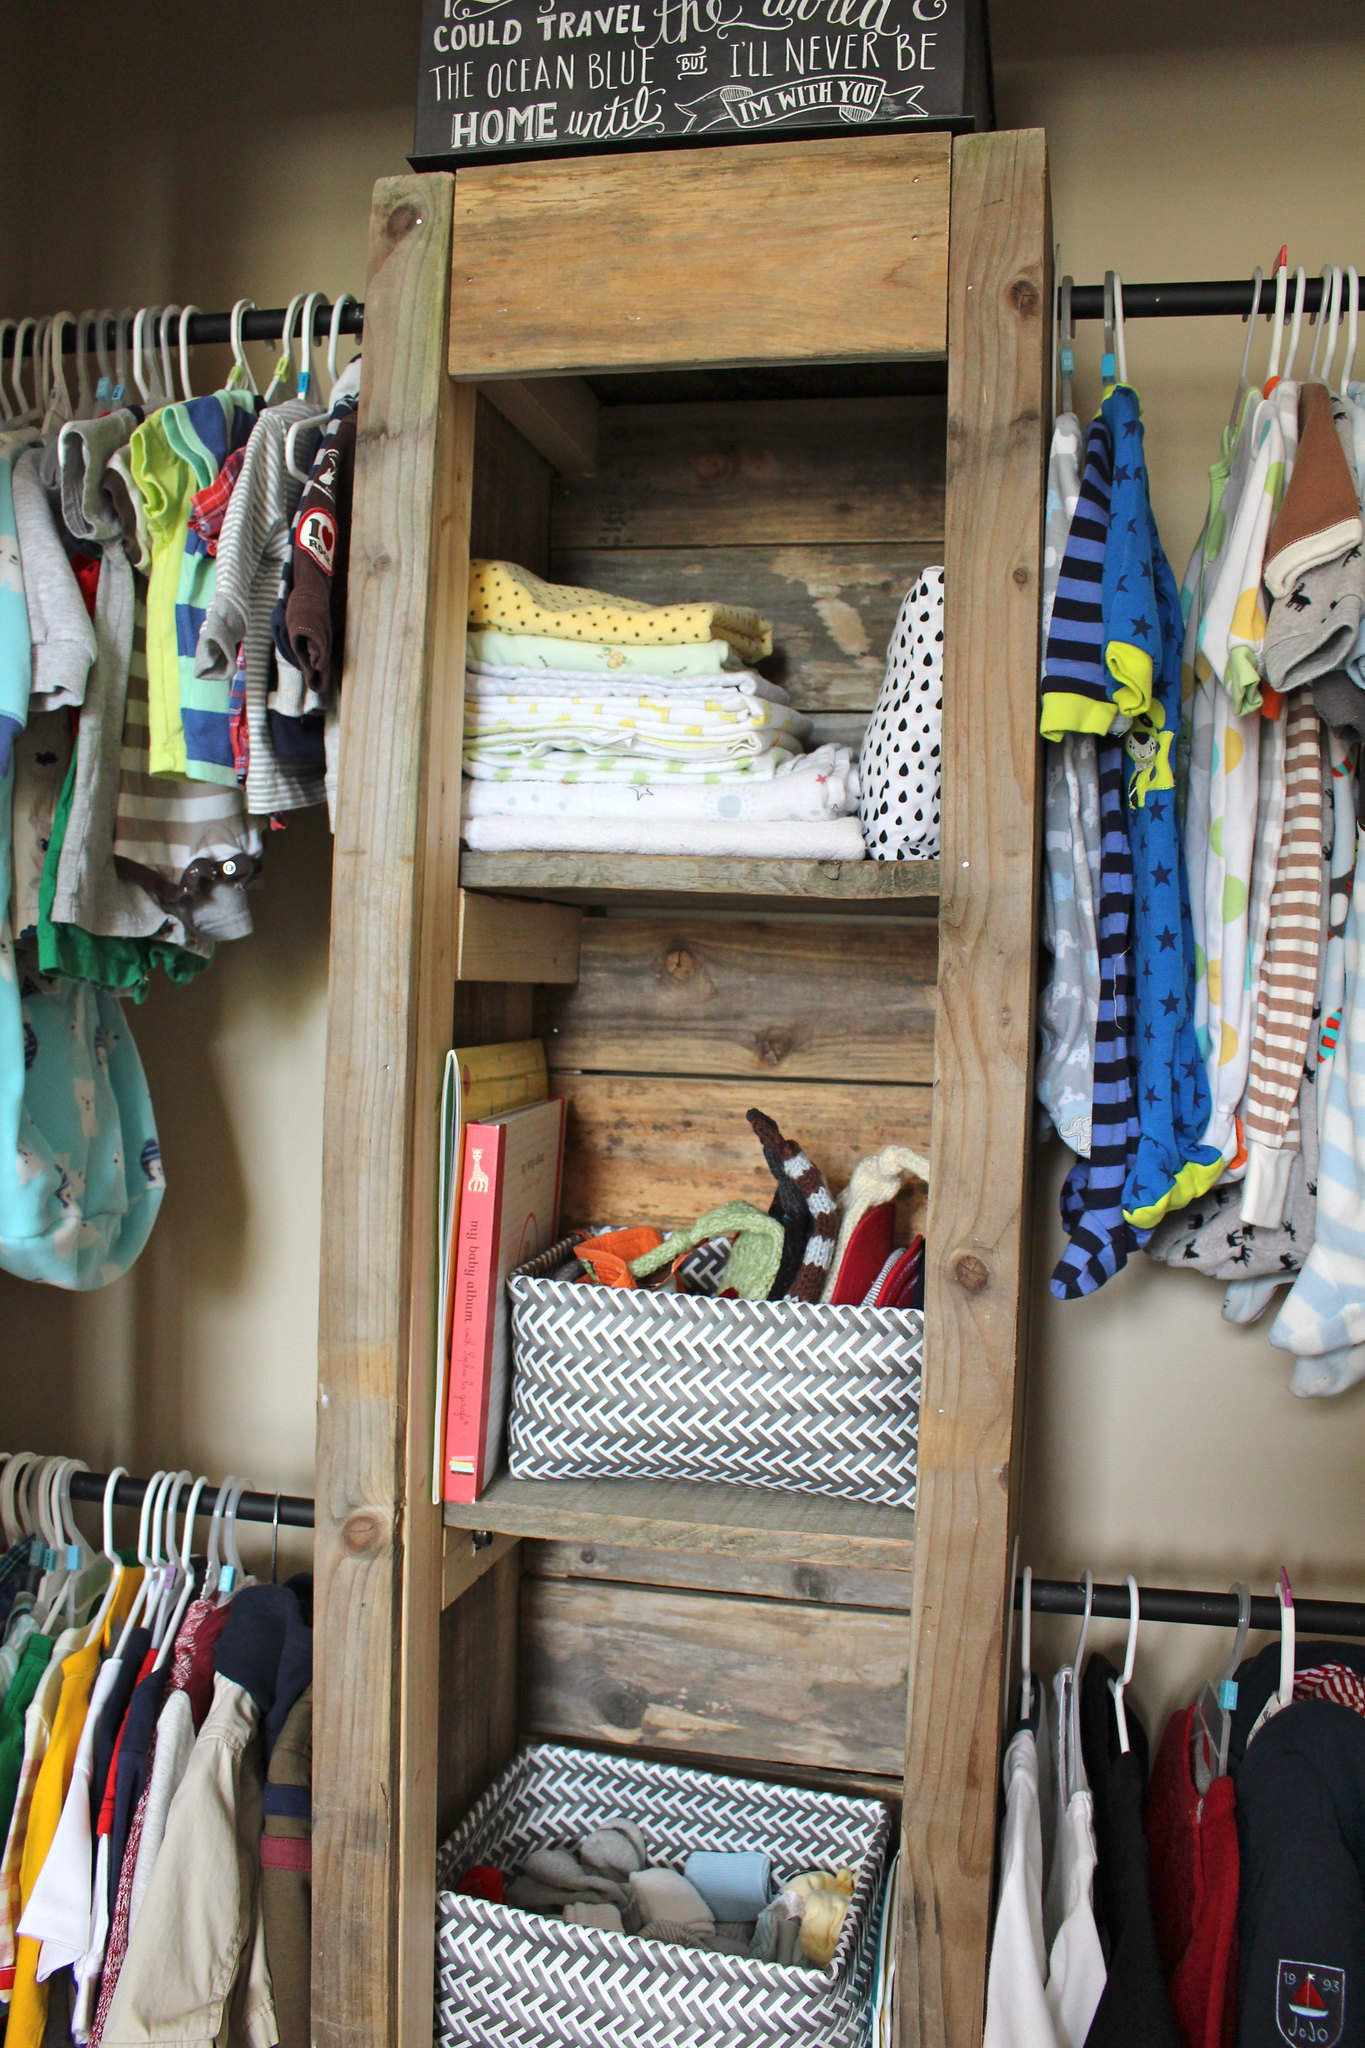
Yup, we had a lot of work to do to get things looking pretty. So, B set to work building some custom shelving for the centre of his closet. He used scrap wood that we had laying around, and what he constructed is absolutely perfect!

Nolan's Closet  - June 2015

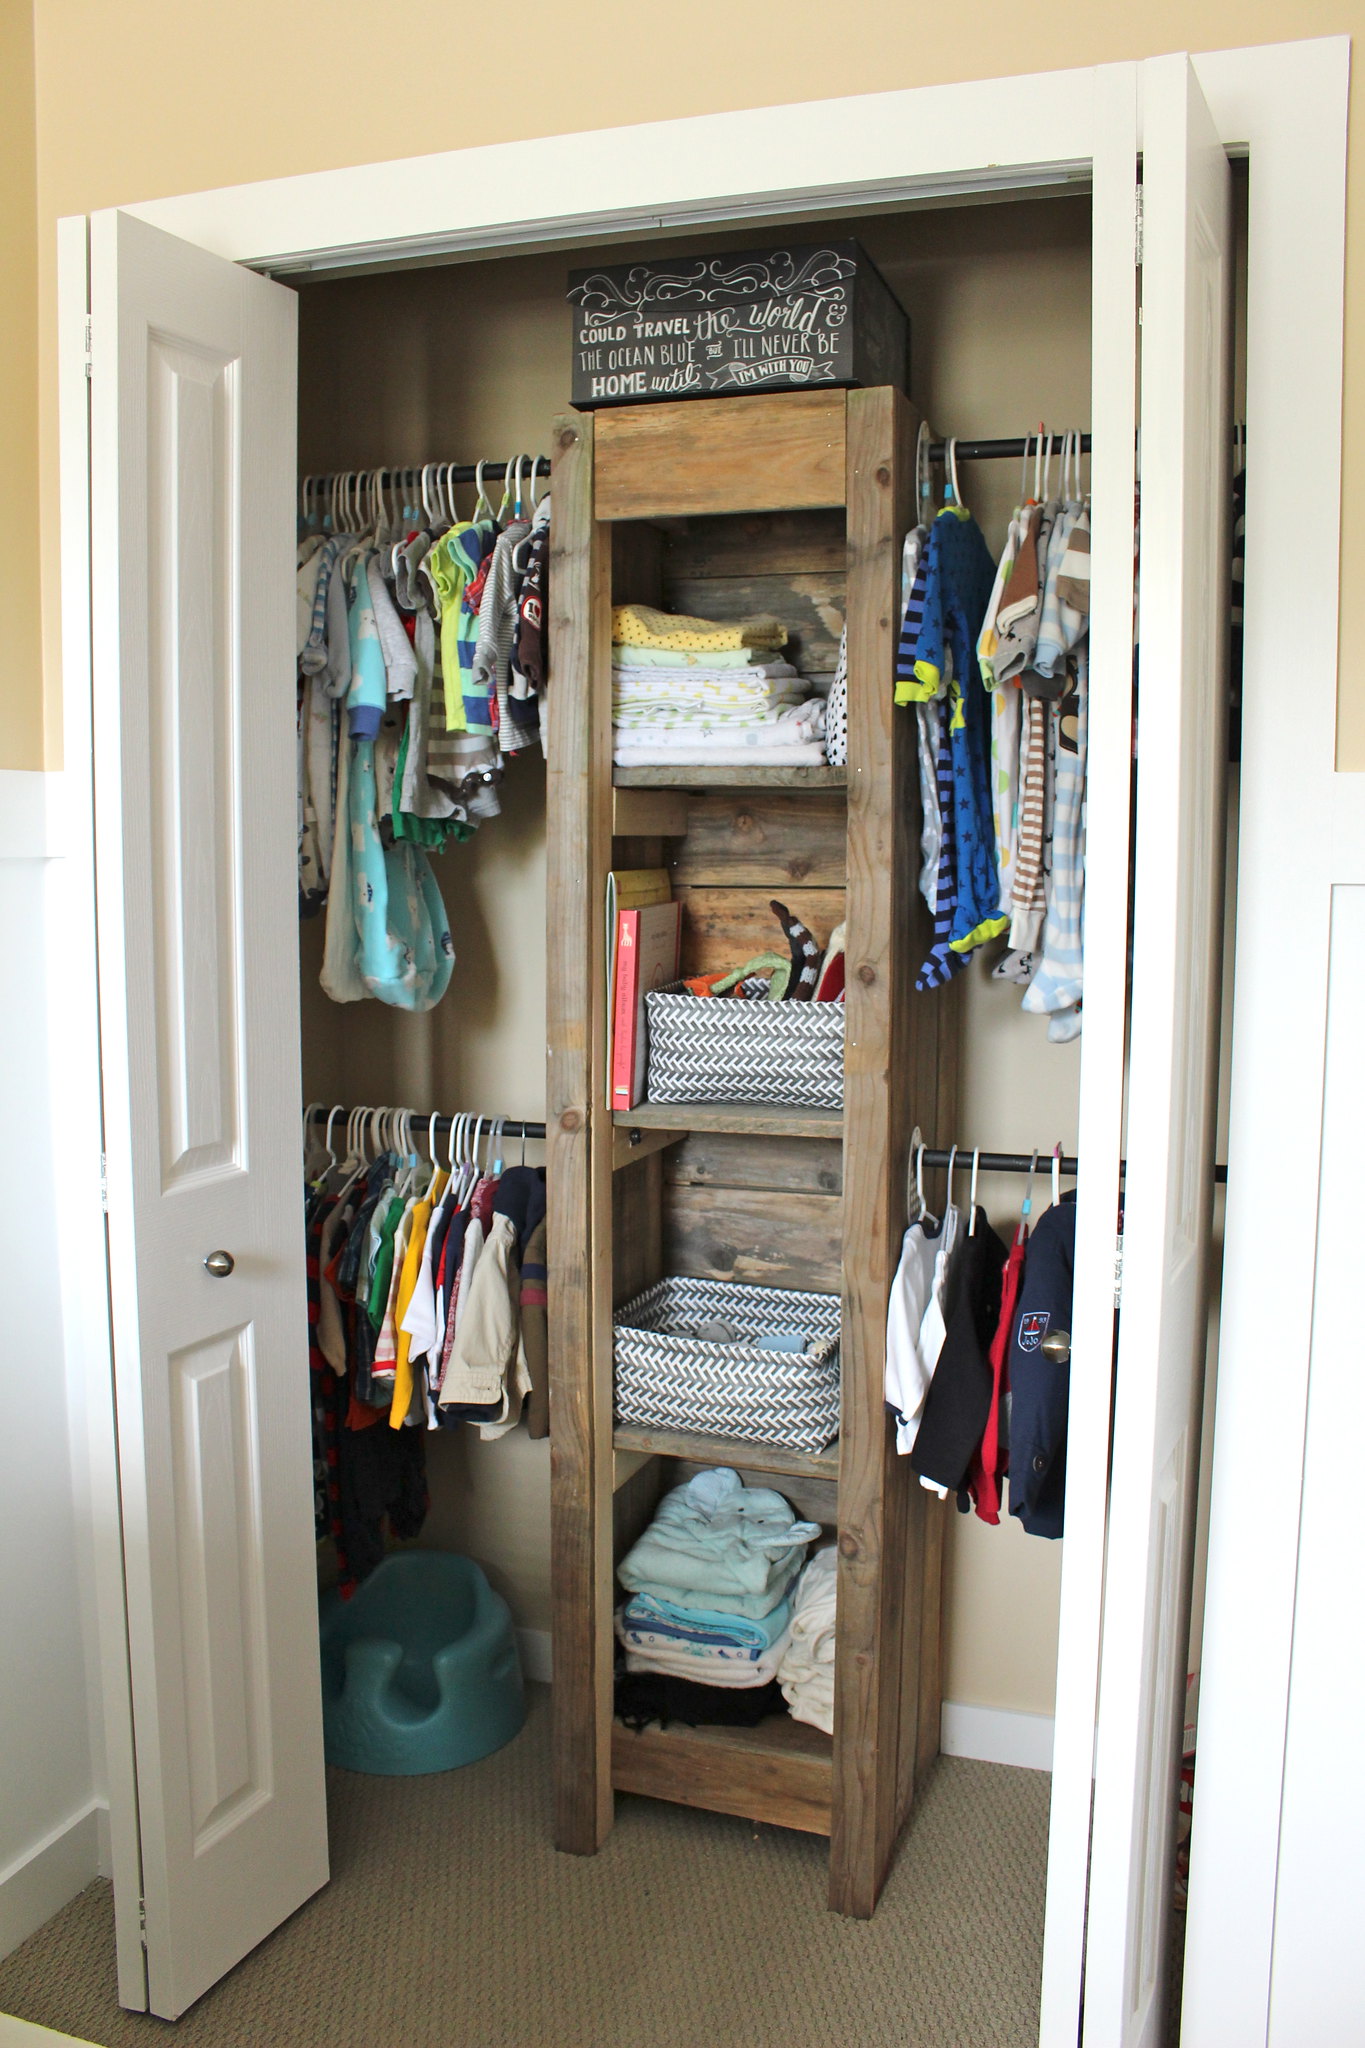
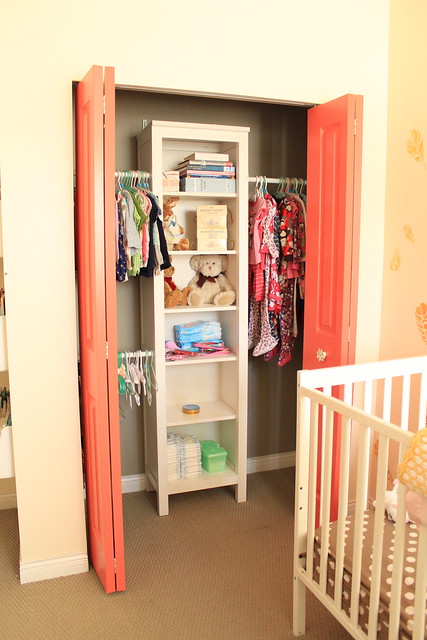
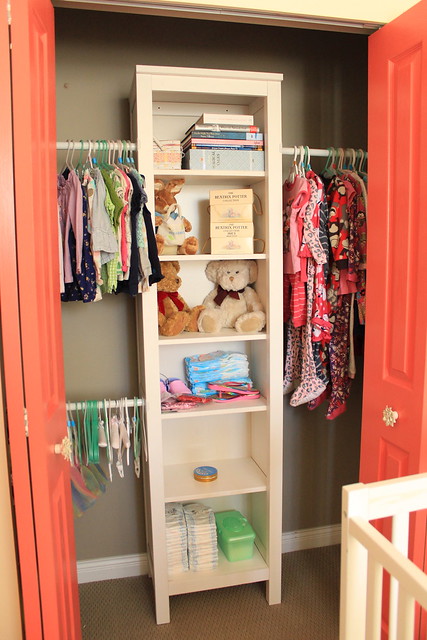
The shelves provide lots of room to keep blankets, towels, extra crib sheets & mattress protectors as well as some baskets for his socks and hats (this boy has LOTS of hats!). Putting the shelves in also allowed us to add four rods for hanging. While this configuration doesn't exactly give us more hanging space, it definitely helps me to keep things more organized!

Nolan's Closet  - June 2015

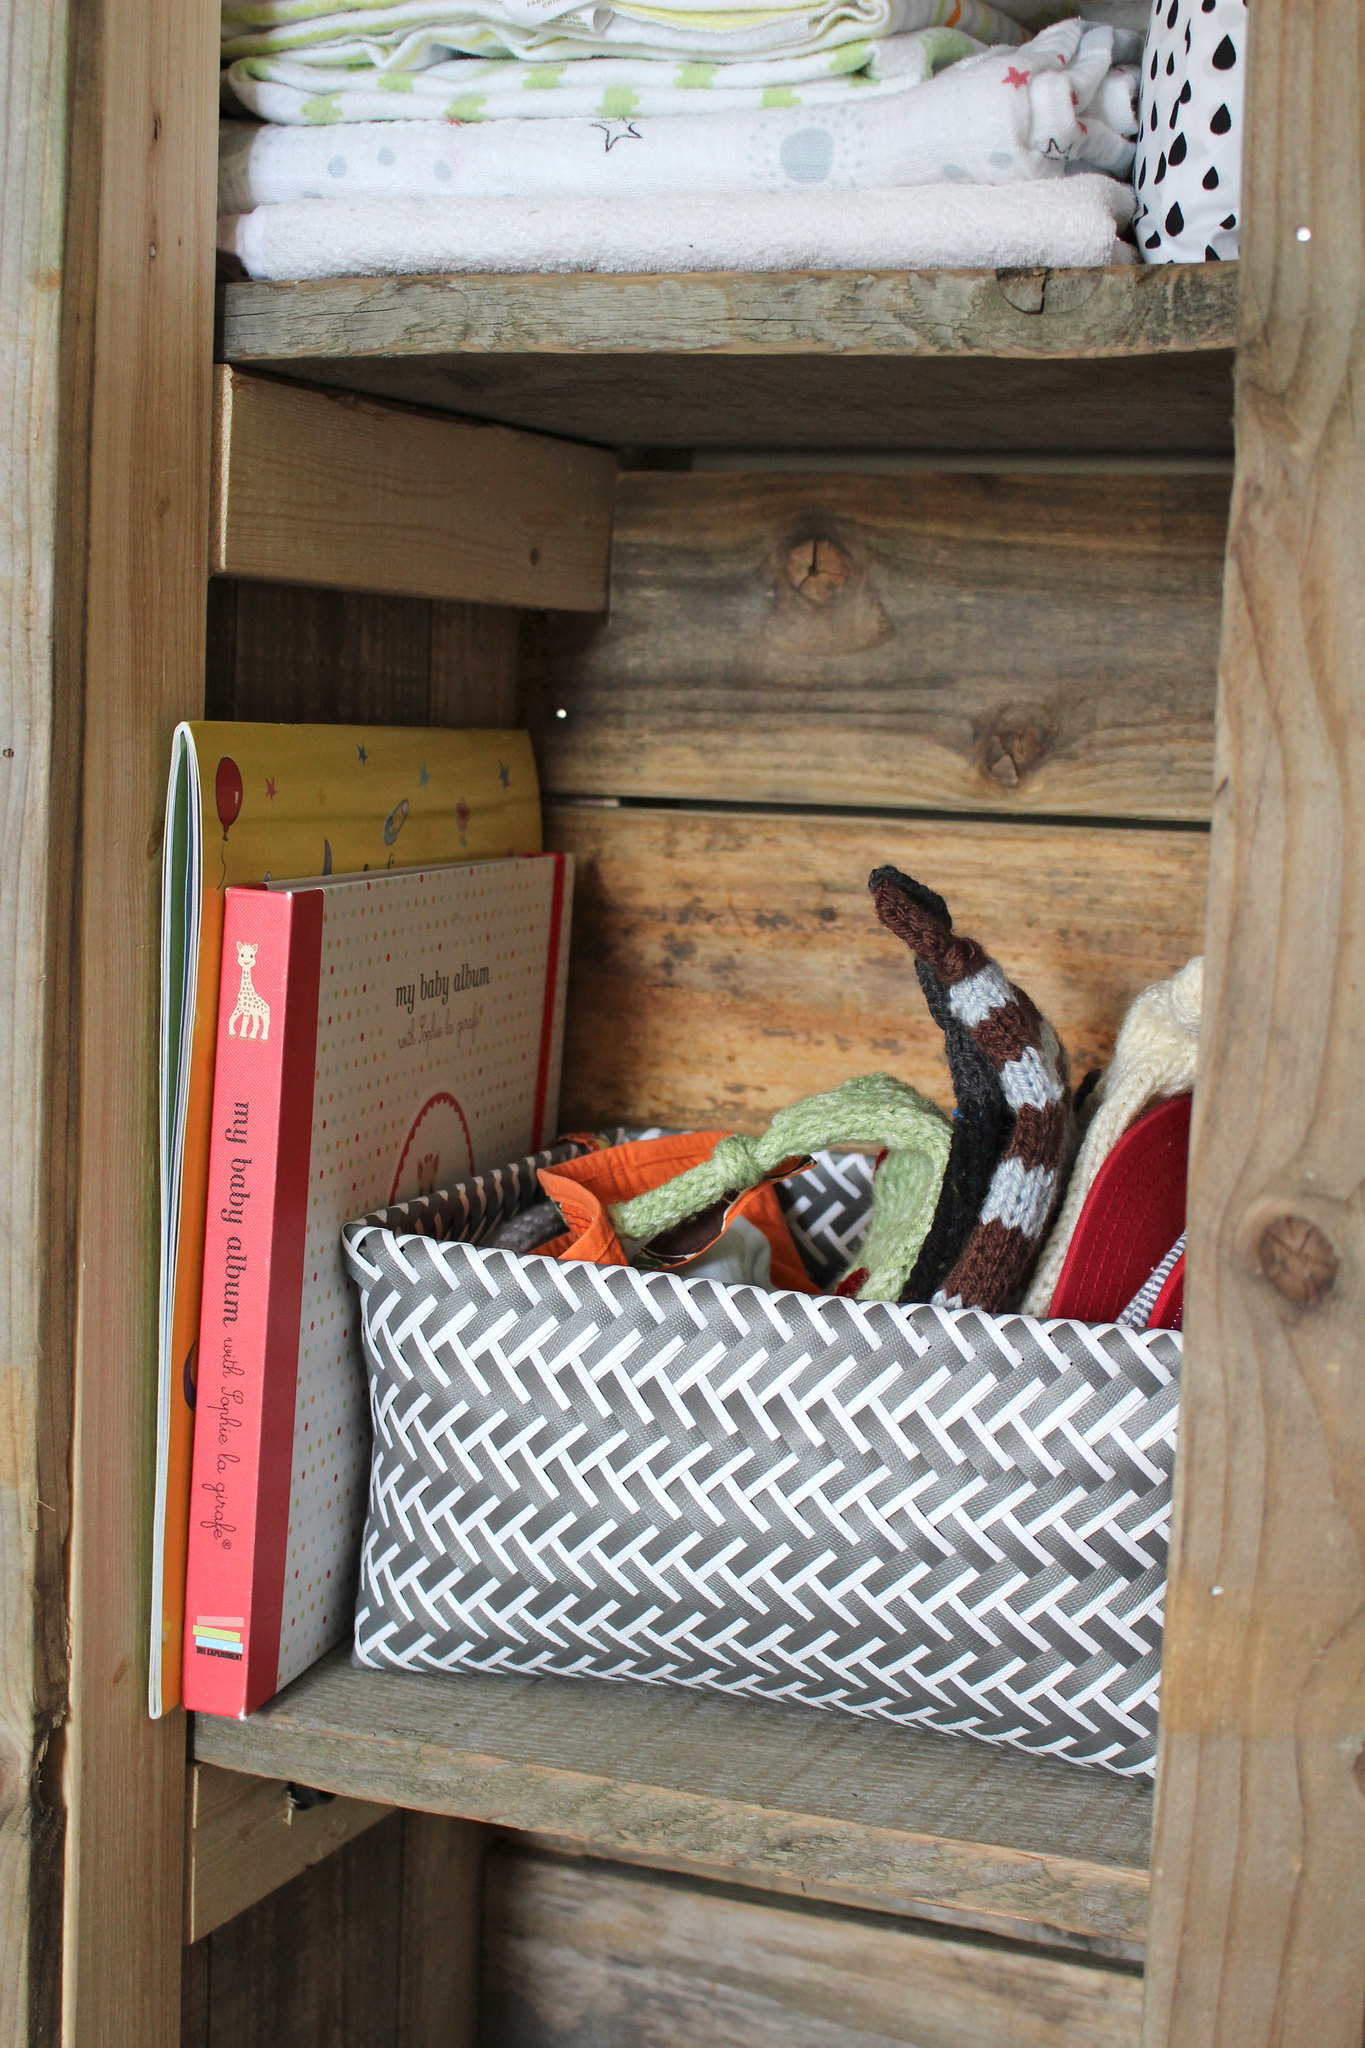
His baby book and first year calendar have also found a home in his closet. I'm pretty happy that I've been doing a decent job staying on top of both of them. The baskets I love, and picked up at HomeSense for around $10 each. I know once they have served their purpose in his room, they will be easy to use as storage somewhere else around here!

Nolan's Closet  - June 2015

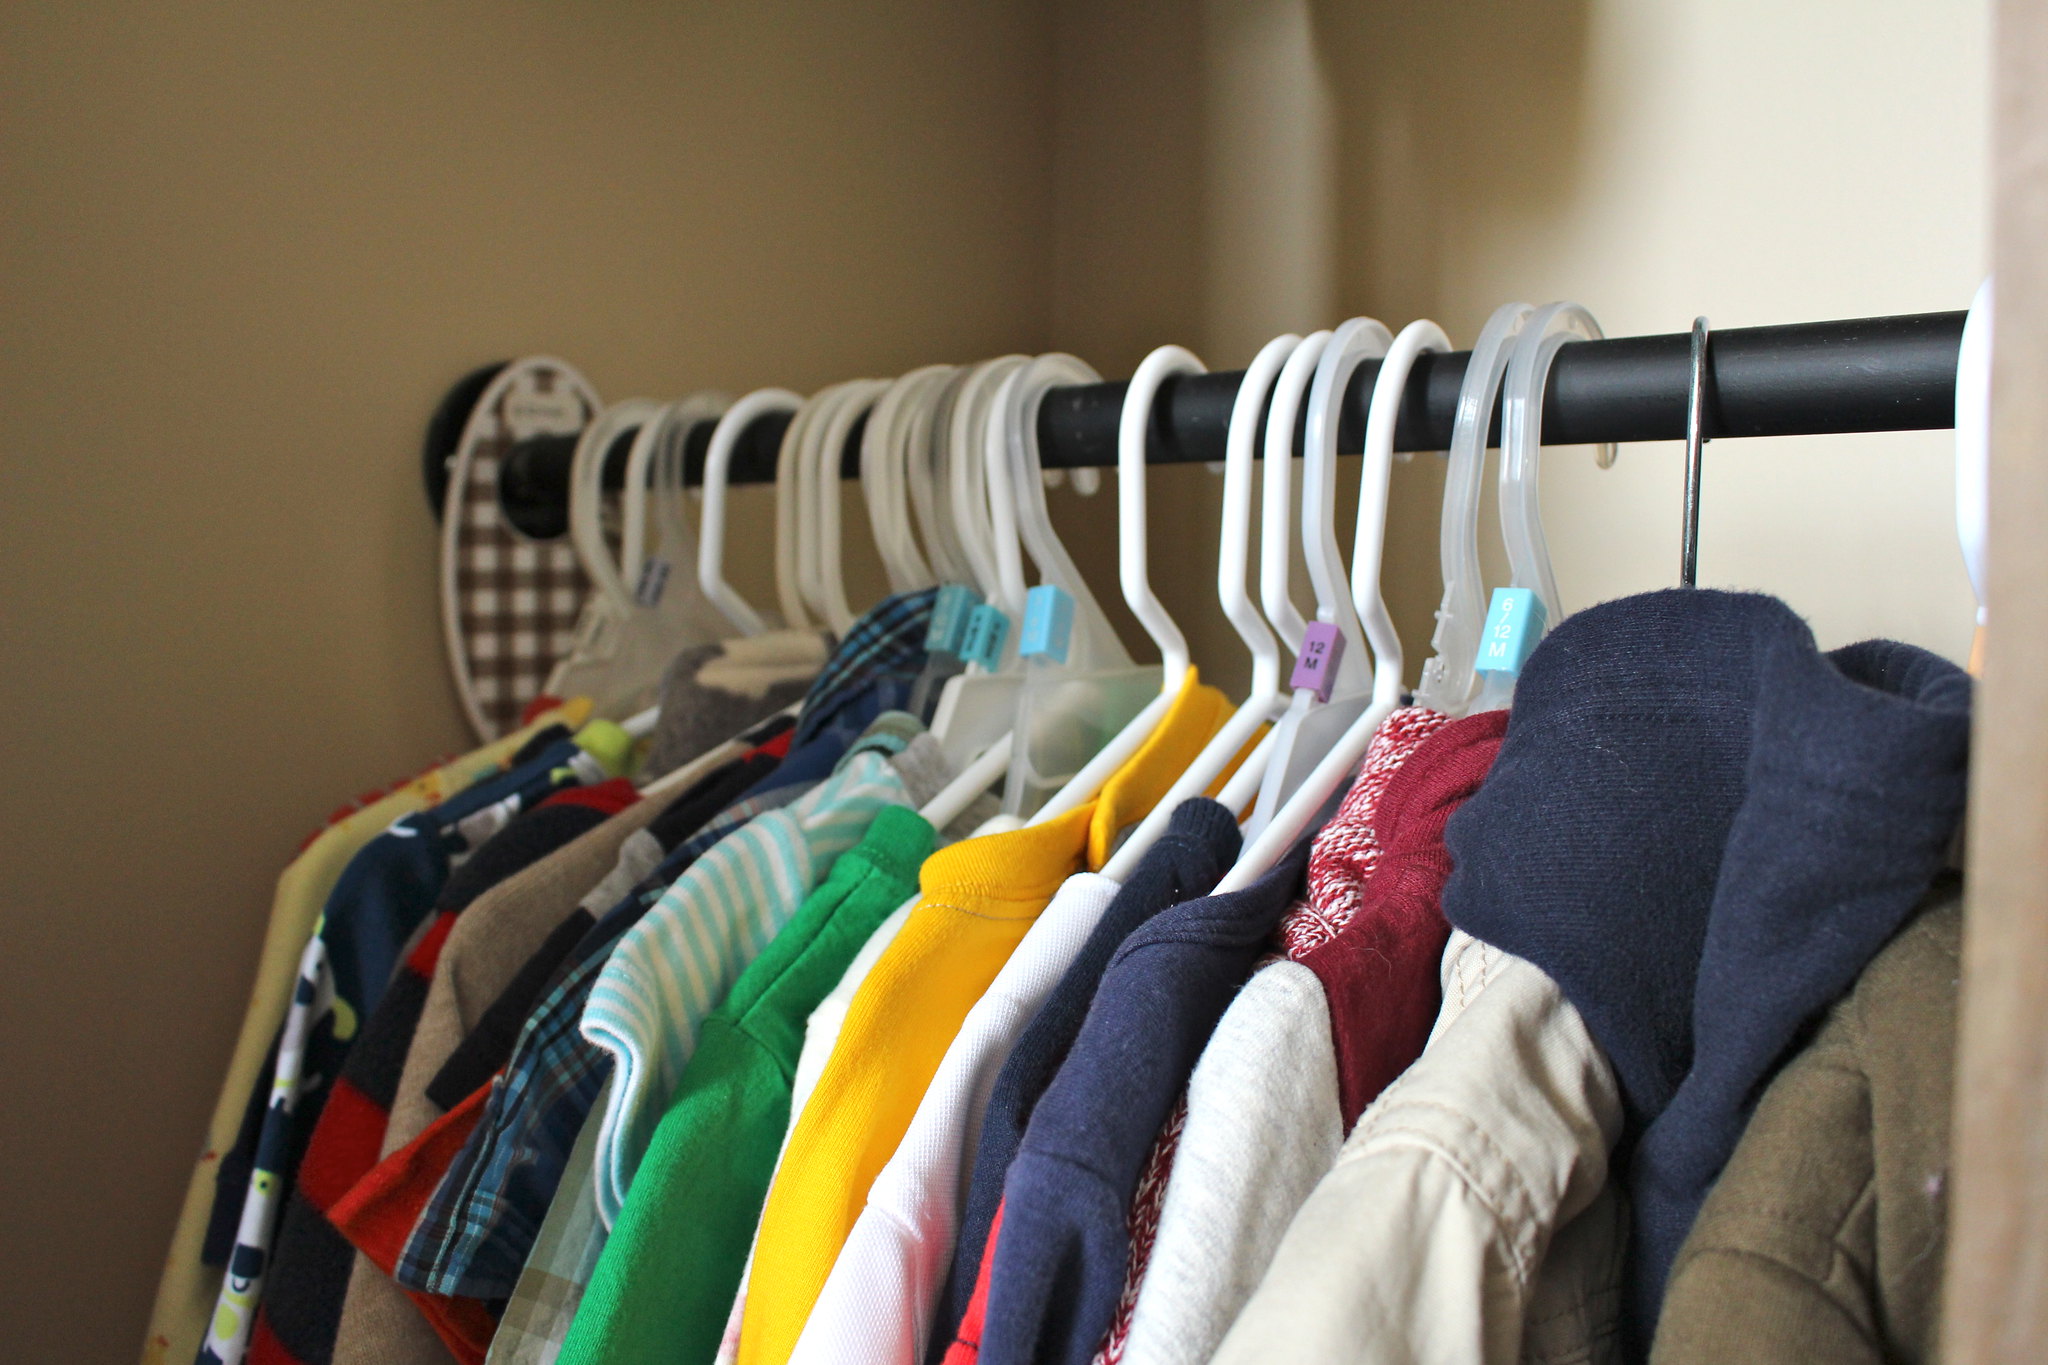
The hanging rods are actually 1/2" galvanized pipe that we spray painted matte black. The match the pipe that we installed for his curtains. You can read more about his nursery here.

Nolan's Closet  - June 2015

It feels good have two of our many closets redone and organized. All of the rest of the closets in this house are also made up of wire shelving, which does not really do the best job at maximizing storage and organization. The next two most important closets? Our master bedroom and hallway linen closet! Maybe this winter will be our chance to work on those problem areas.

Do you have any closets that could use and organizational overhaul? Any of you working on major reorganizational projects this summer? 
SHARE:

Monday, March 31, 2014

A Little Closet Update

Here I am! Still kicking, though my drive to blog seems to have faded drastically. I think a lot of it has to do with my 2014 motto to simplify life. I've been enjoying the little moments with Halle these days. We finished her first round of swimming lessons together, we visit the library weekly, go for long walks with friends and the other day even enjoyed a nice lunch picnic! I've also focused a lot on sorting and organizing our home, and preparing much healthier meals for us.... and I even bake our own bread now! It's so nice and I've been feeling much happier and far more relaxed.

I am, however, hoping to get back on here and share what we'll be up to in the next little while - including our back garden plans and hopefully the built-ins in our dining room (we've been on the hunt for the right cabinets recently). In the meantime, I want to share a quick change we made in Halle's room recently.

I just felt like Halle's closet wasn't providing great storage for us. It had a lot of hanging space, but that big blank floor invited things to just get thrown down there, and the top shelf just collected items that were idly thrown down and then forgotten about. I knew we needed a better solution...


First Time Fancy Toddler Closet Organization

When I took that first photo I had already cleared out the floor space, so next I emptied that shelf and removed all of Halle's clothes. With everything out, it was as simple as B removing that wire shelf (that I was happy to say good-bye too... they seem to dominate our storage spaces in this house, and this is my first step to rid our home of them!).

First Time Fancy Toddler Closet Organization

Though I had originally hoped to find an IKEA Expedit for cheap to center in the closet, we found something even better. The open Hemnes Bookshelf from our old entertainment unit had found a home in our front hall a while ago, and was just collecting items that didn't have a proper home. The other week I realized it would be the perfect solution to add some extra storage to Halle's room. Along with some brackets (to anchor the bookshelf to the wall) and some closet rods from Home Depot, Halle's closet now has some better storage than before...

First Time Fancy Toddler Closet Organization

Overall, we haven't gained more hanging space, but I wasn't looking to add hanging space (we had more than enough). What this new configuration allows us, is an easier way to organize her hanging clothes, plus find better homes for the items that had previously just been tossed into the closet. We are working on potty training at the moment, so I expect that we should free up another shelf and a half soon and it will be a good spot for some extra toys, shoes, etc.

The top shelves currently home some special books that I don't want her touching without our supervision (like my Beatrix Potter books), and some special teddy bears that are also not every day toys, but my parents had gifted to me when I was younger.

First Time Fancy Toddler Closet Organization

We never did paint the interior of her closet, but down the line we are positive the carpet in here will be ripped out - so we could always paint the closet at the same time. 

This was a nice little project to get us moving again! Our biggest upcoming project will surely be our back garden. Halle helped B to plant all of the seeds in started trays and we have a number of sprouts coming up for our tomatoes, cucumbers and peppers! We're excited to see how this progresses!

What projects have you been working on recently? Or what do you need to get moving on now that spring has sprung? (Well, it's sprung out west at least!)
SHARE:

Tuesday, May 8, 2012

Adding Storage

When we transplanted from our tiny Toronto home to our new spacious pad in British Columbia, I never imagined I would be having a hard time trying to store things in Halle's closet. After all, it was significantly larger than her previous one. 


Okay, so storage itself wasn't the main issue - it was hanging all of her tiny little clothes. This girl is a fashionista and she doesn't even know it, and the one rod (installed too closely to the top shelf), was just not cutting it for hanging all of her adorable little outfits...


Halle's Closet

Not only was there not enough room to hang everything, but half of her hangers didn't even fit properly over that single rod, making it hard to slide items to find what I was looking for. From the moment I started unpacking her clothes, I knew that something would have to be done about this situation. 

The top two things that I took into account were 1) it had to be removable and 2) it had to be inexpensive. With those two considerations in mind, it seemed like a no brainer - we'd use a tension rod. Perfect!

May 7, 2012

It adds that extra row of hanging space that we need, and the hangers that don't fit onto the top rod, slide easily along this narrower tension rod. I love that we have a ton of extra space to slowly add to her 12 - 18 and 18 - 24 month clothes as we find stuff we love for a great price (yes, the entire top rod is dominated by 6-9 and 6-12 month clothes... she has SO MANY).

May 7, 2012

Such a simple project, but the type of project we will have to become more familiar with, as we adjust to living the life of renters once again.

What tips and tricks do you have for improving and increasing your storage space for less? We're happy to take any and all of them at this point.

Tomorrow I'll give you a better look at how Halle's nursery is coming along. We're finally starting to get some things hung on the wall, but I still have quite a few decisions to make, and you all know that I value your opinions! 
SHARE:

Wednesday, January 11, 2012

Full Steam Ahead!

Last week we officially proclaimed our to-do list for 2012. With a lot to accomplish, and a lot of motivation, we got right down to business, starting with the first spot you see in our home - the front entrance.


The big closet thatwe put into our front entrance in late 2010 was meant to help with our storage and organization issue in this little ol' house. While it has served us well in the storage department, it hasn't been doing so hot in the area of organization...


January 4, 2012


Not pretty, right? It had been bothering me for ages, so I was happy to work on this one early on. My first step was to pull everything off that top shelf. I organized a basket of dog stuff, and the second held all of our scarves, mitts and other winter accessories. Any winter pieces we no longer needed or wanted were put into a donate bag. Our large collection of baseball caps was also sorted through - with one of B's old hats getting tossed in the trash and a couple going into the donate bag as well. 


With the top shelf under control, everything came out of the bottom and it got a good vacuum. There was one pair of old boots that went the way of the trash and a few pairs that went into our donate bag.

January 4, 2012

One thing that I was really happy about, was to get that old trunk out of the closet. It took up a ton of floor space, and with shoes just piled in there, it wasn't helping us stay very organized. So, to solve the shoe storage dilemma and clear up some floor space, we headed to IKEA and purchased two BISSA Shoe cabinets, which fit perfectly on the two ends of the closet (and at $30 a piece, were easy on the bank account)...

January 4, 2012

January 11, 2012


Each drawer is meant to hold four pairs of shoes, but since we had a few pairs of sandals and some of my flats, a couple of drawers held more than four and left us with some extra space for future storage. Clear floor space also means more space to store Halle's car seat and stroller. In the end, it makes me incredibly happy to see it finally looking nice and neat...

January 8, 2012

January 8, 2012

I'm loving that clear floor space! No more shoes just randomly tossed about on the floor. Now I won't be so embarrassed when guests come over and go to hang their coats in our closet. There is definitely still room for improvement, but things are already looking much better!

Have you started to tackle any projects on your to-do list? Maybe you've just been working on purging and organizing your home too? I'd love to hear what you've been doing around your home!
SHARE:

Sunday, April 18, 2010

The Lovely Bones - My Closet Reveal

After four weeks of having to shuffle through piles of clothes on the guest bed every morning to dress myself, I finally have a more functional and organized closet structure! Let's take a quick trip down memory lane and peak at my previous closet monstrosity, shall we?


Pretty bad, right? Looking at this actually makes me pretty happy that it collapsed, as it gave us a reason to give it some new life. And give it new life we did!

We started out by knocking out the back wall and building a cubby that would add some extra storage. It gave me endless amounts of joy to see us making use of that long forgotten space in behind the closet, and create a new home for my most beautiful shoes!

The next step was to paint the walls white, and get rid of that awful colour (whatever it was). Just removing that awful almondy colour from the wall really made the space a whole lot brighter, and seem so much bigger!

After painting, work once again ground to a halt as B and I stood back to check out the space and really plan out how my clothing rails would fit. Finally after much discussion, we headed out to buy all of the necessary pieces, and B got to work measuring, cutting and priming all of the wood for the new closet structure. Nothing much happened for a bit, then last Sunday, I arrived home from Brunch with a girlfriend to discover this:


What a wonderful, hardworking man my B is! Of course, as the afternoon wore on, I left B to his own devices and had continued on my quest to work on another project I have been working on (to be shared soon... I hope). However, by that evening, I was inside painting all of the wood, anxious to get my clothes back into their proper place.

Late last week the flooring went in, and over the course of the weekend trim was installed and painted, and my closet is finally being used again!


We're still trying to decide how to handle storage above the clothes rail on that second side of the closet. We have a general idea, but right now we are determined to make some serious progress in the basement. I also want to find some nice curtains to cover the opening of the closet, but I'm in no rush.

So just to recap, we went from this:


To this:


In FOUR weeks! Not too bad right? I love it!

Have you done a major overhaul of a storage space in your house? How were you creative with storage in an awkwardly shaped or small space? Would love to hear what some other people have done!
SHARE:

Monday, April 5, 2010

The Closet Fireplace?

Nothing much has been going on around here recently... at least nothing worth blogging about. Closet progress has been incredibly slow, but yesterday we finally got around to sanding it all down and getting the primer on... yup, that's all we've done. Which means the closet now looks like this...


Kind of like we're going to just pop in a gas fireplace insert and call it a day, huh? That could be interesting.

With the closet slowly moving along B suggested tonight that we head over to IKEA to get some closet inspiration. While walking around the closet section, I stumbled across the Komplement birch clothes rail, which was marked "Now or Never", and priced at $4 each. B and I figured it was a great deal, and after being directed by the associate to the "As Is" section, we booked it there hoping to grab 3 of the last 4 they had on hand. We lucked out - not only were all 4 still there, but they were marked down even further to $1.90 a piece - so we grabbed all 4! We also managed to find the perfect shelf for one side of the closet on sale for $7.90. Not bad. We picked up all those piece for the closet, and a new candle, all for $20.33! We left feeling pretty happy with ourselves (especially with frozen yogurt in hand). So here is the plan for the closet...


Those are the measurements of my closet space (obviously!). As you can see, working  with the width of the closet makes no sense, and we'll actually utilize the space better by using the depth instead. Therefore the plan is to run our clothing rails along the 2 sides of the closet (42 inch lengths) rather than across the front (60 inches). Of course, that also leaves our fireplace cubby storage more accessible.

I have some plans to make space for longer hanging items like dresses and robes, and also to create some sort of storage space on top of the clothing rails to hold other linens, shoes and purses. I just need to figure out where exactly everything will go once all of our organization solutions are in place. I'm hoping that by this weekend I can share our final product! Fingers are crossed... I've had enough of shuffling through piles of clothes on the guest bed to get dressed.

I hope you all enjoyed your Easter weekend!
SHARE:

Sunday, March 28, 2010

Closet Progress: Cubby Storage

It's been exactly one week since half of my closet collapsed on me. I've spent the last week with half of my wardrobe piled up on the guest bed, sifting through it as I got ready for work each morning. It hasn't been fun. So this afternoon, after catching up on what was happening up the street, B and I headed upstairs to look at how to tackle the new closet project.

I started by removing the remainder of my clothes and possessions, to get back to the basic (awful) structure.


Once it was cleared out, I got to work removing all the.. uh... JUNK, that once held my clothes and we were left with a wonderful giant space...


I figured I would fill all the holes, sand it down, prime it and paint it and then start taking measurements for the new closet system (whatever that solution might be). Well, B had a different idea, and soon my closet looked more like this:


He told me to "get to work" and I told him to forget it - he chopped a whole in my wall, we were going to fix it together. The idea was to utilize some of that forgotten space in our angled ceiling/walls. The plan was to lose that middle wall stud, and put in a cubby between the two remaining studs, that we could put shelves into to house my purses and linens. First, we measured the depth of the shelves that had already been in there, and planned that the cubby would need to be 12 inches deep. Based on that measurement, we had to figure out how high the cubby could be to allow for our 12 inches depth, and to keep the whole thing square (no sloping like the ceiling). In the end we took all of our measurements and headed out to the garage where B measured, cut and put together a plywood cubby that we could insert into the giant hole in the back of my closet.


Once we got the cubby upstairs, and into the closet, we discovered that the other two stud's would also have to be removed in order to fit the cubby into the wall. After some shifting, adjusting and shimming of the cubby, B had it in the right spot, and used the old wood support from the closet to make two smaller studs that would sit atop of our cubby and connect with the studs in the ceiling. Once they were installed, it looked like this:


The next step, was to do something about that electrical box we had discovered attached to one of the studs when we opened up the wall. B had found out it was live when he shocked his ear leaning into the opening to clean it out. So, after putting the appropriate cover on the box, he screwed it into the side wall to make sure it was secure and safe and out of the way for the remainder of our construction work.

Once that was out of the way, we began our measurements for the drywall. With all of those in hand, we headed into the basement and cut up a bunch of leftover chunks of drywall from our laundry room project. We finally got them into place, taped them up and B put some metal outside corner support on the cubby edges to clean them up.


I was then in charge of mudding all the joints and holes in the closet area... but of course I didn't do such a good job, so B needed to jump in behind me to clean it up.


Right now it's sitting and drying - once it's done I'll be back up there sanding it and touching up any necessary spots. The next step will be to prime it and paint it white... then it's just a matter of figuring out how I want to handle clothes storage, and space the shelves in our new cubby. I'm just glad we've found a way to reclaim some more unused space in our little old house and to create more storage in my closet.
SHARE:

Monday, March 22, 2010

The New Unexpected Project

As I mentioned in my post on Friday - we have way too many projects on the go around our house. The basement renos are ongoing, my kitchen refresh is not yet complete and I have a few pieces of furniture sitting around that are waiting to be finished. Thankfully, I have not yet started sanding or painting the two chairs I plan on refinishing for the basement. So for the moment, I can let that project wait.

Unfortunately, this past weekend didn't really work out quite as I had hoped. I had huge ambitions of banging out some of the projects that we have on the go. Of course, none of them were touched (with the exception of B working on some stuff in the basement bathroom that I couldn't help with). So, with B confined to the basement yesterday, I was looking for something useful to do, and ended up in our upstairs guest bedroom / my dressing room ready to spring clean and purge!

I set about on my merry way - and of course, it had to get worse before it was going to get any better:


I was determined though, and managed to fill three bags of clothing to donate, a bag of stuff to add to our "sell" pile, some things that were very misplaced and half of a small bag of garbage (Incredible how much you can fit into a small place when you just start cramming things in)! It felt nice to finally purge that room. The best part was that my closet suddenly had quite a bit more room for my wardrobe to expand... or so I thought.

I had just put the last blanket on the shelf to the right in the closet, and had turned to work on something else, when I was startled by a very loud noise. I turned to see this:


To be honest, that closet of mine, was never well constructed. So really, this wasn't much of a surprise. Check out that sorry attempt at closet construction...


There are so many things I could point out to you, but I'm sure you can see most of the issues with this monstrosity! I've known since we moved in last July that this would eventually happen. So, here I am, with a purged room, but half of my wardrobe, and a collection of linens and blankets, piled up on the guest bed. Thankfully we have no house guests planned for the immediate future!

All of this, of course, occurred almost simultaneously with B cursing something in the basement that wasn't working out quite right. I must say, we were both happy campers when we met on the main floor following our adventures, at 8pm, starving and too irritated to whip something up for a very late dinner (thank god for left over Thai take-out).
Well, I guess that means it's time to add yet another project to my continuously growing to-do list - building a new closet. Plans for my new closet will come this week...
SHARE:
Related Posts with Thumbnails
© Life on Misneach Ridge
Blogger Designs by pipdig