Trending

Monday, August 10, 2015

Nolan's Custom Closet

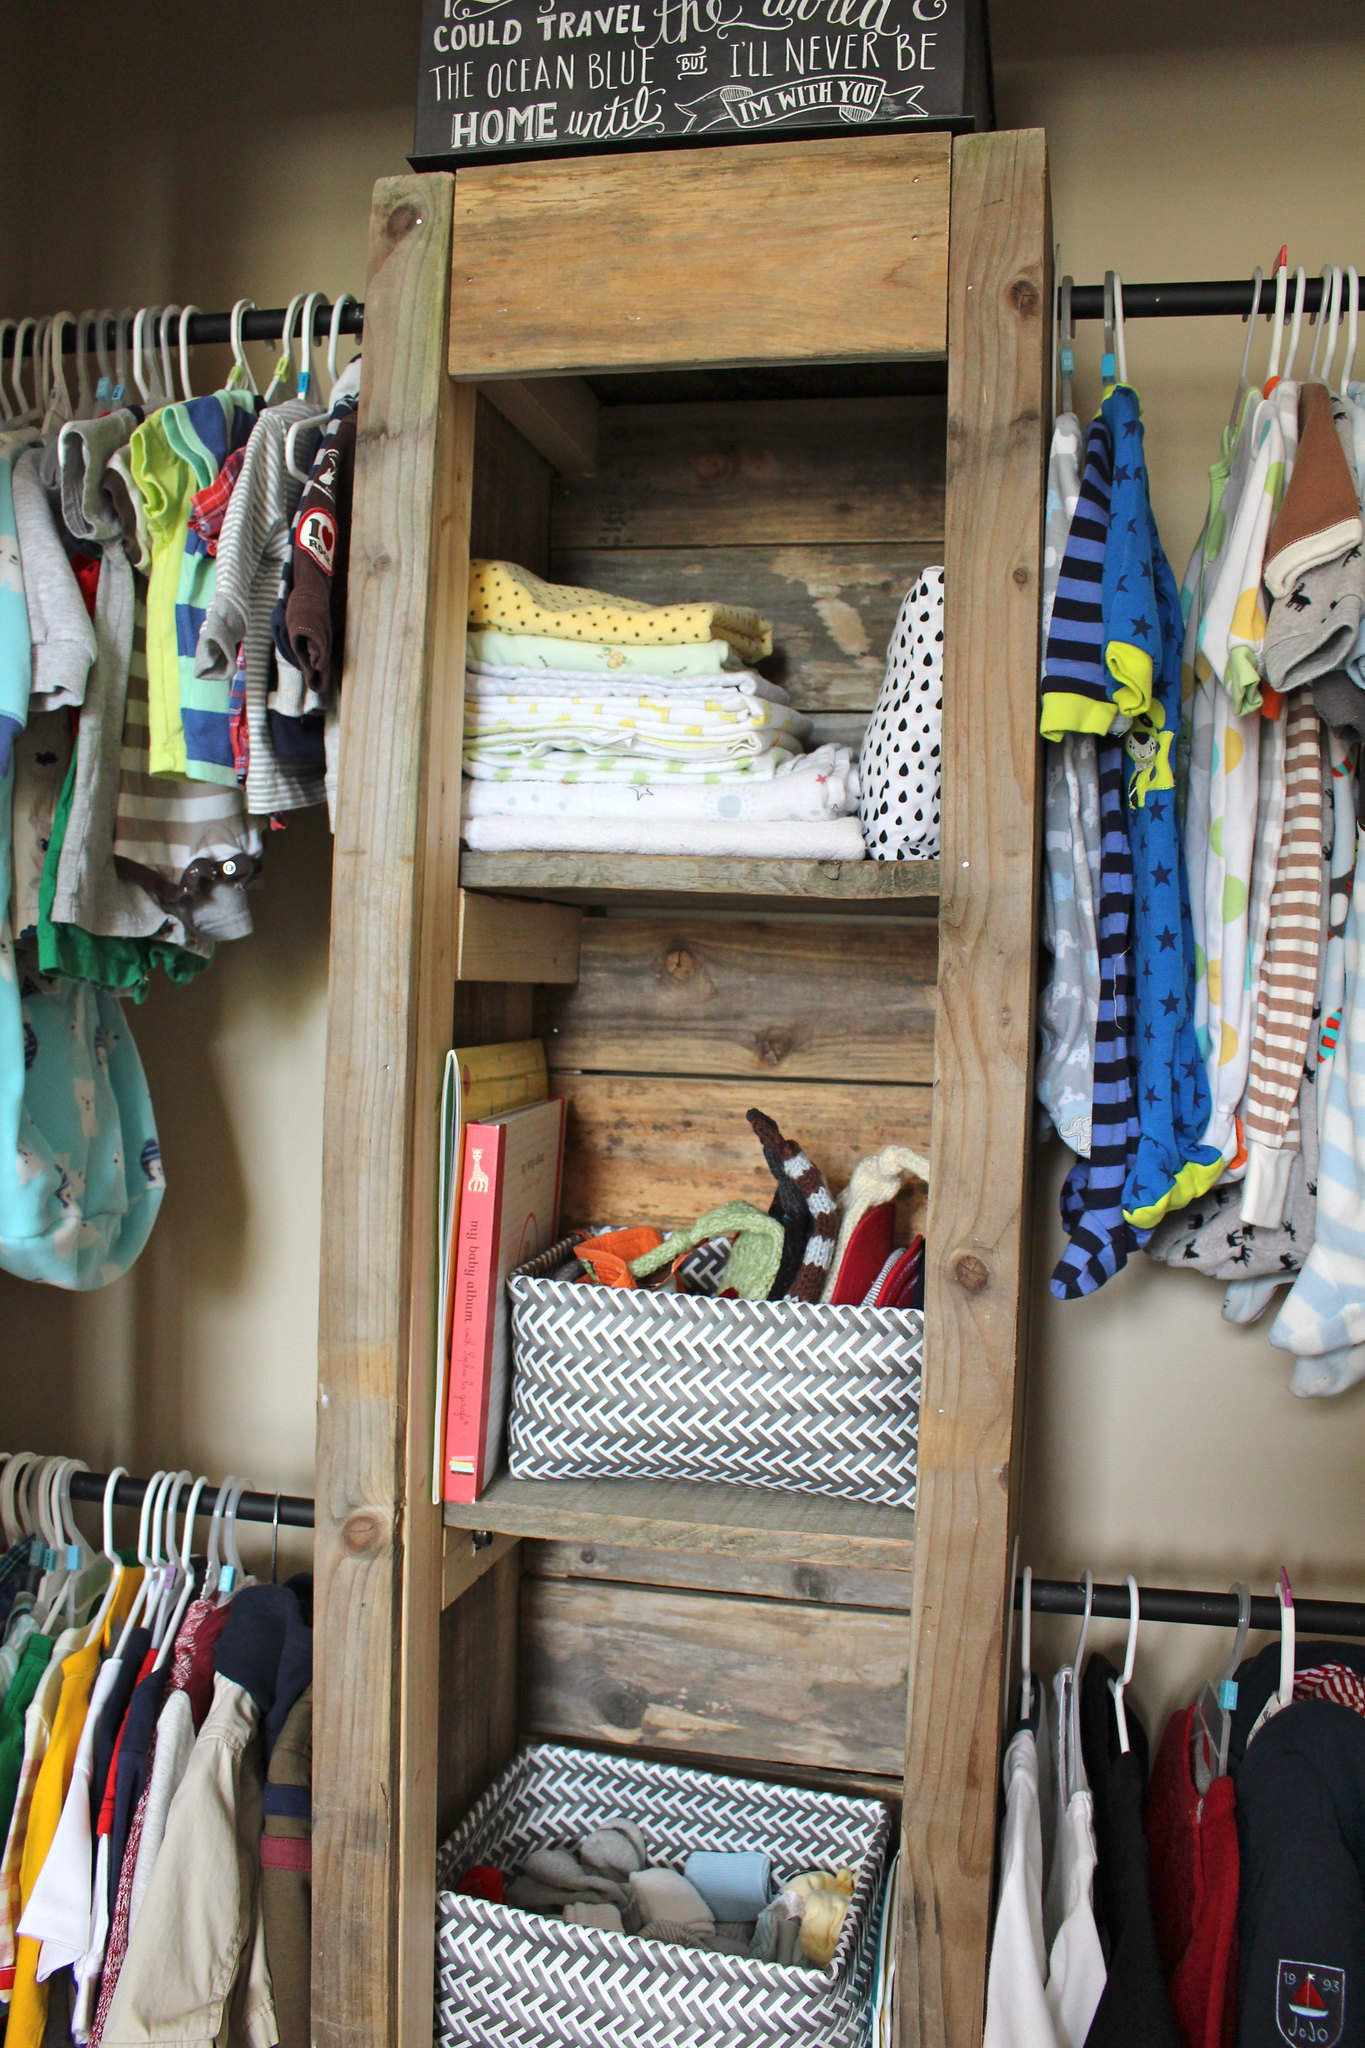
We are creeping up on Nolan turning 3 months, and still his nursery is not complete. We mostly just need to hang his bookshelves, remove some bins and bring his chair in. Hopefully I can share a complete nursery reveal soon, but in the meantime, I wanted to share the custom storage I had B build for his closet.

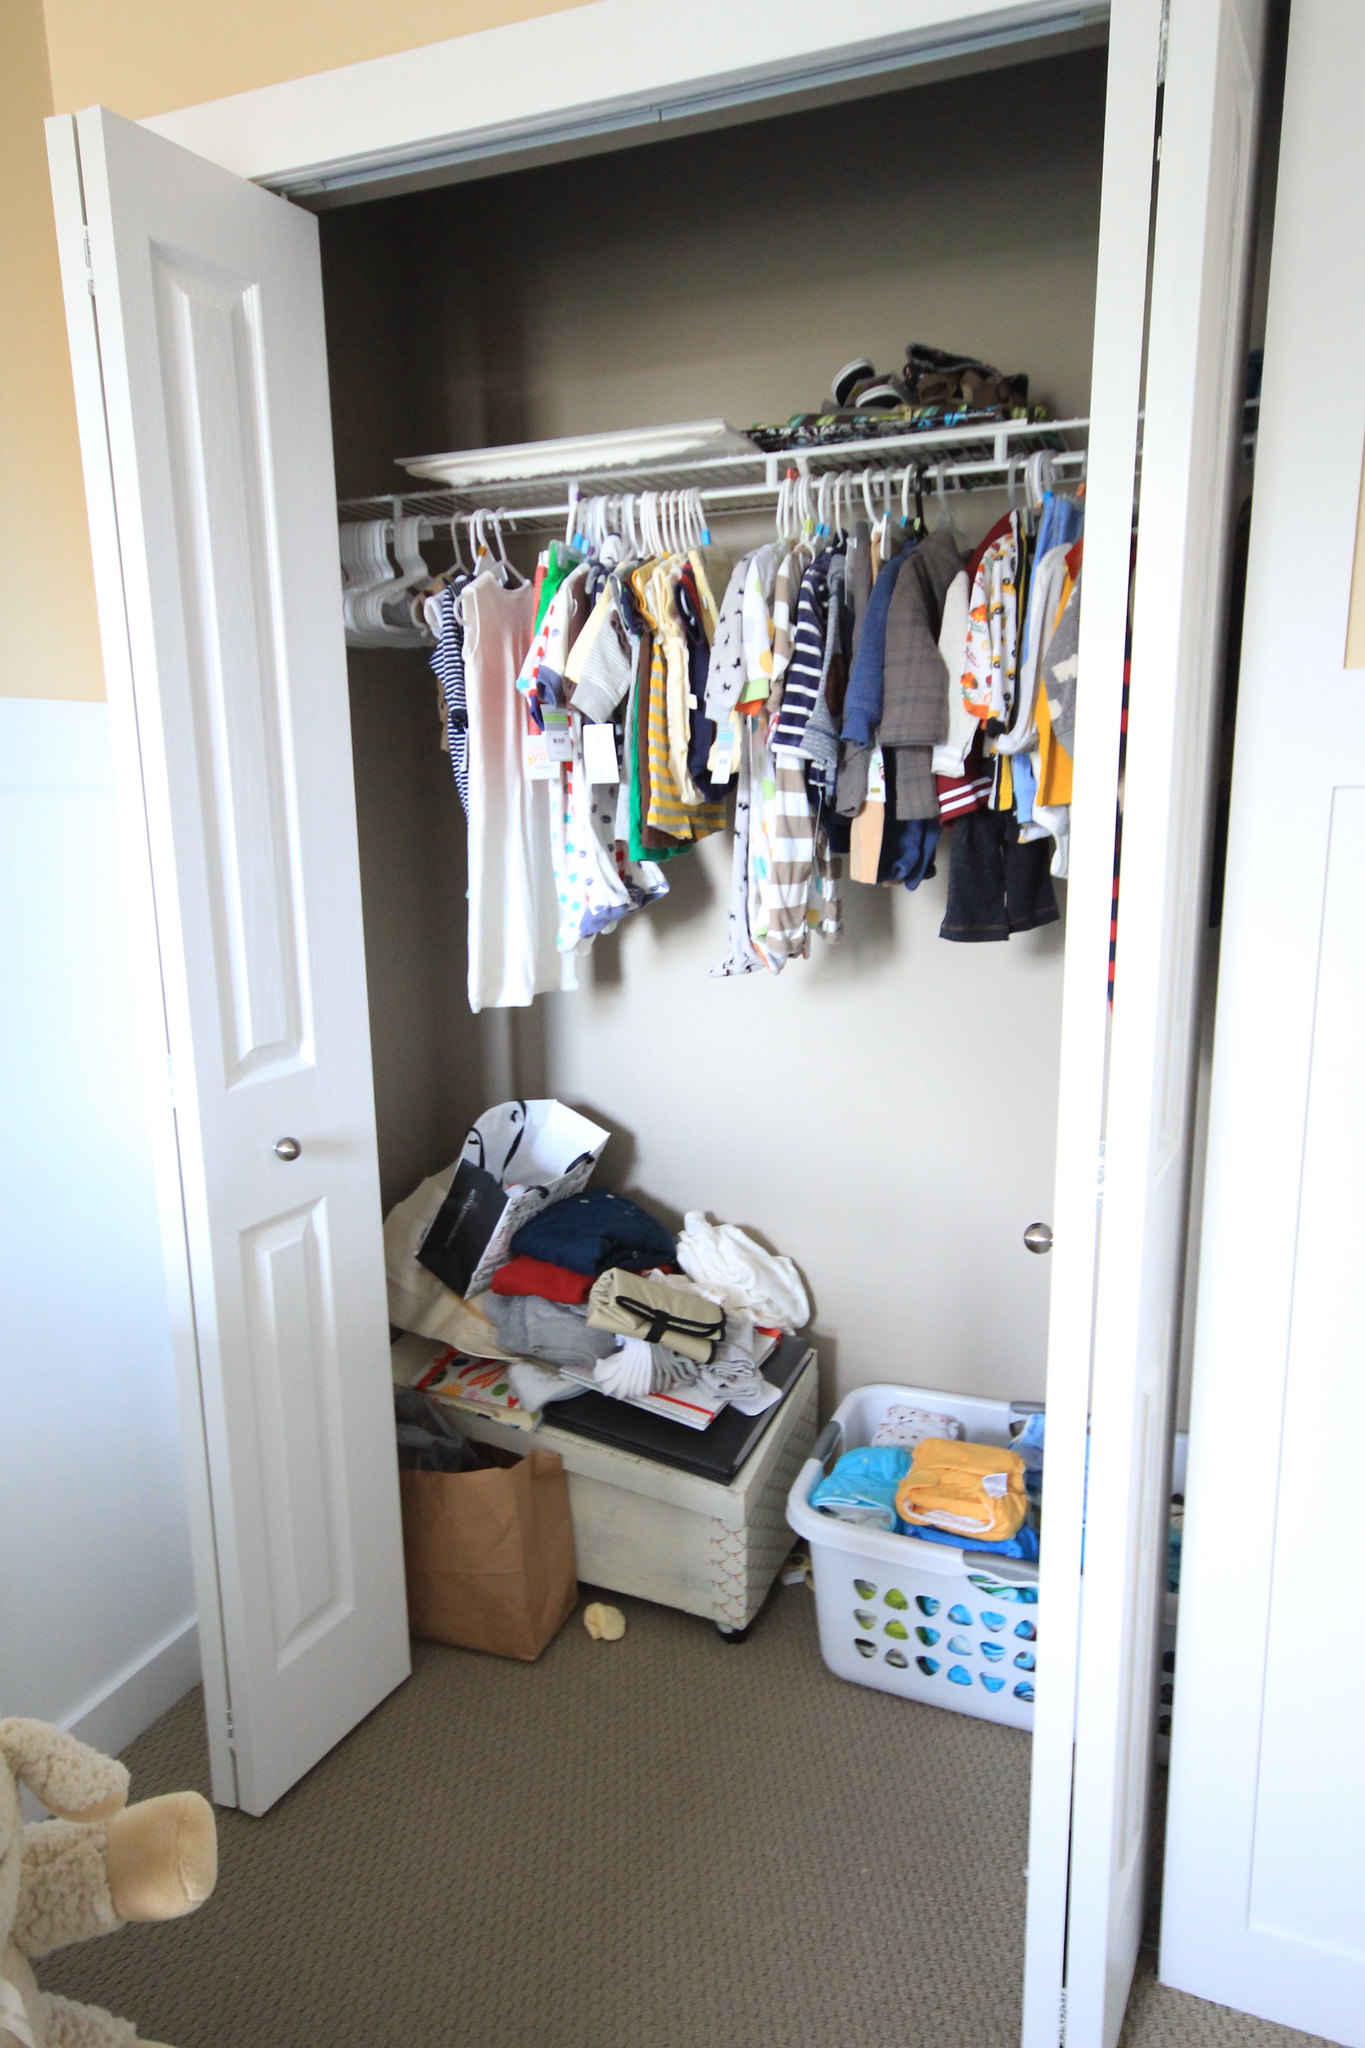
Last March we had tackled Halle's closet, using a lot of what we had to make the space more functional and tidy (you can read about her closet transformation here). A year on, we were so happy with how her closet worked, I knew I wanted something similar for Nolan's closet. What we started out with was quite simple, which didn't provide a variety of storage options for us...


Baby's Nursery - March 26, 2015

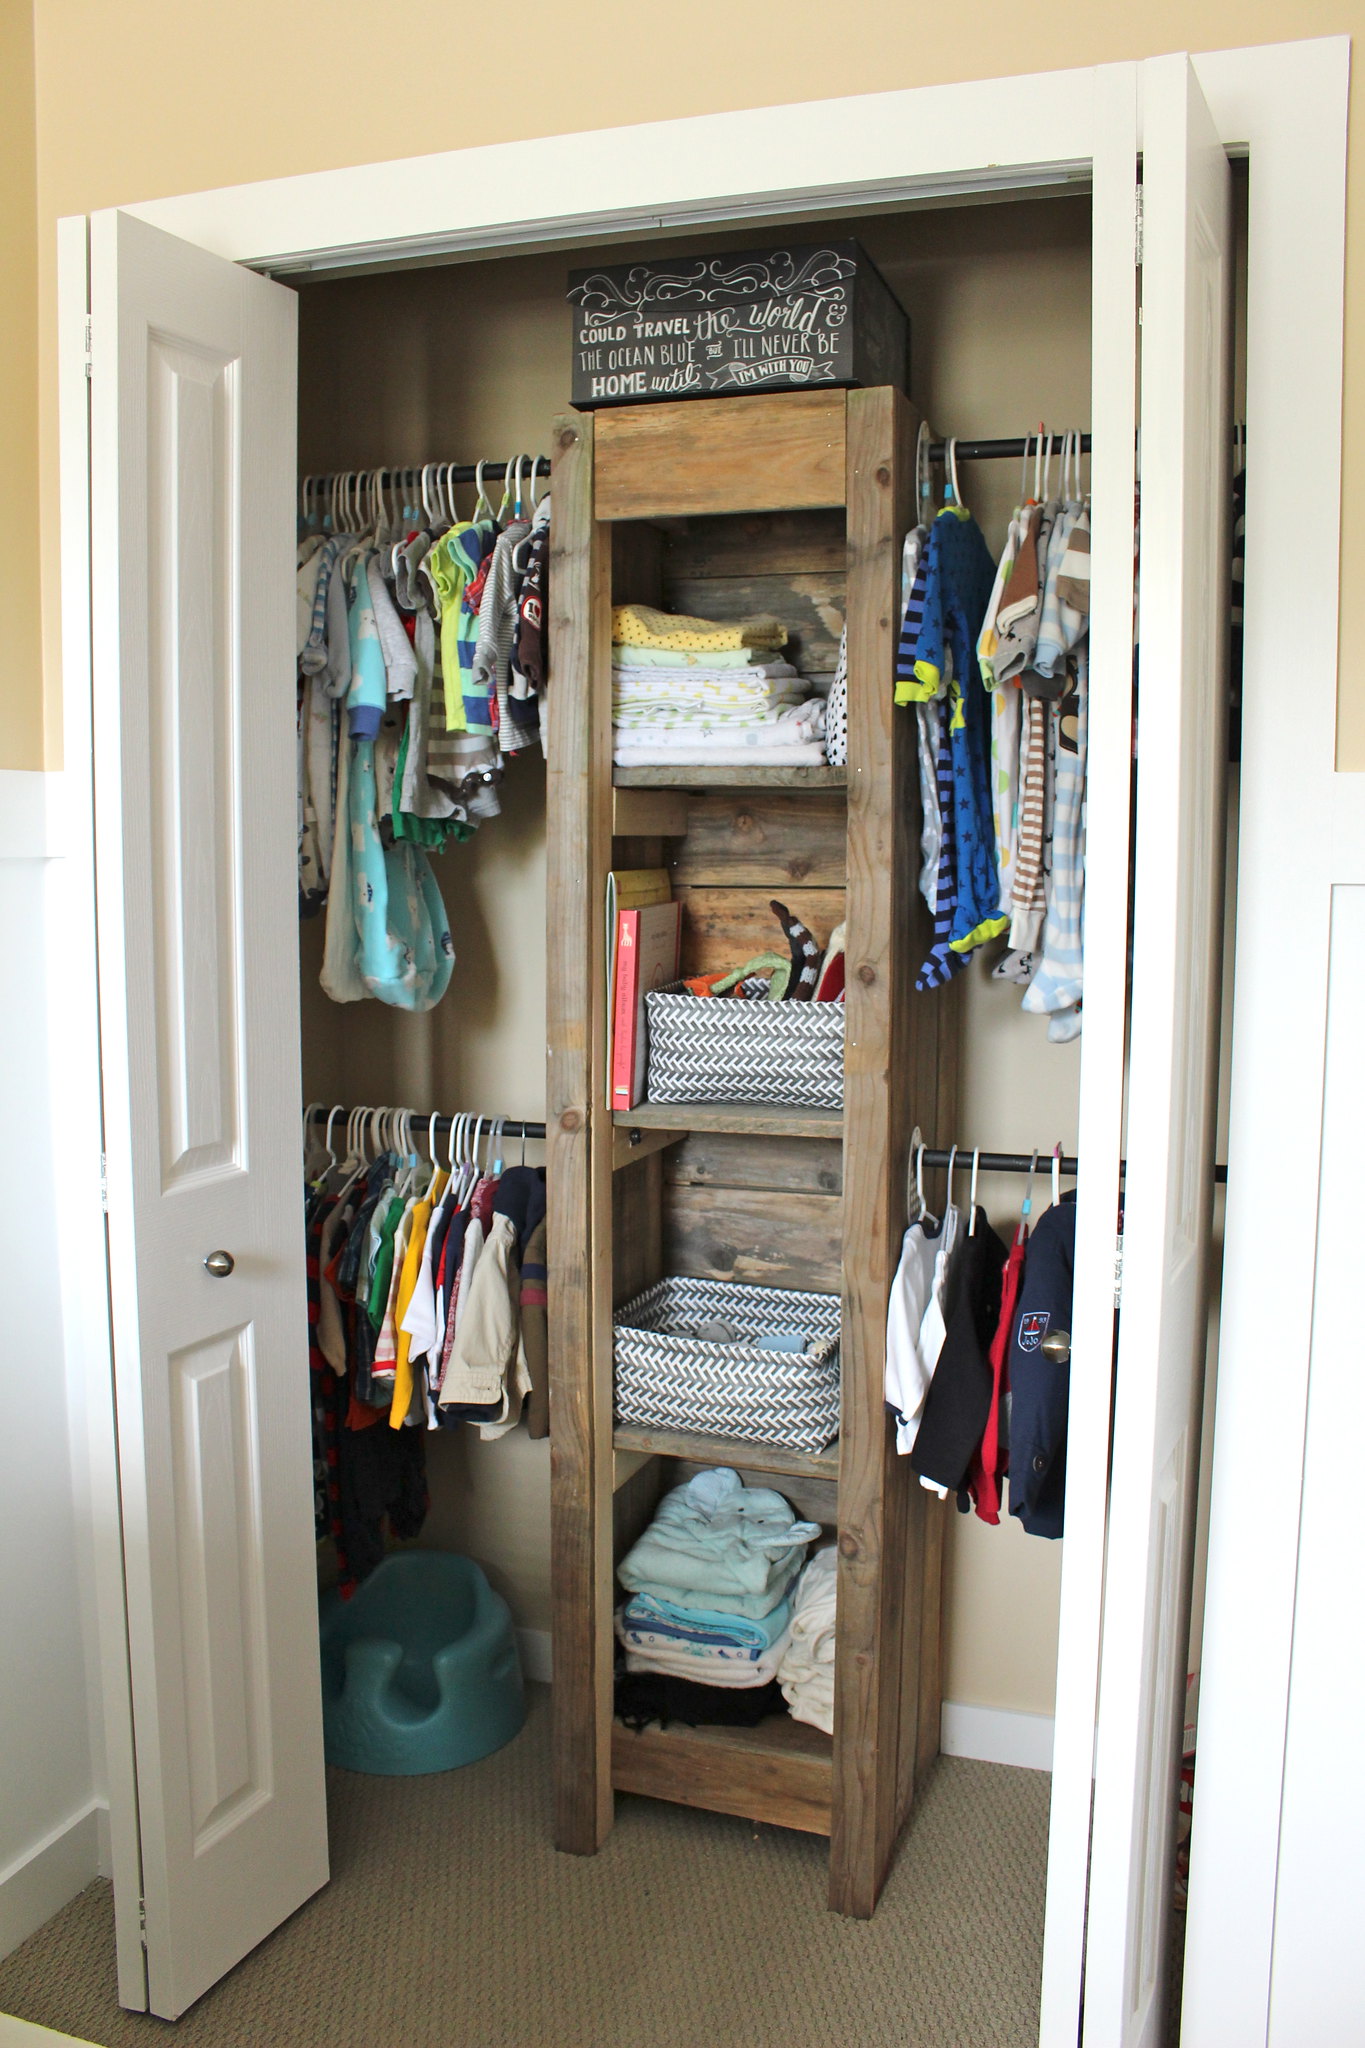
Yup, we had a lot of work to do to get things looking pretty. So, B set to work building some custom shelving for the centre of his closet. He used scrap wood that we had laying around, and what he constructed is absolutely perfect!

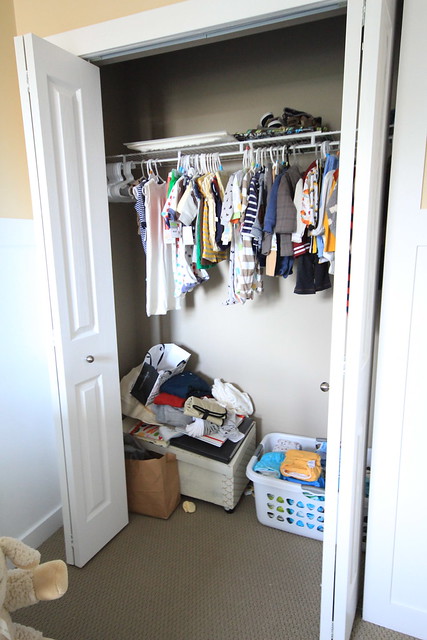
Nolan's Closet  - June 2015

The shelves provide lots of room to keep blankets, towels, extra crib sheets & mattress protectors as well as some baskets for his socks and hats (this boy has LOTS of hats!). Putting the shelves in also allowed us to add four rods for hanging. While this configuration doesn't exactly give us more hanging space, it definitely helps me to keep things more organized!

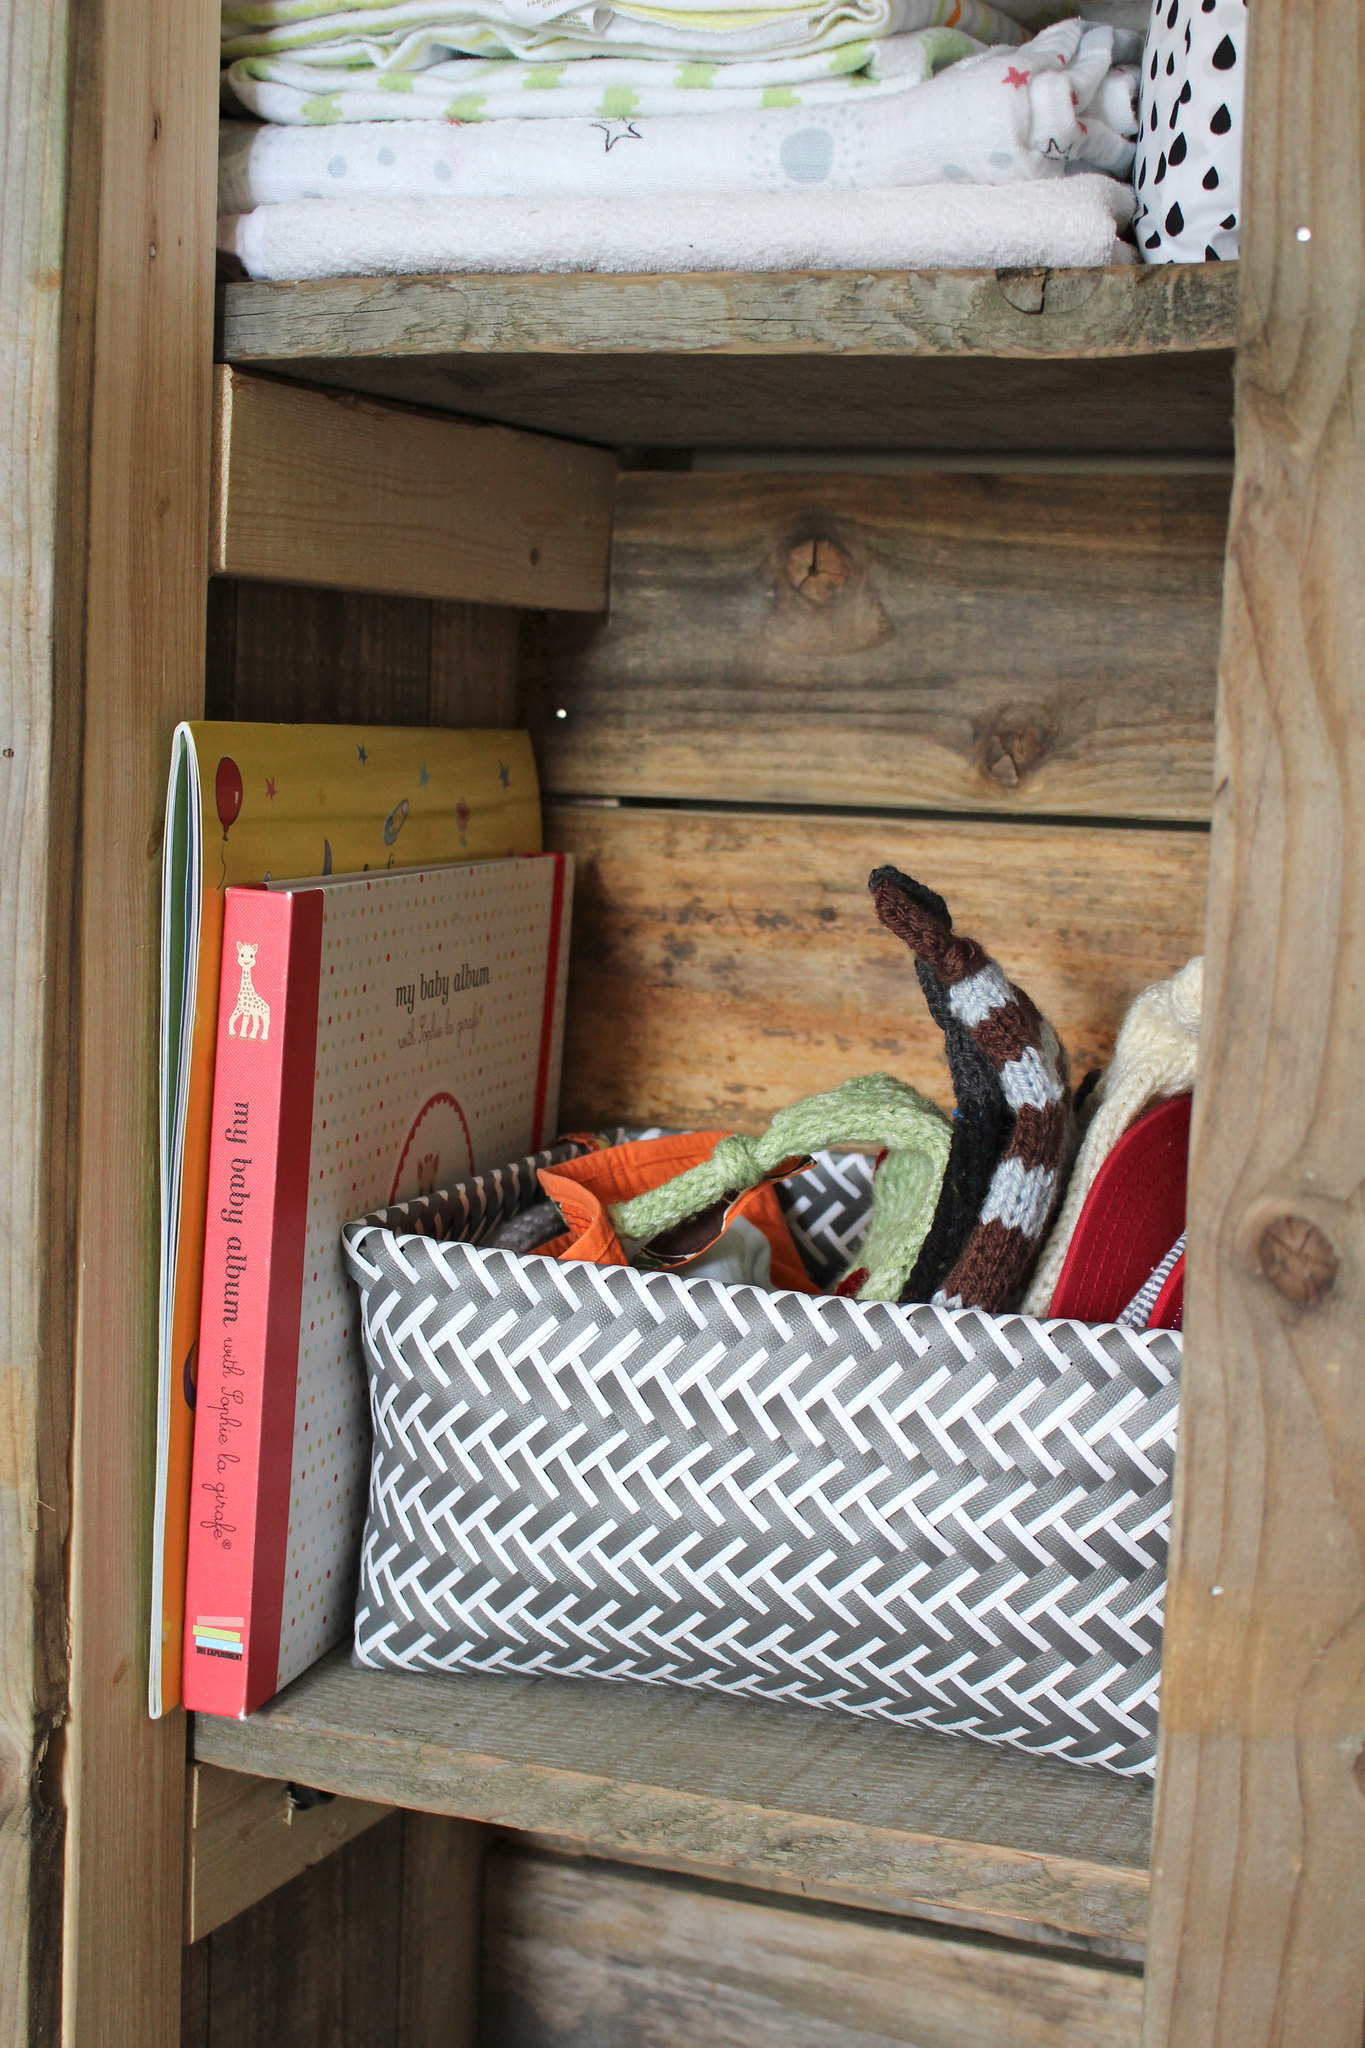
Nolan's Closet  - June 2015

His baby book and first year calendar have also found a home in his closet. I'm pretty happy that I've been doing a decent job staying on top of both of them. The baskets I love, and picked up at HomeSense for around $10 each. I know once they have served their purpose in his room, they will be easy to use as storage somewhere else around here!

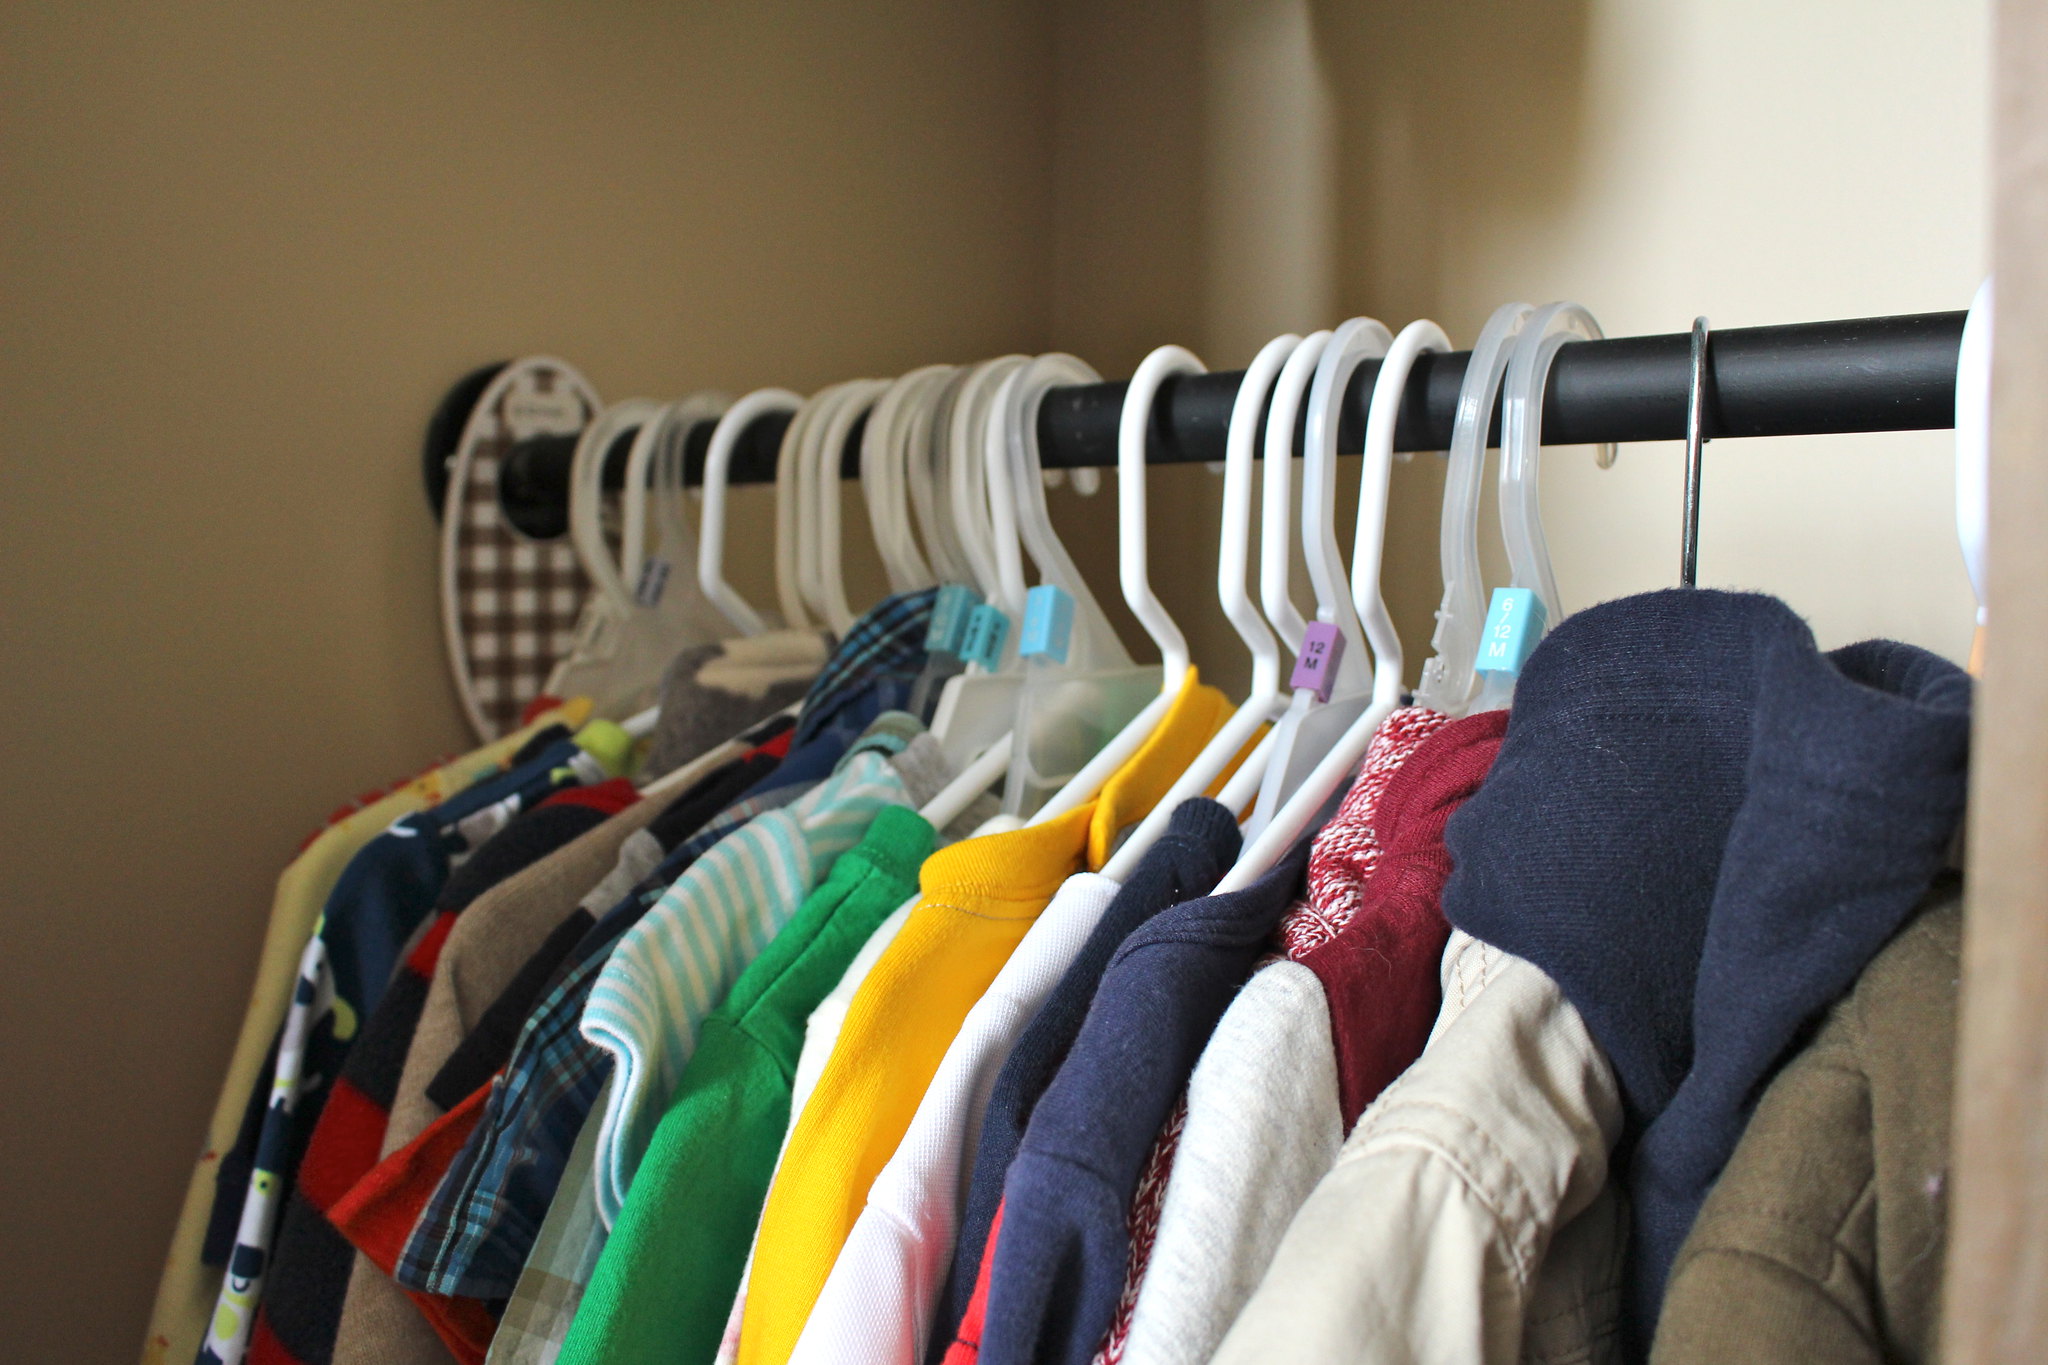
Nolan's Closet  - June 2015

The hanging rods are actually 1/2" galvanized pipe that we spray painted matte black. The match the pipe that we installed for his curtains. You can read more about his nursery here.

Nolan's Closet  - June 2015

It feels good have two of our many closets redone and organized. All of the rest of the closets in this house are also made up of wire shelving, which does not really do the best job at maximizing storage and organization. The next two most important closets? Our master bedroom and hallway linen closet! Maybe this winter will be our chance to work on those problem areas.

Do you have any closets that could use and organizational overhaul? Any of you working on major reorganizational projects this summer? 
SHARE:

Friday, March 27, 2015

Making Room for #4

I swore that with baby number 2 I would stay on top of things... be ahead of the game! Be totally prepared for his arrival. HA! I should have known better, right? Between maintaining our home, being a Mom (which includes taking Halle to different activities, outings, preschool, etc) and maintaining our social life, let's just say I'm a little further behind than I planned to be at almost 33 weeks pregnant!

My due date with this little guy is sneaking up on us quite quickly and I am anxious to have his room mostly (if not completely) finished by the time that he arrives! B has been an absolute trooper, helping me make this whole thing come together. Without him, absolutely nothing would be done! There is still a lot to do, but between the two of us, I know that we'll get there (eventually).

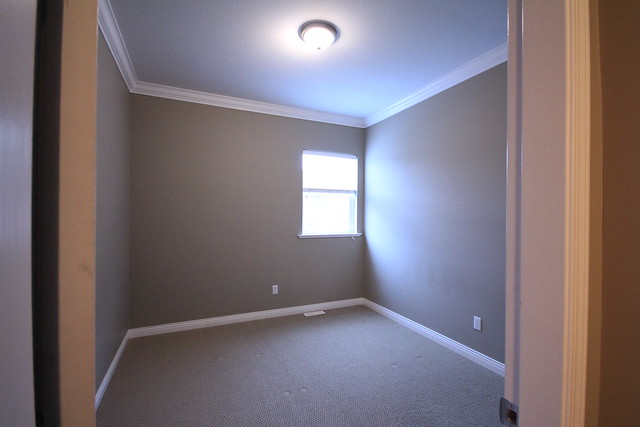
Unlike Halle's nursery in our first home, the space that is the nursery lacked any sort of character. It was just a bland grey box, that we were using as a "guest room" (we dumped a queen size bed in there and pretty much called it a day). Here's how the room looked the day we did our final walk through (in April of 2013).

IMG_1440

I never got a picture of the opposite side of the room on that day, but the closet also had no trim around it, much like that little window shoved into the corner. I knew that I wanted this space to feel more cozy and have more character, so we started to discuss adding trim to the walls. We had a few ideas of what we might do, then I saw this post from Bethany over at This Little Estate and thought that her idea sounded perfect! As soon as B saw what they did he was right on board as well.

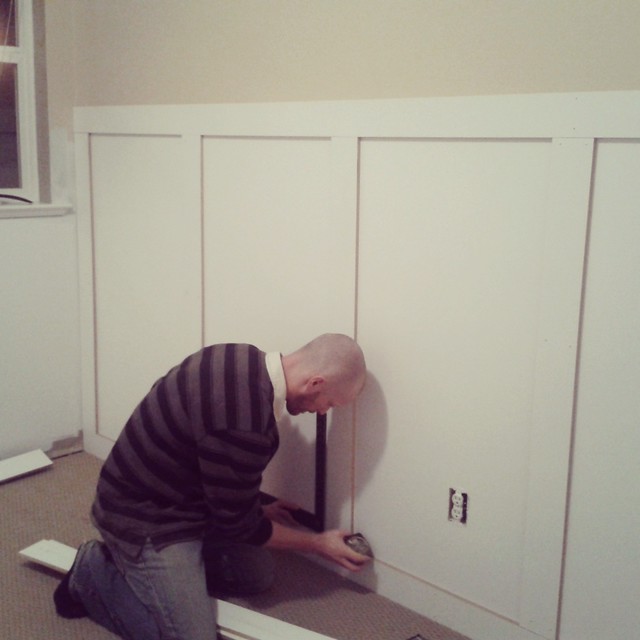
For those of you who follow me on Instagram, you may have seen this photo of B getting to work a few weeks ago. 

IMG_20150305_201152 (1)

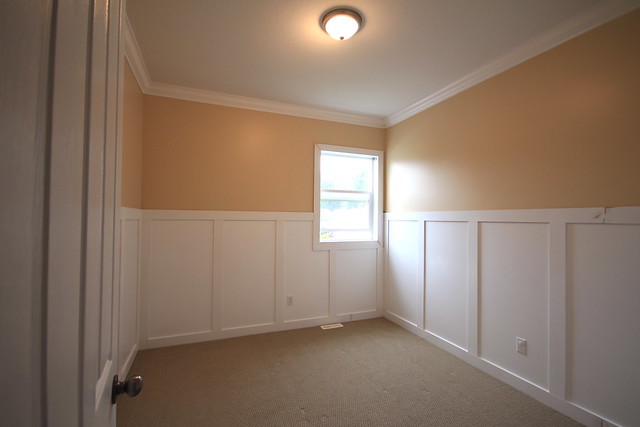
I wish I had documented his process a lot better, but that photo is about as good as it gets. He essentially did the same thing as Bethany and her husband did. He ripped some MDF boards into strips, and used his nail gun to attach them to the wall. He also trimmed out the window and closet doors (as well as the bedroom door of course, to ensure it matched with the rest of the room). Then he had to fill in the nail holes, and caulk around some of the edges, sand it all down and give it too good coats of white trim paint.

By the 15th, we had the nursery looking like this (wall colour not very accurately captured below)...

Nursery - March 15, 2015

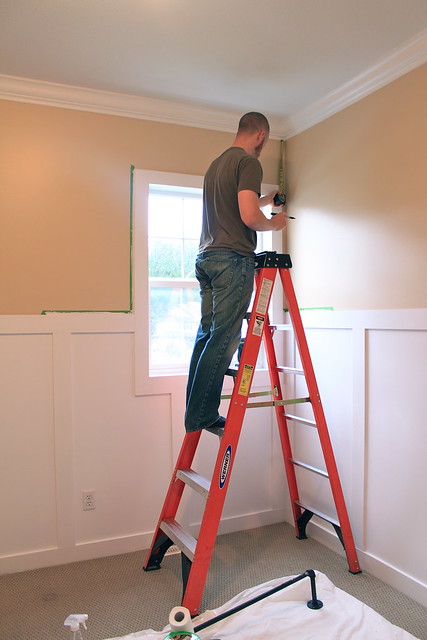
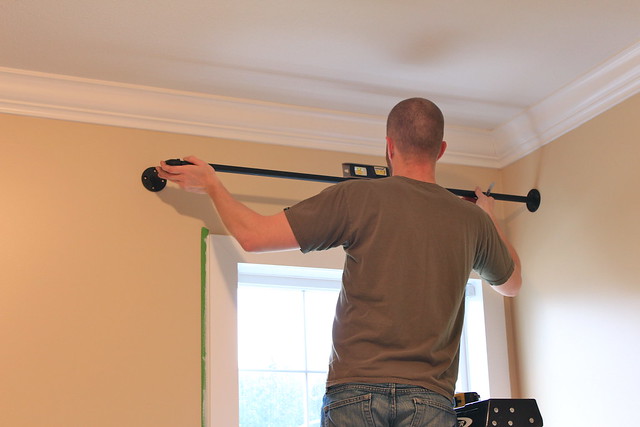
By the end of that evening I wanted to have the curtains up. We had purchased some pipe from Home Depot and spray painted it black. Once it was dry, B attached it to the wall using large butterfly clips that fit in behind the drywall. We secured one side to the wall that the window is on, and the other straight to the opposite wall.

Baby Nursery - March 15, 2015

Baby Nursery - March 15, 2015


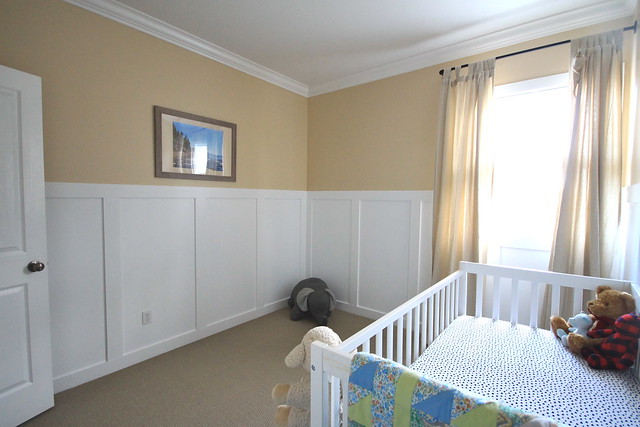
Last weekend B did the last few coats of paint on the trim, and I vacuumed and shampooed the carpets. On Sunday the crib was assembled and the one piece of artwork I was certain I wanted in here (a photo I took on Vancouver Island last summer) was hung. We picked up his dresser (which I found on Craigslist) on Saturday, but we have had to keep it at a friends place since. I'm hoping we'll pick it up sometime this weekend. For now, his nursery is slowly starting to resemble a space for a baby...

Baby's Nursery - March 26, 2015

Baby's Nursery - March 26, 2015

I plan to get his way too long curtains hemmed this weekend and once his dresser comes home, I can finally start to wash and put away his tiny clothes and cloth diapers that I have been amassing. It also means his closet will finally be cleaned out. That's the next big project. It needs to be disassembled, painted and a new storage system installed. We plan to do something similar to what we did in Halle's closet. It will be a whole lot better than it's current state, that's for sure...

Baby's Nursery - March 26, 2015

So there you have it! Not long now till our little man joins us, and progress is slow going in his room... but we are getting there! I can't wait to share the finished space! Hopefully I will be able to well before his arrival.
SHARE:

Wednesday, August 29, 2012

The First Tweak is the Cheapest

I must say, after yesterday's post on making some changes to Halle's nursery, I was itching to get started. Of course, I will be trying to make these changes on a shoestring budget, so for now I have to start small. While we were out and about yesterday, my mind started turning and coming up with ways that I could make some changes on the cheap. Art can always be the cheapest way to go so I immediately went to that. 

If you follow me in instagram (firsttimefancyblog), you would have seen that last week B and I finally got some more artwork up on Halle's wall. I never shared it on here, since it was exactly the same as what we hung in Toronto, and I knew that some changes would eventually be coming.


August 28, 2012

So, what easier place to start then with those embroidery hoops? As beautiful as I think both of those fabrics are, it was time for something new. I headed down to the basement and started sorting through my box of fabric, and pulled out a sample I had picked up when I was back in school - and yes, it was completely free as I had pulled it from the sample room. As soon as I pulled it from the box, I knew it would be a good starting point for our changes, since the colours would work wonderfully with my inspiration art from yesterday:

Halle's New Room - Artwork
{1 . 2 . 3}

After holding up the whole piece of fabric, I knew which part of it would look best in the big hoop, but I decided to recruit Halle to pick for the second hoop - I mean, after all, this will be HER big girl room...

August 28, 2012

Unfortunately, Mommy wasn't completely on board with Halle's pick, so that big flower was spared (probably for a later) project. I really love how everything turned out though, and it's really energized me to make some more changes in her space. Here's how her art wall is looking now...

August 29, 2012

Let's not pay any attention to Halle's memory box that is crooked, and driving me nut, and take a closer look at those pretty embroidery hoops...

August 29, 2012

August 29, 2012 August 29, 2012

I think this was the perfect way for me to get started on changing up Halle's space - especially since it was absolutely FREE! B was pretty happy about this as well! For now, I'll continue to try to shop our home to make changes, and in time share with you the process of her how her room is coming along. Of course, we still have a lot of time with guests coming up, but I'll do my best to keep sharing what's happening! For the time being, if you are interested in what we are getting up to everyday, you can follow along on Instagram. Find me over at firsttimefancyblog. 

Have you been making any small changes around your place by shopping your home?
SHARE:

Tuesday, August 28, 2012

A Big Girl Room for Baby Girl

Happy Tuesday Friends! I had a bit of a disappearing act yesterday. I know it happens rather frequently, but we've been busy catching up and showing B's parents around. They arrived on Sunday, so things have been pretty crazy (in a good way) around here. BUT, today I am back with a bit of an inspirational post!

Recently, I've been dying to spruce up Halle's room here. I loved how everything fit and worked in her old space in Toronto, however, here, things just aren't working the same way. My mind has been spinning and I'm already starting to dream about what Halle's big girl room will look like. I'd like to inject just a little bit of pink into the space - something in a bit of a rosy colour. Since she's not ready for a new bed yet, I thought a good place to start would be with some accessories. Here's some of the artwork I've been eyeing to add to her wall...


Halle's New Room - Artwork

1) "Let Her Sleep For When She Wakes, She Will Move Mountains" Print - $20.00 by Yellow Button Studios: I think this print is sweet, from the words to the colours it is exactly what I would like to add to her little space! The price isn't too bad either, in my opinion.

2) Assorted Girlie Dog Set - $18.00 by Rifle Paper Co. - Alright, so they aren't prints, but these sweet little dog cards would be perfect to frame in Halle's room. There are two of each card in a pack, so four can go on her wall, and four can be saved for stationery. I just knew, as soon as I saw them, they would be the perfect addition to a room for our dog loving girl. 

3) H is for Happiness art print - $25.00 by Evajuliet - I shared this print before on one of my Fancy Friday Love posts. As you can tell, I do really, really love it. It can also be personalized, so I think I would have it changed to H is for Halle. What a perfect piece our baby girl could keep forever!

Accessories will probably be the easiest way for me to begin the transition. While I start on the walls, I will continue to look for the right throw cushions, curtains and other pieces. As much as I love all of the sentimental pieces in her room, I just think I need a change. We're in a new place and Halle is growing so quickly, into quite the girly girl. Don't expect a huge makeover, or major reveal - but some little tweaks here and there as I find the pieces I love for a great price.

Are you planning to make some small switches or adjustments to any rooms in your home for the coming season? 
SHARE:

Thursday, August 16, 2012

A Mobile for a Little Man

Life is pretty exciting these days! Things seem to be changing (for the best) every day, and every time that I turn around someone else has great news to share. Right now, I am most looking forward to the arrival of two special little people this fall. Two of my cousins are expecting babies, about one month apart, and what's more exciting than that? 

During my last visit home, one of my cousins mentioned she wanted a bird mobile for her little man's nursery. I instantly thought of all of the fabulous ideas I've spotted online (mainly Pinterest), and asked her if I could sew her some little birdies. She agreed, and I couldn't wait to get started on my own addition to this sweet babies space. 

She had picked "Night Owl" in Natural as her inspiration fabric (this will adorn the cushions on their glider), so on Sunday we went on a little shopping trip to find some coordinating fabrics for the little birds. 


August 15, 2012

The colours were PERFECT and I couldn't wait to get home and start working on those little birds. Of course, a ton of birthday party stuff got in the way and it wasn't until late last night that I finally had the chance to sit down at my Mother's sewing machine and get to work. For those of you interested in how I went about making these birds, here's what I did.

After stumbling across this blog post via Pinterest, I printed off the pattern found here and started tracing my shapes.

August 15, 2012

I used plain white chalk for the darker/coloured fabrics, and pencil for the neutral fabric that you can see pictured above. It worked well, and then when I started cutting I found most of the fabrics edges frayed - pretty badly too. My Mom suggested I buy some fray check to keep everything smooth while I worked, and let me tell you - this stuff is fantastic. It smells pretty bad, and left some white residue on my fingers when they came in contact with it - but it did the job wonderfully.

August 15, 2012

Now for the sewing part. The tutorial that I read suggested hand stitching these little birds, with the rough edges of the fabric sticking out. I tried, but the weave on all of the fabrics was too loose and wouldn't really hold my hand stitches - so we opted for the sewing machine. We tried the first one with a blanket stitch, and it looked pretty cute, but for me was too much of a pain. For my others, I just used a regular old stitch, and it worked great.

August 15, 2012

I wasn't able to get any more pictures as I was flying solo on my mission, but what I did was sewed the head onto the body and closed up the entire back of the bird. I then sewed half of the belly closed and then half of the other side of the belly, leaving me enough room to stuff the bird. Once the fiber filling was in there nice and tight, I finished sewing the bird closed. At the moment, I have three birds finished, and I am almost done the fourth. (My bobbin ran out before I closed up the fourth bird, and I had no desire to fill a new one at 1 in the morning). Here are the three so far...

August 15, 2012

I still need to add eyes, and I also plan on adding some little brown felt beaks to them to make the ends look more clean. It's such a fun little project to work on, and has given me a bit of a break from only working on birthday party projects. I can't wait to share the final product with you once it's hanging in the nursery (which is still in progress).

Have you been working on any fun projects recently? Have you ever tried making any small stuffed animals, or your own mobile?
SHARE:

Wednesday, May 9, 2012

First Look - Halle's New Nursery

By far, Halle's nursery is coming together the quickest in our new place. As in, it's actually a space worth sharing with all of you. Though for the most part we are keeping all of the elements from her old room, we're still making quite a few changes since we now have a larger space to work with. 


One of the biggest changes would've been obvious in her last monthly photo.


9 Months - April 23, 2012

The wicker chair that was in her nursery in Toronto was left behind with my parents. The much larger (and more comfy) Ektorp was a temporary solution when we got here, but I'm really starting to like it. Halle doesn't nurse as often any more, and usually sleeps through the night, so this chair is  mostly used when I'm putting her to bed. It will also be a great chair for story time as there is a lot more space for us to snuggle into it together.

But here's a shot of the whole room to give you an idea of where we are at the moment...

IMG_7525


So, here's the problems I'm having. I'm sure the biggest one you all saw right away - the curtains! They are way too short for this new space, which comes as no surprise to me with her last room being so tiny. They are hanging for now to help darken the room a little for her daytime naps, but it's glaringly obvious that we need to get new curtains. Since this is not a forever home, my gut instinct is telling me that same plain white panels from IKEA will do the trick... unless I can come up with some way to add length to these two lovely panels. 

The other thing I am struggling with is the large amount of wall space we are now blessed with. Halle's old room had very little wall space, and I think we filled it perfectly. Now, I'm trying to use what we have in this new space, but it's clear we need to find some new pieces. For starters, we've hung three of her bookshelves to the right of the window, and they are working perfectly.

IMG_7520


I'm pretty sure the remaining 2 (my father built us one more before we moved) will go to the right of the window over the chair - thoughts? 

IMG_7526

I'm thrilled that we also finally have a spot to hang her footprints that we have been doing monthly. We hung them directly over her crib and I love, love, love it! (Don't mind the other small pieces hanging randomly on the wall. They are just hanging on screws that were already there, and this is our attempt to keep them off the floor and out of Halle's reach). 

IMG_7521


That's pretty much where it ends. We have all of the pieces from her old gallery wall...

January 26, 2012

I just have to decide where to hang them and how. My first thought is over the dresser, as we are no longer using it as a change table (it's much safer to change this squirmer on the floor these days). 

IMG_7523


However, since it's a larger space, we may need to add to it. Who am I kidding - we WILL need to add to it. So now to find the perfect pieces. 

So there you have it. Halle's nursery... in it's true state (meaning almost everything is still looking for a new home here). I'll be taking a break from blogging tomorrow to prep for a family trip we are taking (hence the diaper bag and suitcase on the floor in the above photo). I'll be back on Friday with my fancy finds and a few details to share about our upcoming trip!
SHARE:

Tuesday, May 8, 2012

Adding Storage

When we transplanted from our tiny Toronto home to our new spacious pad in British Columbia, I never imagined I would be having a hard time trying to store things in Halle's closet. After all, it was significantly larger than her previous one. 


Okay, so storage itself wasn't the main issue - it was hanging all of her tiny little clothes. This girl is a fashionista and she doesn't even know it, and the one rod (installed too closely to the top shelf), was just not cutting it for hanging all of her adorable little outfits...


Halle's Closet

Not only was there not enough room to hang everything, but half of her hangers didn't even fit properly over that single rod, making it hard to slide items to find what I was looking for. From the moment I started unpacking her clothes, I knew that something would have to be done about this situation. 

The top two things that I took into account were 1) it had to be removable and 2) it had to be inexpensive. With those two considerations in mind, it seemed like a no brainer - we'd use a tension rod. Perfect!

May 7, 2012

It adds that extra row of hanging space that we need, and the hangers that don't fit onto the top rod, slide easily along this narrower tension rod. I love that we have a ton of extra space to slowly add to her 12 - 18 and 18 - 24 month clothes as we find stuff we love for a great price (yes, the entire top rod is dominated by 6-9 and 6-12 month clothes... she has SO MANY).

May 7, 2012

Such a simple project, but the type of project we will have to become more familiar with, as we adjust to living the life of renters once again.

What tips and tricks do you have for improving and increasing your storage space for less? We're happy to take any and all of them at this point.

Tomorrow I'll give you a better look at how Halle's nursery is coming along. We're finally starting to get some things hung on the wall, but I still have quite a few decisions to make, and you all know that I value your opinions! 
SHARE:

Wednesday, March 21, 2012

A Sweet Nursery

I am sure that you are all already familiar with our favourite photographer, Nicole from Bittersweet Photography. What you may not know, is that she is currently awaiting the arrival of a sweet little man. I got a look at the nursery when Halle and I went for photos the other week, but when she shared photo's on her blog of the sweet room, I knew I had to share them with all of you...

nursery2

I'm particularly fond of the sweet zigzag blankie and those darling clouds that Nicole made! Girl's talented in more than one way, no? Sometimes it is the simplest things that make me happy, and Connor's nursery is one of those things.

I'm so happy for Nicole and her little family. Connor is one lucky little boy! I can attest to the fact that he will be getting the best Mommy and big brother ever! Congrats Nicole... I can't wait to meet your newest arrival! 
SHARE:

Thursday, January 26, 2012

It's Growing With Her

When I revealed Halle's nursery back in July, her gallery wall looked like this...


Nursery - July 10, 2011

Well, up until last night, it still looked like that. Since switching up the wall was on my 2012 to-do list, and her shadow box was completed, I knew it was time to cross this item off. I stand back and look at it, and think I can still make some tweaks (which I am sure I will), but here is what we have now...

January 26, 2012


So we removed the empty frame since her H is now in her shadow box. Then we added the shadow box and that little tiny embroidery hoop of fabric at the top. You may recognize it from a previous post I did on some fabric I loved. I ordered three sample and when I held that one in my hand, I knew it would look great on her wall.

So, another item sort of crossed off the list. As I mentioned, I am sure I will continue to tweak it a little. I think our owl is up a little high... and something else needs to be added to the top corner with the puppy plaques, unless I just rearrange how those three things are laid out entirely. Something just seems off - what would you tweak?
SHARE:

Wednesday, January 18, 2012

Tiny Memories

Don't you find that when you are at the beginning of something, you always start off with far more focus and determination? Well, I'm definitely feeling that right now as I continue along on my journey to complete as many of the projects on our to-do list as possible. Last week, I shared the first step in making our front entry closet a more organized space, and today I wanted to share the first of the few small updates that I plan to make to Halle's nursery.


A few weeks ago, I picked up this shadow box from HomeSense that was on clearance for $10. 


January 3, 2012


The colour wasn’t what I wanted (I knew that would be easy enough to change), but the size and shape were perfect for what I planned to display in it. 


January 3, 2012


January 3, 2012

First things first, I unscrewed the back to get the  whole thing apart, and then used a little glass cleaner and elbow grease to get that stubborn sticker off the glass. Once everything got a quick wipe down, it was onto the painting portion.


Despite having the same turquoise on her dresser, and another frame on her wall, I decided to use it again for this piece. I figured that in the future her dresser may get painted again or even sold off, and picture frames can always be changed out – but this box I really wanted to represent her time as a baby. So, I pulled out our left over Thai Teal and after about four coats (I made this more difficult on myself by not priming before painting), her pretty little box looked like this...


January 11, 2012

January 11, 2012

Next, it was time to start thinking about filling it. I already knew I wanted her tiny yellow tutu inside, but it was time to shop her nursery for more. First, I decided that her yellow "H", that I had purchased for the empty frame on her wall would go inside. I never got around to putting it in the frame, which I decided I could remove from the wall when we made our tweaks. The final piece, which would always remind us of her tinyness, was her little hand print we had done at six weeks, by Wee Piggies and Paws...


January 11, 2012

With my final memories chosen, it was time to get them in place. The tutu was the easiest. I simply used the pins that came with the box, and pinned the back waistband to the board. This kept it in place without damaging it, and the pins were easily kept out of sight...

January 11, 2012

The next part I wanted to get into place was her letter H. Since I knew that I wouldn't want to move this, I used my glue gun to adhere it to the back of the shadow box...

Shadow Box

Shadow Box

Halle's handprint was a whole other story. I knew that I didn't want to make this permanent, since I may want to switch it out in the future, but also because the back of it looks like this...

Shadow Box

Sweet, right? How could I ever hide that forever? So, in order to attach it, I used a safety pin on the ribbon, and hid it behind Halle's little skirt. The perfect solution, so that I can still remove it to show it off when I want too!

Shadow Box

Lastly, I wanted to add a little something for a decorative touch. So down into my craft room I ventured, and pulled out my jar of buttons. I found four that matched my colours and used my glue gun to add them to the back...

Shadow Box

I ADORE how the whole thing turned out, BUT you will have to come back next week to see the whole thing together... hanging on Halle's fully tweaked art wall! Yeah, I'm wasting no time on that to-do list!

What have you done to preserve memories that are special to you? Have you made any memory boxes, or do you scrapbook? I'd love to hear what you do to hold onto those memories that are special to you!
SHARE:
Related Posts with Thumbnails
© Life on Misneach Ridge
Blogger Designs by pipdig