Trending

Monday, September 1, 2014

Four New Beauties

Welcome September! My favourite month of the entire year - one that brings the feeling of a new start, the beginning of fall (my favourite season as of late) and of course my birthday. And this September 1st, I have one more reason to love this month. Today Farrow & Ball is launching 4 new stunning wallpapers, inspired by Japanese craftsmanship.

Using their own paints and unique production methods, Farrow & Ball have created the perfect papers to bring pattern, colour and texture into your home. When the samples arrived on my doorstep late last week, I was instantly won over by the quality of the paper and the texture of the designs. Though they offer big bold patterns and colours, I found myself more drawn to the subtle tones and finer designs.

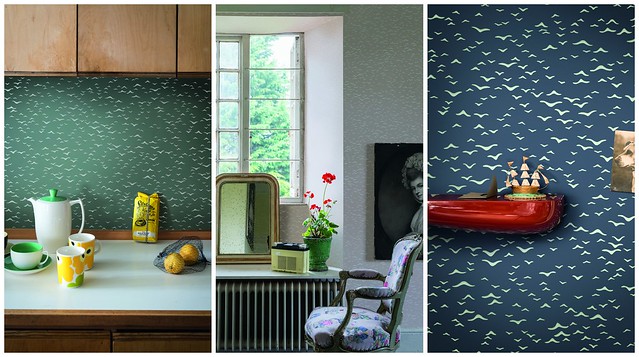
Yukotori (meaning birds flying away in a group) is, without a doubt, the design that I am most drawn to. The pattern is simple and delicate, and could bring a sense of calm into any room, no matter which colourway you choose.


Farrow&Ball-Yukutori1
Farrow&Ball-Yukutori2

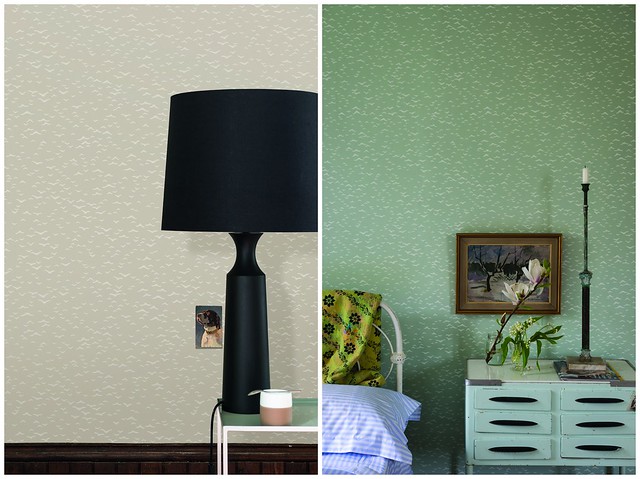
My guest room walls are screaming to be covered in this gorgeousness! 

If the birds aren't really your thing, Amime is the other subtle pattern offered in this collection. This design is taken from a Japanese pen and ink drawing and the name means the space between netting.

Farrow&Ball-Amime

Moving towards the bolder patterns, Aranami will bring the rolling waves into any room you choose. What I adore the most about this paper is how the waves rise up to meet one another brings so much depth to the paper. I'd love to see this in a dining room (mine to be exact) over a chair rail with a solid colour below.

Farrow&Ball-Aranami1

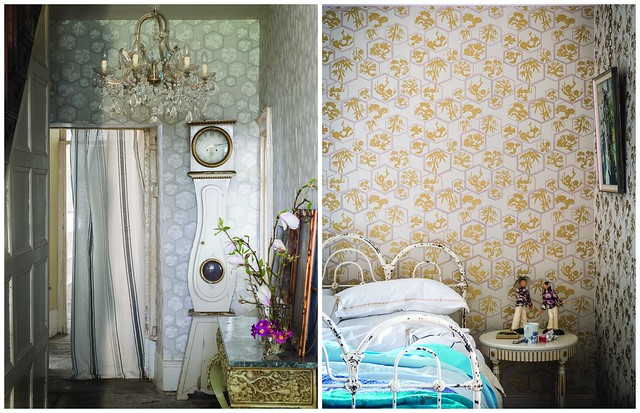
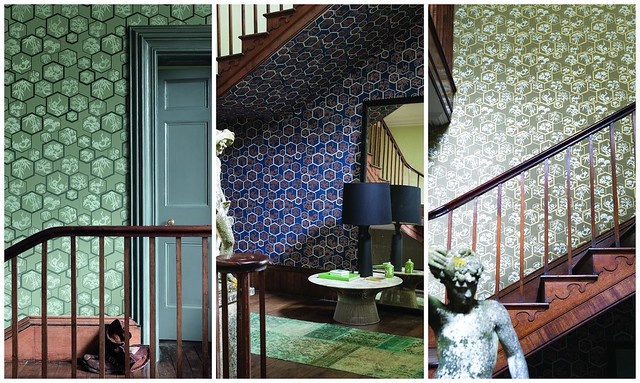
Last, but certainly not least, Shouchikubai is what I believe to be the showstopper (specifically in the metallic gold colour). The paper features flowers, bamboo and trees in hexagonal frames, all of which bring a very obvious Japanese feel to this design, which is taken from a metallic print found in Kyoto.

Farrow&Ball-Shouchikubai2
Farrow&Ball-Shouchikubai1

As much as I found these wallpapers gorgeous when I saw the first photos from Farrow & Ball, nothing can compare to seeing and touching these works of art. The quality and craftsmanship that Farrow & Ball is known for, is present in each of them and I'm certainly itching to wallpaper all over this place!

Which one is your favourite, and where would you love to use it in your home? Don't forget, they are all available for purchase as of today. Visit their website here to find your nearest stockist!

While this post is brought to you by Farrow & Ball all opinions are my own! I would never, ever share something that I didn't absolutely love with my readers!
SHARE:

Tuesday, October 22, 2013

Cobwebs, Witches & Ghosts

We are now 9 days away from Halloween. Though it has never been one of my favourite days of the year, having B and Halle around has really changed how I prepare and celebrate.   For one, B and I started collecting Halloween decorations together after our first October 31st in Toronto. Our collection is growing slowly but we do have fun putting things together for the big day. If you want to take a peek at how we decorated the rental last Halloween, you can read about it here. Today, I want to share how we decorated our house for Halloween this year... 


Halloween Decorations 2013

This little sign (and the orange Halloween lights that border our front door) all came from Home Depot last year, but they are still selling them.

Halloween Decorations 2013

I made these bats in different sizes using this template that I found on Pinterest, and some heavy duty black construction paper that we bought at Jo-Ann. We'd seen some Martha Stewart Craft bats that were $12 - our $1.99 construction paper bats are far more economical! 

The bats are taped inside of the window, and we plan to use our strobe light from Home Depot in this window - I think it will be a fun effect to have with the bats. 

Halloween Decorations 2013

Cotton spiderwebs are kind of our go-to thing around here. B loves them, and they are so inexpensive and easy to put up. We usually reuse ours for more than one year as well.

Halloween Decorations 2013

I adore these ghost lights that we bought at Target last year! So cute, and I hope to buy more this year when Halloween stuff goes on sale, so they can border our entire garden out front!

Halloween Decorations 2013Halloween Decorations 2013

I can't remember for certain where we got this creepy witch from, but I want to say HomeSense. I'd never really looked really closely at it until I was taking these pictures (B bought it last year after Halloween), and this thing REALLY creeps me out. I mean seriously. It's one of those things that when I was a kid I would have been very wary of when I was walking up to a house.

Halloween Decorations 2013Halloween Decorations 2013

We picked up three pumpkins this past weekend at the way-to-busy pumpkin patch. None of us enjoyed it as much as we did last year, but I am looking forward to coming up with a design and carving them! The two smaller pumpkins in our lanterns we bought for Halle at Granville Island the other week. She was so excited when she saw them and I couldn't pass them by - I just knew they would be perfect in those lanterns by the door! 

Halloween Decorations 2013

Our skull candle holder - our very first Halloween decoration that we purchased together at HomeSense. We've had the same red candle in it since then and we may just keep it that way! It's really quite fun, and the sidelight is the perfect spot to place it. A black sparkly ghost hangs overhead, but it won't be visible until Halloween night. We plan to hang a white sheet behind behind them in the window so they stand out a little better.

So there you have it - a look at our 2013 Halloween decorations. Do you decorate for Halloween? Have you started? What are some of your favourite ideas for Halloween decorating?
SHARE:

Tuesday, October 15, 2013

Fall Florals

Happy Tuesday friends! It definitely feels like a Monday, so how nice to have a short week ahead of us. I hope everyone had a great Thanksgiving weekend and celebrated with the people that you love the most. We were surrounded by some guests from south of the border and we did everything that we could to have the house be a welcoming place for them. Part of that included creating the perfect fall floral arrangement for our Thanksgiving weekend. 


Fall Flower Arrangement

Mid week last week a package arrived from the people at Pottery Barn, containing the beautiful Evleen Vase

Pottery Barn Evleen VasePottery Barn Evleen Vase

Pottery Barn Evleen Vase

It's the smallest vase in this style, and it is just the perfect size for a centrepiece on a table,  or to sit on top of a mantel. I'm in love the mercury glass base, and I know that it will work perfectly for every season and holiday. 

Along with the vase, I was provided with a $25 gift certificate to head over to our local florist, Magnolia's on Main. I was so excited not only to be getting some pretty flowers, but also to be shopping local and supporting a small business! The shop itself runs on 80% locally grown flowers, so that was exciting to learn as well. So, last Friday I dropped by to look around and pick out the perfect flowers for a lovely autumn inspired arrangement. 

Flowers from Magnolias on Main

Flowers from Magnolias on Main

Flowers from Magnolias on Main

I knew when I showed up that I wanted to move away from the traditional fall colours - so there would be no yellow, orange and red bouquet coming home with me. After browsing around a little, I settled on dark purples and sunny yellows.


Purple and Yellow Fall Flowers

When I arrived home, it was about more than just plopping those pretty blooms into my new vase. It was time to start arranging them to look lovely. I started by creating a grid at the top of my vase to help with arranging. It was just a matter of cutting up some tape and sticking it to the top of the vase. 

tape grid on vase for floral arranging

Next, I took a moment to separate all of the beautiful blooms so I could evaluate exactly what I had to work with. Then each stem had to be trimmed down so that they would sit properly in our shorter vase. This step also included removing a few lower leaves so that they would fit nicely into the vase. 

Fall Flowers

Fall Flowers

Trimming Flower Stems

Finally, I was able to have fun putting all the flowers into the vase. I spent a lot of time placing them and arranging and rearranging. I started with the flowers, then used some of the pretty grasses and finished it all off by filling in empty spaces and supporting some of the blooms with greenery. By working in this order, I was able to space the flowers out and make sure that the arrangement was nice and full all the way around.

Flower Arranging

Making a Flower Arrangement

The final product was so perfect - each flower was gorgeous and I'm so glad I opted for a little bit of rich purple with those sunny yellow flowers. Of course, the decorative grasses really helped to make the whole arrangement feel a bit more festive for the Thanksgiving holiday.

Fall Flower Arrangement

Fall Flower ArrangementFall Flower Arrangement

Fall Flower Arrangement

I also used the pretty gold ribbon that was wrapped around the flowers, and tied it around my pretty new Evleen vase. I think it was a nice touch to finish off the whole thing.

Fall Flower Arrangement

Fall Flower ArrangementFall Flower Arrangement

Fall Flower ArrangementFall Flower Arrangement

This was such a fun post to work on, especially as a reminder that fresh flowers are not just for the Spring and Summer. The fall is actually the perfect time to bring some beautiful flowers into the house to brighten things up as everything starts to go to sleep for the cooler months. I also loved piecing together an arrangement for this season that was a little outside the norm - avoiding the traditional orange, red and yellow combination. 

Are you bringing any pretty flowers into your house for the fall season? 
SHARE:

Monday, July 29, 2013

Feeling Ruffled

My office is coming along nicely, but not quite ready to share. You may have to wait until after the wedding! For now, I want to share how I addressed the lighting in my space. From the moment we first saw this house, I knew the light fixture in here would have to go - it's just not our style and it's even more obvious now as we've been pulling my whole design together. 


Old Light Fixture in Office

I may have mentioned this once or twice, but we're on a tight budget when it comes to decorating. I'm attempting to pretty up the space using things we already have. Thankfully, I had a paper lantern laying around that I had bought back in September for $2... on the downside, the delicate paper had ripped, leaving a pretty large hole in the side of the lantern. 


Light Fixture

To find some inspiration, I began searching around on Pinterest for some fancied up paper lanterns. There is SO MUCH out there (of course), but in the end it was these (from Martha Stewart of course) that had me feeling the most excited...


via Martha Stewart

I really loved the scalloped, girly feel to them and knew it would be pretty easy and inexpensive for me to pull off. The whole project got a whole lot easier when I stumbled across some tissue paper at HomeSense that had scalloped edges, and only $3.99 a pack. I went back and forth a lot on whether I wanted to do coral, gold or white, but in the end white won out (as it usually does with me). I did grab a few extra packs of the tissue paper though for gift giving - it's just so pretty!

DIY Light

While the project was easy it a little time consuming. I cut the scalloped edges off of the tissue paper in strips, and with most of the sheets I was actually only able to use two sides of the sheets because of some "defects" in the paper. 

DIY Tissue Paper Lantern

Then it was just a matter of taking my craft glue and running it along the wire frame of the lantern. I learned quickly that I had to apply the tissue paper in one full rotation of the lantern and let it dry before applying more. If you don't, your tissue paper will start to stick where it overlaps and it will just look all wonky and messy. So yes, a lot of this project was spent waiting for the glue to dry, but man, was it worth it!

I started applying the paper from the bottom so that it would all overlap properly and hide the glued sections. At first I looked at my silly lantern with glued on tissue paper and thought "This is going to be a disaster", but soldiered on. About halfway through it was looking better... but similar to an artichoke. 

The middle was by far the easiest part to do as the wire frame went around in a pretty straight line. The scalloped paper went on really nicely and I was feeling super confident about the project... until I started to apply the paper closer to the top.

Much like the bottom half, the top of the lantern had the wire getting closer and closer together. I guess because of the angles it was just harder to lay the tissue paper flat, and I ended up having to fold small sections to follow the wire properly. My first few attempts were just messy and looked awful, but by the time I was finishing the last few visible pieces, I had figured out a pretty good system.

DIY Tissue Paper Light

It took a lot longer than I had anticipated, but when I was finally finished (late last week) I was thrilled with the final outcome...

DIY Tissue Paper Light

Yesterday was all about finally getting it hung. We already had a wire and chain from the chandelier we removed from the dining room, so we just had to go out and buy the right socket for our lightbulb. We made a trip to Canadian Tire and came home with this dimmer socket, since the light in my office is on a dimmer switch.

Dimmer Socket for DIY Tissue Paper Light

B spent Halle's nap time working away removing the old light fixture, wiring our new socket, shortening the wire and chain from the old chandelier and finally hanging my lovely new light. 

Preparing to Hang a Tissue Paper Light

 It now hangs beautifully in my office, brining me one step closer to finishing it off. It feels more and more like "me" everyday, and now you can get your first real glimpse at the space...

DIY Tissue Paper Light in Office

DIY Tissue Paper Light in Office

I'm so happy with it. It brings a more feminine feel to the room. I'm also pretty thrilled to finally have it crossed off of my to-do list. 

Did you cross any projects off your list this weekend? Maybe you made something new out of something you had already laying around the house?
SHARE:

Thursday, July 11, 2013

Laundry Room Dreaming

We are in NO position to be starting a Laundry Room renovation, but let me tell you right now - I've been dreaming of it. I've mentally started decorating this space that we inherited as a blank slate...


IMG_1395

Since the day we got our keys, the only thing we've done is acquired ourselves an LG Washer & Dryer pair... and of course filled the room with all kinds of stuff. It's not a pretty space, and it doesn't have any storage but for the moment it is functional (as in we have clean clothes and linens). In the future, I want a really pretty space that makes doing laundry easier and (dare I say it) more enjoyable. So, why not start dreaming up my plans now? It will make the whole process a lot easier when the time is finally right.

PicMonkey Collage


1} Olinda 1 Light Bronze Pendant - The ceilings in this space are a pretty decent height, making it an ideal space to go from flush mount to pendant. I wouldn't hang it too low, and I like that this pendant visually would not take up a lot of space. 

2} Wall Mounted Drying Rack - The room itself is rather small. At the moment I find it hard to be in there with the washer and dryer, a laundry basket (or two), a fold up drying rack, an ironing board, a hamper AND usually a small child trying to help. Seriously - that's A LOT of stuff. It would be nice to clear up some of the floor clutter by adding a wall mounted drying rack to the room. I'm positive we could DIY something similar to the one pictured!

3} White Floor Tile - The vinyl flooring has GOT to go and I always have been, and always will be a sucker for a clean, white tile floor. Yes, I could go with a simple square floor tile but I think this white on white mosaic would be perfect in a laundry room. You still get the pattern but it's not as in your face without the contrast.

4} Overhead Cabinets & a Folding Counter - We need some storage in there - BADLY! An easily solution would be to add some wall mounted cabinets framing the window. I'm thinking two doors to the the left of the window, an open shelf above and some open cubbies to the right. A folding counter over the washer and dryer is a must, plus it adds extra counter space to keep the always necessary items close by like detergent and fabric softener. 

5} Benjamin Moore Paint - Colour scheme? I'm really digging the navy and white. Our washer and dryer are a dark grey, so I think painting the walls white (Benjamin Moore's "Frostline"), with the overhead cabinets in Navy (Benjamin Moore's "New York State of Mind") would be perfection. As for the counter top - white or a light grey. I'm still undecided... so I guess it's a good thing we're not in a position to start redecorating, huh?

What room is on your renovate or redecorate wish list? Are you day dreaming and creating mood boards for a space you are dying to tackle? 
SHARE:
Related Posts with Thumbnails
© Life on Misneach Ridge
Blogger Designs by pipdig