Last night I got a little "bored"... so I pulled out the other sample can of paint that we decided not to use for our living room. I got it on the wall of another room that I've anxiously been waiting to get my hands on, and was so excited to see it was the perfect colour. Now that the room is completely painted, I have a few more things I want to do before I can reveal it, but I'm so excited. Especially because this is the first room in the house that only I will have a hand in. I almost have blisters on my hands after painting all afternoon... and there is a ton more to do, but in the end it will be MY room! I can't wait to share it with all of you!
All I can say is that it is going to consist of a lot of paint... B even bought me a paint sprayer today which will make my life a little A LOT easier. I'd include a picture here, but my hands are far too sore to even think about pulling out the camera. That being said, I'll leave you hanging a little longer - hopefully I'll have an update post before the week is over (God, I'm ambitious!)
Hope you all enjoyed your weekend :)
Sunday, January 31, 2010
Thursday, January 28, 2010
Five Second Kitchen Refresh!
The other night as B was putting some finishing touches on our newly painted living room, I was in the kitchen cleaning up when my eyes once again fell on these sad ugly details on our kitchen backsplash.

The kitchen is seriously outdated, and part of me feels like these stupid accents are a huge part of that. So, as I was cleaning the other day, for the first time in the 6 months we've lived here, I realized there were NO grout lines around these snazzy little works of art. That was when I realized this could only mean one thing - they are not TILES... they must be something stuck on top of the tile. On closer inspection, I was pleased to discover they were stickers! What made me even more excited - they were super easy to peel off!!

Okay, I'll be honest... I look at this picture and I'm beyond embarrassed that I didn't realize they were stickers... LOOK AT THEM - they don't even line up! Especially that one on the left! I guess they were so ugly that most of the time I just tried to pretend that they weren't there.
Anyway - since I was so excited that I could finally rid my kitchen of them forever, I went to town...

EW! Look at that vent... actually, on second thought - DON'T! It's gross and I can't wait until we redo the kitchen.... which of course won't be for another few years...
After they were off, a little wipe down and "voila!" - no more ugly stickers.

I must admit - the kitchen still has a long way to go, but I can't even begin to express how happy I am that these little babies are finally gone. I only wish I had realized sooner that they were stickers... I would've removed them the day we moved in!
Wednesday, January 27, 2010
Mini Living Room Makeover
So, for those of you who read last week, you might remember that I posted a little entry of out 2010 home to-do list. Well, in the spirit of crossing off as much as possible B and I got busy two nights ago, on lucky number 13 from our overly ambitious list.
Okay - to be honest, the whole process began Saturday. After spending a really lazy morning (read: until about 3:30pm) laying around on the couch, we peeled ourselves away from the TV and pulled out the two sample cans of grey paint we had picked up from Lowes during our previous weekend shopping expedition. We put a small amount of each paint on each wall in the room, so that we could see them in different light. After seeing the two colours up, it was no contest, and Valspar's "Rocky Bluffs" won as our choice colour.
After living with our splotchy walls for a couple of days - B came home Monday night with a full can of paint and we got to work covering those sterile, and not so homey, white walls. Of course, no reveal would be complete without a little before action...
This first picture is of our living room the day we got the keys. B and the dog are inspecting things.


Probably some of the better befores you'll get of the room, from when we actually had furniture in it (I took these obviously before Christmas). And now - our lovely new living room.


Yes - the wreath is still up. For now it fills a blank space that seriously needs something... and personally I like it for the winter months, as it looks icy and wintry, and adds a little sparkle.
Of course, this is not the final product. We have a lot of big plans for this room - a full makeover to be exact. But for now, this will do and I think the colour really warms it up and makes it feel more like home. What do you think?
Friday, January 22, 2010
Fancy Friday Love...
Another Friday... another day to share some of my favorite finds over the course of the past week...


We spent last weekend doing some shopping for our continuous basement renos - mainly the basement bathroom. After finding our vanity, we began the search for the perfect faucet. I came across this gorgeous faucet from Restoration Hardware (Chrome Lugarno 8" Bathroom Faucet). It's perfect.... minus the $429 price tag. I don't think we need a faucet that costs slightly less than our sink and vanity.


I discovered the Etsy shop of crankbunny quite a while ago - but only discovered this specific card this past week! All of the cards in the shop are gorgeous, a little bit more than average pricewise ($8.00 + shipping) - but they are all handmade pop-up cards. In my mind it's justified! This card in particular caught my attention as I am in the midst of planning a baby shower for one of my dearest friends. I think I might just have to get one of these to go along with her baby shower gift.
Not a ton of love this week - it's been a crazy one! But I'll be back again next Friday, with more of my lovely finds. Hope you all enjoy the weekend!
Thursday, January 21, 2010
Project Floor Plans
I should start off by saying, B is the most wonderful and patient man I have ever met. The things that he is willing to do for me, blow my mind sometimes - especially when it comes to our home renos. I'm so particular about everything and he really listens and discusses with me, which I completely appreciate. So, as we finish up our shopping for our renos (so we can include them as part of the HRTC), we need to really think about floor plans and measurements.
Well, I guess that today B wasn't doing much at work and wanted to be productive on our home projects. This resulted in me receiving an email that contained the following three floor plans, a la Microsoft Paint.


The last one was a wonderful floor plan (with door options and landscaping!) of our brand new front entrance that we plan to build come spring! Probably one of the projects I look forward to the most. Not only will it keep the house warmer in the cold months, I know it will drastically improve our curb appeal!
None of these are by any means the final floor plan of any of our upcoming projects. But I thought they would be fun to share, and give my readers some context regarding the layout of the basement (our current undertaking). I already know what I would change to these floor plans - but those will be part of later discussions.
So what do you think of B's paint floor plan skills?
2010 Home To-Do List
As we've recently taken a break from working on the basement, so as not to burn ourselves and our bank account out, I haven't had much inspiration for posts. Until yesterday morning! I read a post from the wonderful Mrs. Limestone over at Adventures in Renovating a Brooklyn Limestone and was immediately inspired to write this post. I know that January is nearing it's end, but I thought it would be useful to put together a little list of things I would like to accomplish around our home in 2010! So here goes;
1) Finish Basement Laundry Room/Craft area
- Install baseboard
- Build storage/cabinetry in laundry area
- Install laundry room countertop & sink
- Complete DIY door project
- Figure out window treatment
- Build work area/storage for me
2) Refinish an old chair for my Work Space
3) Make an inspiration Board for Work Space
4) Start AND Finish Basement Bathroom
5) Start AND Finish Basement Living area
6) Refinish Living Room Coffee & Side Table
7) Finish Nightstand for Master Bedroom
8) Frost Glass on Top Floor Bathroom Door
9) Hang curtain and frost glass on Master Bedroom Door
10) Make Roman Shade for Top Floor Bathroom
11) Build new Front Entrance
12) Make small fixes to back deck
13) Paint Living Room
14) Paint Garage Doors
15) Install new railing from top floor down to basement
Just looking at this list makes me want to get started RIGHT NOW! I know some projects are more specific than others, but these are really the things I want to do. Things will grow and change, and I'll probably revisit this little list in six months to see where we are (and prepare for our "See How Far We've Come" party that we plan to throw exactly one year from the day we got our keys!)
I know the list is pretty long, but this will be our first full year in our house, and B and I are pretty ambitious. With that being said, I think I might have to follow this up with an entry showcasing what we completed during 2009. Could be interesting considering we only lived in the house for about 4.5 months!
Saturday, January 16, 2010
Making Room
When we moved in, the staircase from the main floor to our second half floor looked like this...


(Yes, this is the best before picture I have....) Anyway, when I came home from work yesterday, it looked a little more like this...

No more wall closing in the staircase! This is what B spent his afternoon working on yesterday. We've had plans to do this since we moved in, along with putting hardwood and a new railing that will run from the top floor all the way down to the basement. We just had to do this a little sooner than we originally anticipated so that we can get the new washer and dryer into the basement.
I know it looks a little unsafe, but B was explaining to me that there is a piece of wood running the length of the stairs that is tied in at the bottom of the stairs and also at the top, which is tied in up to our second floor. There is also a piece at the back of the top step that is tied into the side wall. So for now they are safe, but I would definitely like to put some sort of post up once we start renovating the whole room. We have lots of plans for this little room to make it look bigger... but I'll have to share those another day!
Friday, January 15, 2010
Fancy Friday Love...
This week there were quite a few items that caught my eye and made my heart swoon. Most not home related (a girl needs a break sometimes, right?). So, I thought I would share with you the items that won me over this week! :)
 One thing you will most certainly learn about me, if you read my blog, is that I am a Kate Spade-aholic! I L-O-V-E everything from Kate. When this bag (the Wellie Magee Bag) popped into my inbox yesterday (via: I Resolve to Sing in the Rain), I fell in love immediately. Seriously - it's an adorable rubber tote that would keep all of my things nice & dry on those rainy days (as well as keep my beautiful leather Kate's safe and dry at home). Not to mention the colours brightened my otherwise dreary January morning... and hey $195 for a kate purse!? Can't complain about that price!

Of course, the Wellie Magee was not my only Kate Spade item I've been lusting after this week! Via the same email - this gorgeous red trench (King Street Twill Bow Trench Coat) was brought to my attention. The colour = incredible! The shape and the bow on the back - everything I always wanted! The price tag - $645.... totally not in my current budget. But a girl can dream....


Of course, the Wellie Magee was not my only Kate Spade item I've been lusting after this week! Via the same email - this gorgeous red trench (King Street Twill Bow Trench Coat) was brought to my attention. The colour = incredible! The shape and the bow on the back - everything I always wanted! The price tag - $645.... totally not in my current budget. But a girl can dream....

Recently I've been looking for some nice black boots that I can wear with jeans. So the other day while checking out Aldo's website, I found these baby's (BABINSKI Boot). I don't know what it was, but it was love at first sight (Actually, I'm pretty sure it's the cuff over the boot....). Anyway - with a regular price of $160 - marked down to $109 on their website, I thought it was a pretty good deal. Later that same day, I headed to their store down the street and they had these exact boots marked at $79! DEAL. Did I buy them? Sadly, No. With all the money we are currently hemorrhaging, snagging house stuff before the deadline arrives for the HRTC, I have $0 in my "new boot budget". C'est la vie!

Finally - the one thing I may allow myself to spend money on. Tilano has this great line of coloured chalk board paint (10 colours!). This morning Marie Cole (@decondemand), tweeted about Hudson Paint's line of colourful chalkboard paint. After checking it out I did a bit more investigating and found Tilano's line. Turns out that the founder of Tilano Fresco products, Randy Orr, is Canadian born - from Ottawa to be exact! I was even happier to discover that, according to the Tilano website, two stores in Toronto carry these beautiful chalkboard paints!:
- Angelbean - located at 4168 Finch Ave East
- Kids At Home - located at 2086 Queen Street East
Looks like we may be adding one of these two stores to our Saturday shopping outting.
I think I might start sharing my favorite weekly finds every Friday... if nothing else, it makes me happy :)
Tuesday, January 12, 2010
A Little "Me" Space
I've been talking a lot recently about our basement laundry room reno. One thing I haven't talked about is that this room will be much more than a laundry room (as many of you may have guessed based on the size of the room). Earlier this morning I tweeted about a new idea I have. It's something I've been thinking over for a while, and I'm now ready to move forward with it! This room will be integral to this idea/project. What is it you ask? Well - that I can't share right now, but I can at least let you in on what the other half of this room will provide me.
Our laundry room plan didn't start off with such a large space, but the more B and I talked about it... the bigger it seemed to grow. We ended up taking away some space from the width of the old bathroom (but added some on in length) to make a larger space for the laundry room. Why? Well - the main section you've been watching the progress on, will actually be a small office/craft space for moi! A place where I can let my creativity abound!
Because it's so small (especially height-wise), I've been looking for small office space inspiration photos that will help me come up with some excellent storage solutions.


This one, also from Canadian House & Home, I was drawn to because it's such a small space that is so neat and so organized. I think that all three of these combined could turn my new little basement room into the perfect laundry/office/craft space!
However, still lots of work ahead before we start building and adding furniture - but I think my vision of what I want is finally starting to come together. I'll probably be a little lighter on the basement updates over the next little while as we pull together finishing touches - but I can't wait to share the final reveal (whenever we get there!)
Our laundry room plan didn't start off with such a large space, but the more B and I talked about it... the bigger it seemed to grow. We ended up taking away some space from the width of the old bathroom (but added some on in length) to make a larger space for the laundry room. Why? Well - the main section you've been watching the progress on, will actually be a small office/craft space for moi! A place where I can let my creativity abound!
Because it's so small (especially height-wise), I've been looking for small office space inspiration photos that will help me come up with some excellent storage solutions.

I seriously love the above room found in the Basement Gallery on the Canadian House & Home website. Especially when I found the storage portion of it...

Look at all that storage space!! Exactly what I need! What's even better is that this room looks about the same size as ours - I mean, the ceilings may even be a bit lower in the pictured room! Which means - this could totally work in our little basement! JOY!

I'm sure most of you have stumbled across this beauty from homelife.com.au. What's most appealing here to me is the organizational pieces used around the desk. For what I have in mind, I'll have to have a lot of organization going on. Specific pieces from here I plan on using? Magazine holders and an idea board - both of which are mini projects I am sure I will feature on this blog at some point!

This one, also from Canadian House & Home, I was drawn to because it's such a small space that is so neat and so organized. I think that all three of these combined could turn my new little basement room into the perfect laundry/office/craft space!
However, still lots of work ahead before we start building and adding furniture - but I think my vision of what I want is finally starting to come together. I'll probably be a little lighter on the basement updates over the next little while as we pull together finishing touches - but I can't wait to share the final reveal (whenever we get there!)
Monday, January 11, 2010
Gettin' Down and Dirty
So it's been about 2 weeks since our basement went from this:

To this:

... In one night. So it's time that I bring you up to speed on where we are now, as I feel we've come a long way for two weeks of labour.
B had Thursday off while the guys came to install our new tankless water heater. After the guys left, B got to work getting the tape and the first coat of mud onto the drywall. We let that set and on Friday, B got another coat of mud onto the wall and then got to work, redirecting all of our plumbing, to the whole house (we moved the location of the water heater from the front of the house to closer to the back. So B had to rework the plumbing so that the hot water had a shorter distance to travel to ALL faucets/shower heads in the house).
Sunday we were up bright and early, sanding the walls (dust masks required FOR SURE!) and cleaning up the room in preparation for laying tile.

My Dad headed over to help us out with laying the tile, as it was our first tiling job, and I was certain I wanted our square tiles laid in a diamond pattern to give it that something extra. (B didn't want to attempt this pattern on our first job... I don't blame him). We're both really happy we went with the diamond pattern though. One of those little things that will make a big difference in the look of the room.

So for the day I was in charge of the tile saw (to cold to work outside, so we set it up in what will later become our new and improved basement bathroom), while B and my Dad worked quickly to lay the tile and then we'd work together to clean up the thinset from the spaces between the tiles and double check the lines. It took most of the day, with a break only to stop for dinner. By the end of the day our laundry room looked something more like this....

Not too shabby, huh? Tonight was all about getting the grout in between the tiles. I mixed it up and B got it on there as quickly and efficiently as possible. We used a light grey, quick set grout that I think is going to be perfect for our light grey tiles!

Now we just have to let it sit so we can get that white "haze" off top. Tomorrow... we paint! I can hardly wait!
Saturday, January 9, 2010
An "AirFare" to Remember
I don't know if anyone has heard of it, or seen it - but Homemakers.com is hosting a contest called "I Knew It was Love When...". They are calling for entries on when you knew you were in love with your significant other. The winning couple wins a romantic trip for two to the Grand Cayman Island for 7 days and 6 nights. How sweet is that? So, I entered our story! :)

This is where I ask for you help! Right now they are accepting entries and ask people to get as many views and comments as possible (I believe they are also monitoring where your views are coming from - so how many places online you are sharing your story!). All entries need to be received by February 14th and from there 10 finalists will be chosen based on popularity. The final winner will be chosen based on the most votes received out of those 10 finalists. Right now I'm just asking for your help to get the word out about our story! Comments would be great, but even if you can visit whenever you remember, and share our link with friends and family - we'd really appreciate it.
I know most of my readers know what it's like to be on a tight budget when working on home renos. Of course with everything we have planned for this year, there will be no money for a nice long getaway this year - so winning this contest would be great!
Thursday, January 7, 2010
Radiator Love

Radiators... I love 'em! I know it may sound crazy - but I do love the look of them. After admitting this to B last month at a friends Christmas party (where I spotted an original in their Toronto home) he looked at me like I was mad. After telling me how inefficient they are, I admitted I didn't want one that was used to heat my home - I just love how they add character to homes that would've once been heated by them.
Well - let me tell you how excited I was when I opened the February 2010 copy of Canadian House & Home Magazine last night and discovered a small piece on ECORAD. Let me give you a low-down on ECORAD and what they do (incase you missed it in the magazine). The gist of it: ECORAD takes old discarded cast iron radiators, saves them from ending up in the dump and converts them to electrified raditor systems! YUP! They'll even take one you own and convert it for you (which is only slightly cheaper than purchasing one). I literally jumped off of the couch (despite my sore foot) and hobbled as fast as I could to the basement to show B.
Now, why, you may ask, do I care about electric heating? Well, this past summer/fall, as B and I began our hunt for a new furnace and air conditioner, it had been suggested that we try a heat pump. There were 3 main reasons:
1) Because of the size of our house, two small units (one on the main floor and one on our teeny tiny top half), would be able to heat and cool it
2) Yup - you read that right - the unit will save us money as we'll be buying a heating AND cooling system in 1!
3) We'd be able to lose the huge furnace AND all the duct work, and reclaim a lot of space (and some headroom) in our basement
Though I wasn't completely sold on installing electric heating in our home (scary thoughts of house fires started by electric heat!!), B was pretty insistent. The biggest downside - he was talking about installing baseboard heating in the basement to keep it warm and stop the pipes from freezing. Now, I know that they make stuff that looks like actual baseboard now - totally great option - but for some reason I couldn't get THIS kind of image out of my head:

So, this leads us back, full circle, to my excitement when I discovered the small write up on ECORAD last night! It meant that there is a fighting chance that I could get a traditional cast iron radiator as electric heating in our 1920's home (depending on cost, of course). The best part is, the systems are completely environmentally responsible since 99% of their materials used are recycled! Oh yeah - and I almost forgot to mention... they're Canadian!
Yes, I could probably sit here and write all day on the wonderful company that is ECORAD - but I'll leave it at that. If this little piece struck a cord with you - jump on over to their website and check them out!
Anyone have an old radiator they are looking to get rid of? :) I'll get her refurb'd and give 'er a good home... promise!
Wednesday, January 6, 2010
Let There Be Walls!
Yes my friends - B managed to finish drywalling the laundry room tonight (okay... the exception is still that extra tiny wall, but theres a reason for that), while I was out of commission with a sore foot (don't ask).

This is obviously the opposite side of the room than what I've been sharing in previous posts. This is the side that the washer, dryer and sink will be on. No taping or mudding has started yet, because once the drywalling was done, B had to clean up the other half of the basement which became a storage area for a huge amount of miscellaneous items (as well as old basement bathroom fixtures). Now you may be asking, "Why do you have to clean the basement mid reno?". Good question! Well, to demo another wall of course!

Yes - another wall was (partially) demolished tonight to allow more room to the wonderful people who will come tomorrow to remove our old water heater and bring us a wonderful new tankless variety. Endless hot water - pure bliss, no?
Tuesday, January 5, 2010
Basement Update - Part II
As I stated at the end of my previous basement update - I won't bore you with all of the daily goings on around here. I'll just say there has been a lot of dust flying in the basement and give you a quick rundown of some of the major highlights of our reno.
After getting all of the walls out from around the bathroom, and all but two from the guest bedroom, B and I realized that there was NO vapor barrier behind the two exterior walls we planned on leaving up. This discovery, of course, led to even MORE demolition, which in the end we agreed was worth it. Thankfully, we didn't have to reframe one of the walls (or so it seemed...) - leaving us only two major walls we had to frame, along with two smaller walls on either side of the new door frame. Framing began on the evening of the 30th, but due to what felt like a stress fracture in my right foot, we had to call it an early night. (Not to mention B was exhausted after working on the basement all week).

Bright and early on New Years Eve, B and I headed out to pick up all of our dry walling needs, and made a few additional stops to continue looking for basement bathroom inspiration. After being gone far longer than we had anticipated, we returned home ready to once again get back down to business.
We had high hopes of ringing in 2010 in a laundry room with at least some drywall on the ceiling - however, this would not be. After a lot of measuring, hammering, drilling into concrete and all kinds of other fun stuff, to get the frames up, I was ready to stop at 10:30. By 11:30 both B and I were showered and ready to ring in the New Year/Decade with a bottle of champagne and a box of chocolates. Not the most exciting New Year - but we were both happy to be spending our first New Years in our first home, working on a project that we were both excited about.

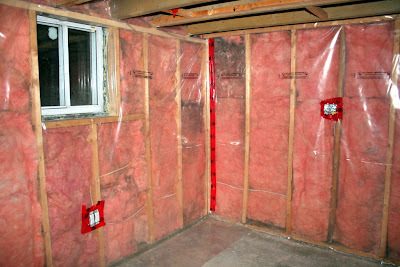
The following day, while I started cleaning (note: basement reno = everything in our house completely displaced) in preparation for our dinner/over night guests on Saturday, B was doing all the electrical work for my laundry room before crawling in and out from under the deck as he created a new hole for our brand new dryer vent. This was by far his least favorite part of the project so far. The next step was to get insulation up for the exterior walls and get the vapor barrier up. Between the two of us, this part was pretty easy.
Later that evening, we unloaded all of the drywall that had been in the truck bed since the previous day. With everything finally inside, we got to work measuring and cutting drywall for the laundry room ceiling. Only two pieces went up the first night, but that, along with actually being able to maneuver all of drywall into the basement, was accomplishment enough for one day.
After taking a break on Saturday to entertain our guests, work resumed Sunday when my parents came over and my Dad helped out in the basement. Together, they were able to finish off the drywall for the ceiling, as well as install our new recessed lighting.
Last night's progress wasn't any more exciting. After spending more time than we planned wandering around IKEA, we returned home and were able to successfully drywall ONE of the laundry/utility room walls. The ONE wall that we didn't reframe because it looked like the person who had done work prior had done a decent job on it. WRONG! Not all of the studs were the same depth (if thats even the right terminology), so when trying to drill into a section of the drywall I was greeted by a not so pleasant ripping sound as the drywall pulled away from the screw. To say it was frustrating would be an understatement. Thankfully we were able to resolve this problem by spacing out the screws on that one stud enough to avoid the worst of it. That combined with the unevenness of the structure of our 90 year old home, meant drywalling was shortlived.

Tonight - we got the biggest drywall project done by completing the back wall. Lots of measuring and cutting was done to make the pieces fit around the outlet, window and our new dryer vent (not pictured). I am now a master of the drywall saw - no lie. It makes me happy to see this progress...

Though progress will be more slow going this week, with both of us back to work, I hope that we'll be ready to tile by the end of the week at the latest. I'm just looking forward to having a nice clean space that I can do laundry in again. Climbing over sheets of drywall and other construction equipment to wash my clothes is getting old... very quickly!
After getting all of the walls out from around the bathroom, and all but two from the guest bedroom, B and I realized that there was NO vapor barrier behind the two exterior walls we planned on leaving up. This discovery, of course, led to even MORE demolition, which in the end we agreed was worth it. Thankfully, we didn't have to reframe one of the walls (or so it seemed...) - leaving us only two major walls we had to frame, along with two smaller walls on either side of the new door frame. Framing began on the evening of the 30th, but due to what felt like a stress fracture in my right foot, we had to call it an early night. (Not to mention B was exhausted after working on the basement all week).

Bright and early on New Years Eve, B and I headed out to pick up all of our dry walling needs, and made a few additional stops to continue looking for basement bathroom inspiration. After being gone far longer than we had anticipated, we returned home ready to once again get back down to business.
We had high hopes of ringing in 2010 in a laundry room with at least some drywall on the ceiling - however, this would not be. After a lot of measuring, hammering, drilling into concrete and all kinds of other fun stuff, to get the frames up, I was ready to stop at 10:30. By 11:30 both B and I were showered and ready to ring in the New Year/Decade with a bottle of champagne and a box of chocolates. Not the most exciting New Year - but we were both happy to be spending our first New Years in our first home, working on a project that we were both excited about.

The following day, while I started cleaning (note: basement reno = everything in our house completely displaced) in preparation for our dinner/over night guests on Saturday, B was doing all the electrical work for my laundry room before crawling in and out from under the deck as he created a new hole for our brand new dryer vent. This was by far his least favorite part of the project so far. The next step was to get insulation up for the exterior walls and get the vapor barrier up. Between the two of us, this part was pretty easy.

Later that evening, we unloaded all of the drywall that had been in the truck bed since the previous day. With everything finally inside, we got to work measuring and cutting drywall for the laundry room ceiling. Only two pieces went up the first night, but that, along with actually being able to maneuver all of drywall into the basement, was accomplishment enough for one day.
After taking a break on Saturday to entertain our guests, work resumed Sunday when my parents came over and my Dad helped out in the basement. Together, they were able to finish off the drywall for the ceiling, as well as install our new recessed lighting.
Last night's progress wasn't any more exciting. After spending more time than we planned wandering around IKEA, we returned home and were able to successfully drywall ONE of the laundry/utility room walls. The ONE wall that we didn't reframe because it looked like the person who had done work prior had done a decent job on it. WRONG! Not all of the studs were the same depth (if thats even the right terminology), so when trying to drill into a section of the drywall I was greeted by a not so pleasant ripping sound as the drywall pulled away from the screw. To say it was frustrating would be an understatement. Thankfully we were able to resolve this problem by spacing out the screws on that one stud enough to avoid the worst of it. That combined with the unevenness of the structure of our 90 year old home, meant drywalling was shortlived.

Tonight - we got the biggest drywall project done by completing the back wall. Lots of measuring and cutting was done to make the pieces fit around the outlet, window and our new dryer vent (not pictured). I am now a master of the drywall saw - no lie. It makes me happy to see this progress...

Though progress will be more slow going this week, with both of us back to work, I hope that we'll be ready to tile by the end of the week at the latest. I'm just looking forward to having a nice clean space that I can do laundry in again. Climbing over sheets of drywall and other construction equipment to wash my clothes is getting old... very quickly!
Monday, January 4, 2010
On The Hunt...
See this beautiful sink? Used by none other than the fabulous Sarah Richardson for Sarah's House...

I want it... or at least something like it, to use in our Basement Bathroom. I know that we still have a ways to go before the bathroom starts getting put together (our laundry room doesn't even have walls up yet!) - but I'm on the hunt to find something like it for a good deal. Anyone have any great places to look? (Mainly in Toronto, but I mean if I can find it online I'll take it!)

Sunday, January 3, 2010
What Lies Beneath...
Our basement reno is well underway at our tiny Toronto home. As sledgehammers fly, and dust and debris scatter - I thought I'd give my readers (if there are any) a little update on what we've been working on down below.
Day 1 - Sunday, December 27, 2009: I must start out by saying that in no way did we plan on tearing our basement apart on this fine Sunday evening. The day started off pretty calm. We packed everything up from my parents (where we spent Christmas), dropped by HomeDepot to pick up our new washer and dryer pair and then headed home, with my parents following behind us. While the menfolk unloaded our new appliances from my father's trailer, and hooked up the new dishwasher in the kitchen, my Mom and I headed out to buy some storage bins for stuff we had in the basement, as well as for our Christmas decorations. After a small dinner, B, my father and myself headed downstairs to discuss what our plans were for our basement reno. The gist is that the old tiny office/guest bedroom was to be turned into a bright and airy laundry room, our basement bathroom was getting a complete overhaul, and the remainder of the living space was to be completely redone as well (just a little further down the road). To no one's surprise, shortly after the discussion started the dust masks, hammers and wrecking bar came out and we went to town. As my outfit in this picture will demonstrate - it really was an impromtu demolition session.

After a couple of hours of swinging hammers and weilding a wrecking bar - our basement bathroom and guest bedroom was nothing more than a giant pile of wood and drywall.

There weren't too many surprises this first day. A few moldy spots of drywall (which B was careful to cut up and immediately bag) and of course a bunch of beer caps - which would probably explain the horrible job done not only on the basement, but the work on the rest of the house!
The biggest surprise was the old wasps nest B stumbled across, where our bathroom ceiling met an outside wall. There wasn't too much too worry about, as the old nest was dried out and had clearly been there for quite sometime without any use. More than anything, it let us know to be extra certain that the exterior of the house is well sealed when we close everything back up. After an exhausting night of ripping our basement apart, we called it quits and headed to bed feeling accomplished and ready for round 2 of demo the following day.
Day 2, Monday, December 28th, 2009: With both of us off work, Monday was the perfect day to head out to do some more shopping for our basement reno before getting back down to demolition. Our first stop was our local Habitat for Humanity ReStore where we were looking for everything - doors, a pedestal sink, a tub - you name it. We scored pretty huge when I found a stack of 375 sq. ft of laminate flooring for $280 bucks. Exactly what we'll need when we finish the living area of the basement. We definitely want to use laminate down there, just incase there ever IS an issue with water - we don't want expensive hardwood getting destroyed, or moldy carpet! We also left carrying a Rhino Bag, a great alternative to renting a dumpster for all of our basement demo waste. From there we picked up some more demolition supplies at Princess Auto before moving on to Home Depot (we really wish there was a Lowes closer to our house), where B needed to pick up a bunch of plumbing supplies. While B was exploring the isles of plumbing, I took off on my own to investigate sinks, vanities and tubs. While exploring I came across a lighting clearance section. To my joy I found THREE boxes of 3 1/4 inch recessed lights for $20 a box! SCORE! B and I inspected them and they are exactly what we need for the basement reno, and with 18 lights in total, we can do our laundry room and bathroom - as well as our kitchen!
Once our rather expensive shopping expedition was complete, we headed home and prepared to empty the basement of all of its debris. Thankfully, our basement windows were large enough to pass the debris out of (and for B to crawl through), so I passed up old pieces of wood and drywall, while B loaded them up in the Rhino Bag. Once we were done, we gave it a sweep and scooped up the smaller debris into some garbage bins.

With everything off the floor, it was time to take out the sledgehammers and break up the nasty green bathroom tile, and very strange mosaic tile floor (if you can call it that) - and of course, finally rip out the awful almond coloured, jetted monstrosity of a tub. After it was removed and B was able to get at the drain, we found our new friend - creepy the frog. An old broken up ceramic dish sponge holder. B promptly put him back together the best he could and let him sit by to supervise the remainder of our demo.

After the floor had been completely broken up and cleared away and B and I started discussing our final plans for the layout of our new laundry room and bathroom. While checking things out, we peeled back the vinyl flooring in what had been the guestroom to face a TON of mildew that we'll need to tackle with a handy bleach solution.

Day 3, Tuesday December 29, 2009: While B was staying home, working away on the basement, I was at work - feeling like I had demolition hang over. I was exhausted, congested feeling (despite my handy dandy dust mask) and hurting all over, but wishing I was at home helping with the work to be done. But - B trudged on, ripping up where the old tub drain used to be and smashing up concrete to create a new drain, where our new shower stall will be. After which, he filled in the old hole for the tub and a few places where the concrete was soft and smashed up when we were removing the old tile floors. Not surprisingly, that work took up most of his day. After we ate, and before the concrete set completely - B went down and wrote our name in the concrete that will be behind the new wall, separating the bathroom and laundry room.

So, Tuesday was pretty much taken up by filling in holes with concrete. A lot more on our plate - a bunch that B will have to do on his own, but a lot that we'll be able to knock out as a team.
Clearly, by this time we have completed much more but I didn't want to get into an overwhelming post of our progress and thought that for now, sharing our first three days would be helpful. I think my next update will spare you on so much of the detail and maybe just provide a quick update on where we've got to at this point. Let's just say, it's finally starting to look like a room!
Day 1 - Sunday, December 27, 2009: I must start out by saying that in no way did we plan on tearing our basement apart on this fine Sunday evening. The day started off pretty calm. We packed everything up from my parents (where we spent Christmas), dropped by HomeDepot to pick up our new washer and dryer pair and then headed home, with my parents following behind us. While the menfolk unloaded our new appliances from my father's trailer, and hooked up the new dishwasher in the kitchen, my Mom and I headed out to buy some storage bins for stuff we had in the basement, as well as for our Christmas decorations. After a small dinner, B, my father and myself headed downstairs to discuss what our plans were for our basement reno. The gist is that the old tiny office/guest bedroom was to be turned into a bright and airy laundry room, our basement bathroom was getting a complete overhaul, and the remainder of the living space was to be completely redone as well (just a little further down the road). To no one's surprise, shortly after the discussion started the dust masks, hammers and wrecking bar came out and we went to town. As my outfit in this picture will demonstrate - it really was an impromtu demolition session.


The biggest surprise was the old wasps nest B stumbled across, where our bathroom ceiling met an outside wall. There wasn't too much too worry about, as the old nest was dried out and had clearly been there for quite sometime without any use. More than anything, it let us know to be extra certain that the exterior of the house is well sealed when we close everything back up. After an exhausting night of ripping our basement apart, we called it quits and headed to bed feeling accomplished and ready for round 2 of demo the following day.
Day 2, Monday, December 28th, 2009: With both of us off work, Monday was the perfect day to head out to do some more shopping for our basement reno before getting back down to demolition. Our first stop was our local Habitat for Humanity ReStore where we were looking for everything - doors, a pedestal sink, a tub - you name it. We scored pretty huge when I found a stack of 375 sq. ft of laminate flooring for $280 bucks. Exactly what we'll need when we finish the living area of the basement. We definitely want to use laminate down there, just incase there ever IS an issue with water - we don't want expensive hardwood getting destroyed, or moldy carpet! We also left carrying a Rhino Bag, a great alternative to renting a dumpster for all of our basement demo waste. From there we picked up some more demolition supplies at Princess Auto before moving on to Home Depot (we really wish there was a Lowes closer to our house), where B needed to pick up a bunch of plumbing supplies. While B was exploring the isles of plumbing, I took off on my own to investigate sinks, vanities and tubs. While exploring I came across a lighting clearance section. To my joy I found THREE boxes of 3 1/4 inch recessed lights for $20 a box! SCORE! B and I inspected them and they are exactly what we need for the basement reno, and with 18 lights in total, we can do our laundry room and bathroom - as well as our kitchen!
Once our rather expensive shopping expedition was complete, we headed home and prepared to empty the basement of all of its debris. Thankfully, our basement windows were large enough to pass the debris out of (and for B to crawl through), so I passed up old pieces of wood and drywall, while B loaded them up in the Rhino Bag. Once we were done, we gave it a sweep and scooped up the smaller debris into some garbage bins.


Clearly, by this time we have completed much more but I didn't want to get into an overwhelming post of our progress and thought that for now, sharing our first three days would be helpful. I think my next update will spare you on so much of the detail and maybe just provide a quick update on where we've got to at this point. Let's just say, it's finally starting to look like a room!
Subscribe to:
Posts (Atom)
