


I'm so excited today to finally have the new blog look up! I was getting tired of the usual blogger template with no colour. Don't get me wrong, I love white, but it just wasn't cutting it anymore!
My beautiful new header was designed by the wonderful Brittany from Pink Peacock Designs, and I think that she perfectly captured what I was looking for, for my little ol' blog! I was also thrilled that she was able to change the layout from two columns to three! She was so quick, and an absolute pleasure to work with, and I definitely recommend her if you're looking for a little blog makeover! Oh yes, and she is also the lovely designer behind that cute little piece of art work that I have hanging in the guest bedroom! Isn't she talented?
So - what's the verdict? Are you loving my new look?
Thursday, April 8, 2010

Monday, April 5, 2010
The Closet Fireplace?
Nothing much has been going on around here recently... at least nothing worth blogging about. Closet progress has been incredibly slow, but yesterday we finally got around to sanding it all down and getting the primer on... yup, that's all we've done. Which means the closet now looks like this...

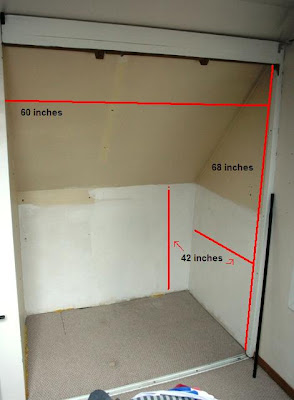

Kind of like we're going to just pop in a gas fireplace insert and call it a day, huh? That could be interesting.
With the closet slowly moving along B suggested tonight that we head over to IKEA to get some closet inspiration. While walking around the closet section, I stumbled across the Komplement birch clothes rail, which was marked "Now or Never", and priced at $4 each. B and I figured it was a great deal, and after being directed by the associate to the "As Is" section, we booked it there hoping to grab 3 of the last 4 they had on hand. We lucked out - not only were all 4 still there, but they were marked down even further to $1.90 a piece - so we grabbed all 4! We also managed to find the perfect shelf for one side of the closet on sale for $7.90. Not bad. We picked up all those piece for the closet, and a new candle, all for $20.33! We left feeling pretty happy with ourselves (especially with frozen yogurt in hand). So here is the plan for the closet...

Those are the measurements of my closet space (obviously!). As you can see, working with the width of the closet makes no sense, and we'll actually utilize the space better by using the depth instead. Therefore the plan is to run our clothing rails along the 2 sides of the closet (42 inch lengths) rather than across the front (60 inches). Of course, that also leaves our fireplace cubby storage more accessible.
I have some plans to make space for longer hanging items like dresses and robes, and also to create some sort of storage space on top of the clothing rails to hold other linens, shoes and purses. I just need to figure out where exactly everything will go once all of our organization solutions are in place. I'm hoping that by this weekend I can share our final product! Fingers are crossed... I've had enough of shuffling through piles of clothes on the guest bed to get dressed.
I hope you all enjoyed your Easter weekend!
Sunday, March 28, 2010
Closet Progress: Cubby Storage
It's been exactly one week since half of my closet collapsed on me. I've spent the last week with half of my wardrobe piled up on the guest bed, sifting through it as I got ready for work each morning. It hasn't been fun. So this afternoon, after catching up on what was happening up the street, B and I headed upstairs to look at how to tackle the new closet project.
I started by removing the remainder of my clothes and possessions, to get back to the basic (awful) structure.

Once it was cleared out, I got to work removing all the.. uh... JUNK, that once held my clothes and we were left with a wonderful giant space...

I figured I would fill all the holes, sand it down, prime it and paint it and then start taking measurements for the new closet system (whatever that solution might be). Well, B had a different idea, and soon my closet looked more like this:


I started by removing the remainder of my clothes and possessions, to get back to the basic (awful) structure.

Once it was cleared out, I got to work removing all the.. uh... JUNK, that once held my clothes and we were left with a wonderful giant space...

I figured I would fill all the holes, sand it down, prime it and paint it and then start taking measurements for the new closet system (whatever that solution might be). Well, B had a different idea, and soon my closet looked more like this:

He told me to "get to work" and I told him to forget it - he chopped a whole in my wall, we were going to fix it together. The idea was to utilize some of that forgotten space in our angled ceiling/walls. The plan was to lose that middle wall stud, and put in a cubby between the two remaining studs, that we could put shelves into to house my purses and linens. First, we measured the depth of the shelves that had already been in there, and planned that the cubby would need to be 12 inches deep. Based on that measurement, we had to figure out how high the cubby could be to allow for our 12 inches depth, and to keep the whole thing square (no sloping like the ceiling). In the end we took all of our measurements and headed out to the garage where B measured, cut and put together a plywood cubby that we could insert into the giant hole in the back of my closet.

Once we got the cubby upstairs, and into the closet, we discovered that the other two stud's would also have to be removed in order to fit the cubby into the wall. After some shifting, adjusting and shimming of the cubby, B had it in the right spot, and used the old wood support from the closet to make two smaller studs that would sit atop of our cubby and connect with the studs in the ceiling. Once they were installed, it looked like this:

The next step, was to do something about that electrical box we had discovered attached to one of the studs when we opened up the wall. B had found out it was live when he shocked his ear leaning into the opening to clean it out. So, after putting the appropriate cover on the box, he screwed it into the side wall to make sure it was secure and safe and out of the way for the remainder of our construction work.
Once that was out of the way, we began our measurements for the drywall. With all of those in hand, we headed into the basement and cut up a bunch of leftover chunks of drywall from our laundry room project. We finally got them into place, taped them up and B put some metal outside corner support on the cubby edges to clean them up.

I was then in charge of mudding all the joints and holes in the closet area... but of course I didn't do such a good job, so B needed to jump in behind me to clean it up.

Right now it's sitting and drying - once it's done I'll be back up there sanding it and touching up any necessary spots. The next step will be to prime it and paint it white... then it's just a matter of figuring out how I want to handle clothes storage, and space the shelves in our new cubby. I'm just glad we've found a way to reclaim some more unused space in our little old house and to create more storage in my closet.
Monday, March 22, 2010
The New Unexpected Project
As I mentioned in my post on Friday - we have way too many projects on the go around our house. The basement renos are ongoing, my kitchen refresh is not yet complete and I have a few pieces of furniture sitting around that are waiting to be finished. Thankfully, I have not yet started sanding or painting the two chairs I plan on refinishing for the basement. So for the moment, I can let that project wait.
Unfortunately, this past weekend didn't really work out quite as I had hoped. I had huge ambitions of banging out some of the projects that we have on the go. Of course, none of them were touched (with the exception of B working on some stuff in the basement bathroom that I couldn't help with). So, with B confined to the basement yesterday, I was looking for something useful to do, and ended up in our upstairs guest bedroom / my dressing room ready to spring clean and purge!
I set about on my merry way - and of course, it had to get worse before it was going to get any better:


I was determined though, and managed to fill three bags of clothing to donate, a bag of stuff to add to our "sell" pile, some things that were very misplaced and half of a small bag of garbage (Incredible how much you can fit into a small place when you just start cramming things in)! It felt nice to finally purge that room. The best part was that my closet suddenly had quite a bit more room for my wardrobe to expand... or so I thought.
I had just put the last blanket on the shelf to the right in the closet, and had turned to work on something else, when I was startled by a very loud noise. I turned to see this:
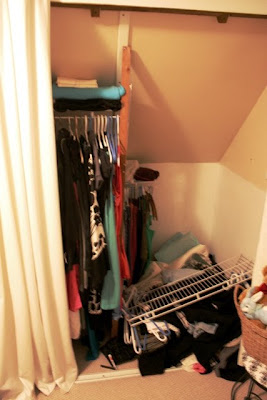
To be honest, that closet of mine, was never well constructed. So really, this wasn't much of a surprise. Check out that sorry attempt at closet construction...

There are so many things I could point out to you, but I'm sure you can see most of the issues with this monstrosity! I've known since we moved in last July that this would eventually happen. So, here I am, with a purged room, but half of my wardrobe, and a collection of linens and blankets, piled up on the guest bed. Thankfully we have no house guests planned for the immediate future!
All of this, of course, occurred almost simultaneously with B cursing something in the basement that wasn't working out quite right. I must say, we were both happy campers when we met on the main floor following our adventures, at 8pm, starving and too irritated to whip something up for a very late dinner (thank god for left over Thai take-out).
Well, I guess that means it's time to add yet another project to my continuously growing to-do list - building a new closet. Plans for my new closet will come this week...
Unfortunately, this past weekend didn't really work out quite as I had hoped. I had huge ambitions of banging out some of the projects that we have on the go. Of course, none of them were touched (with the exception of B working on some stuff in the basement bathroom that I couldn't help with). So, with B confined to the basement yesterday, I was looking for something useful to do, and ended up in our upstairs guest bedroom / my dressing room ready to spring clean and purge!
I set about on my merry way - and of course, it had to get worse before it was going to get any better:

I was determined though, and managed to fill three bags of clothing to donate, a bag of stuff to add to our "sell" pile, some things that were very misplaced and half of a small bag of garbage (Incredible how much you can fit into a small place when you just start cramming things in)! It felt nice to finally purge that room. The best part was that my closet suddenly had quite a bit more room for my wardrobe to expand... or so I thought.
I had just put the last blanket on the shelf to the right in the closet, and had turned to work on something else, when I was startled by a very loud noise. I turned to see this:

To be honest, that closet of mine, was never well constructed. So really, this wasn't much of a surprise. Check out that sorry attempt at closet construction...

There are so many things I could point out to you, but I'm sure you can see most of the issues with this monstrosity! I've known since we moved in last July that this would eventually happen. So, here I am, with a purged room, but half of my wardrobe, and a collection of linens and blankets, piled up on the guest bed. Thankfully we have no house guests planned for the immediate future!
All of this, of course, occurred almost simultaneously with B cursing something in the basement that wasn't working out quite right. I must say, we were both happy campers when we met on the main floor following our adventures, at 8pm, starving and too irritated to whip something up for a very late dinner (thank god for left over Thai take-out).
Well, I guess that means it's time to add yet another project to my continuously growing to-do list - building a new closet. Plans for my new closet will come this week...
Sunday, March 21, 2010
It's Up!
Some of you may remember that a little while back I won this adorable print from Brittany over at My. Daily. Randomness. Well, it took me some time, but I finally found the perfect black frame (both style and price) for it. I also finally decided on the perfect spot to hang it!
In my guest bedroom / my dressing room, I once had this little water colour painting of the Spanish Steps (that I bought at the top of the Spanish Steps in Rome, n February 2005) hanging over my dresser. Well, it was definitely far too small for that spot, as the picture below would indicate.


In my guest bedroom / my dressing room, I once had this little water colour painting of the Spanish Steps (that I bought at the top of the Spanish Steps in Rome, n February 2005) hanging over my dresser. Well, it was definitely far too small for that spot, as the picture below would indicate.

I love the watercolour, but it really just was a temporary home for it. I wanted it on the walls when we moved in, so it's been there for the past 8 months filling a blank spot.

The larger frame and print definitely balance things out better. I'm so happy to finally have it hanging in our home. The little watercolour will definitely have a new spot soon, I'm hoping that once the basement is FINALLY done, I will add it to a little gallery wall I plan on doing. I guess you'll just have to stick around to see where it ends up!
Friday, March 19, 2010
What I Really Want...
I know that right now we have quite a few projects on the go at home. From my mini kitchen refresh project, to our massive basement reno to the makeover of my two second hand chairs, I have no shortage of projects to work on right now. However, in my usual manner, I have the desire to start so many more. I'm sure you all know what it's like, there is always something else that you can find to do! Well, right now, with all of the gorgeous weather that we've been having, what I REALLY want, is to do something about our backyard (all pictures from July 2009, when we got the keys):


As you can see in this picture, our backyard is shared with the neighbours - the garage door to the left is their's. We could put up a fence, but they have two little ones that like being able to run around, and we don't mind them in our yard.


There's quite a lot that we not only want to do, but just HAVE to do (i.e. the deck is a disaster and if we don't completely rebuild it, boards still need to be replaced this spring/summer before someone breaks a leg!). Thankfully, since these photos were taken, that twisted rotten branch tree sticking out of the middle of our yard has been removed, and the area next to the garage has been all cleaned out.
Aside from actual landscaping (the dogs RUINED the grass because the winter was so mild, they just tore it up running around when it was damp), we really want to tackle our half of the garage. Painting the doors on the garage is actually on our list of things we'd like to accomplish around the house in 2010 (aka: the list that I made that B must now suffer through).
So, with the weather cooling off a bit this weekend, and a possibility of rain, it's the perfect time for B and I to finish up some of the projects we have on the go! But i'd like to throw it to my readers. If this were your yard - what would you do with it? I'd love to hear some of your ideas! (Note: Our house faces the west, and we have HUGE trees behind the house... so lots, and lots and lots of shade - which you can probably tell from the photos!). So share away... and I'll be sure to share OUR plans once we really get going with our outdoor work!
Wednesday, March 17, 2010
The Emerald Isle
Happy St. Patrick's Day Friends! However you choose to celebrate this wonderful day, I hope that it's a great day for you! This past November B and I spent 5 wonderful days exploring the city of Dublin - a first trip for both of us to Ireland! I loved the city and hope to return one day to see much, much more of this beautiful country. In honour of St. Patrick's Day, I share with you some of my favorite photos from our trip to the Emerald Isle...


How could I start with anything other than a photo of St. Patrick's Cathedral itself?


The Dublin Spire (top) and Dublin City Hall at night


Views from the Guinness Storehouse in the Gravity Bar - can't beat free Pint's of Guinness!


Head with every Pint of Guinness (top) and a view of the Old Jameson Distillery from the restaurant


Interior of the stunning Christchurch Cathedral (top) and Historic Kilmainham Goal


Night scenes in Dublin - The Custom House at the top


Interior of Dublin Castle

Irish Parliament
There are plenty more where these came from - I could post photos of our lovely little vacation forever. But I will spare you! Enjoy & Happy St. Patrick's friends!
Subscribe to:
Posts (Atom)
