As I stated at the end of my previous basement update - I won't bore you with all of the daily goings on around here. I'll just say there has been a lot of dust flying in the basement and give you a quick rundown of some of the major highlights of our reno.
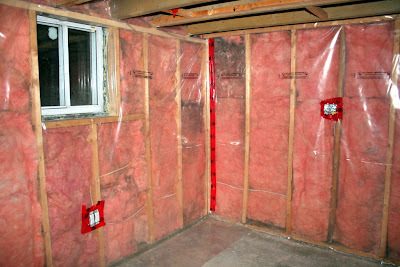
After getting all of the walls out from around the bathroom, and all but two from the guest bedroom, B and I realized that there was NO vapor barrier behind the two exterior walls we planned on leaving up. This discovery, of course, led to even MORE demolition, which in the end we agreed was worth it. Thankfully, we didn't have to reframe one of the walls (or so it seemed...) - leaving us only two major walls we had to frame, along with two smaller walls on either side of the new door frame. Framing began on the evening of the 30th, but due to what felt like a stress fracture in my right foot, we had to call it an early night. (Not to mention B was exhausted after working on the basement all week).
Bright and early on New Years Eve, B and I headed out to pick up all of our dry walling needs, and made a few additional stops to continue looking for basement bathroom inspiration. After being gone far longer than we had anticipated, we returned home ready to once again get back down to business.
We had high hopes of ringing in 2010 in a laundry room with at least some drywall on the ceiling - however, this would not be. After a lot of measuring, hammering, drilling into concrete and all kinds of other fun stuff, to get the frames up, I was ready to stop at 10:30. By 11:30 both B and I were showered and ready to ring in the New Year/Decade with a bottle of champagne and a box of chocolates. Not the most exciting New Year - but we were both happy to be spending our first New Years in our first home, working on a project that we were both excited about.
The following day, while I started cleaning (note: basement reno = everything in our house completely displaced) in preparation for our dinner/over night guests on Saturday, B was doing all the electrical work for my laundry room before crawling in and out from under the deck as he created a new hole for our brand new dryer vent. This was by far his least favorite part of the project so far. The next step was to get insulation up for the exterior walls and get the vapor barrier up. Between the two of us, this part was pretty easy.
Later that evening, we unloaded all of the drywall that had been in the truck bed since the previous day. With everything finally inside, we got to work measuring and cutting drywall for the laundry room ceiling. Only two pieces went up the first night, but that, along with actually being able to maneuver all of drywall into the basement, was accomplishment enough for one day.
After taking a break on Saturday to entertain our guests, work resumed Sunday when my parents came over and my Dad helped out in the basement. Together, they were able to finish off the drywall for the ceiling, as well as install our new recessed lighting.
Last night's progress wasn't any more exciting. After spending more time than we planned wandering around IKEA, we returned home and were able to successfully drywall ONE of the laundry/utility room walls. The ONE wall that we didn't reframe because it looked like the person who had done work prior had done a decent job on it. WRONG! Not all of the studs were the same depth (if thats even the right terminology), so when trying to drill into a section of the drywall I was greeted by a not so pleasant ripping sound as the drywall pulled away from the screw. To say it was frustrating would be an understatement. Thankfully we were able to resolve this problem by spacing out the screws on that one stud enough to avoid the worst of it. That combined with the unevenness of the structure of our 90 year old home, meant drywalling was shortlived.
Tonight - we got the biggest drywall project done by completing the back wall. Lots of measuring and cutting was done to make the pieces fit around the outlet, window and our new dryer vent (not pictured). I am now a master of the drywall saw - no lie. It makes me happy to see this progress...
Though progress will be more slow going this week, with both of us back to work, I hope that we'll be ready to tile by the end of the week at the latest. I'm just looking forward to having a nice clean space that I can do laundry in again. Climbing over sheets of drywall and other construction equipment to wash my clothes is getting old... very quickly!


Love the pictures, it's bringing back memories of our basement reno! (And mess, and total displacement of stuff in our house). Looking good!!
ReplyDeleteThis is an underground basement? Putting the fiberglass insulation right against the concrete is going to soak up moisture like a sponge, isn't it?
ReplyDeleteYes it will. You screwed up dude. You are going to have a bunch of rot. You need that vapor barrier behind the insulation...
ReplyDeleteThank you so much for your informative comments Anonymous individuals. The basement was already insulted as it was, we just put some new stuff in and we have never had any moisture issues whatsoever... when we moved in or after the renovation years ago. I appreciate your concern though!
ReplyDelete