BUT, with B's sister arriving on Friday and a little dinner party planned for Saturday, we needed to whip our dining room into shape for some hosting. We've been busy bee's the last couple of weeks. The last photo I shared on here of our dining room was just after B had finished our dining table...

In the last few weeks we've accomplished quite a bit. Here's what our dining room currently looks like...
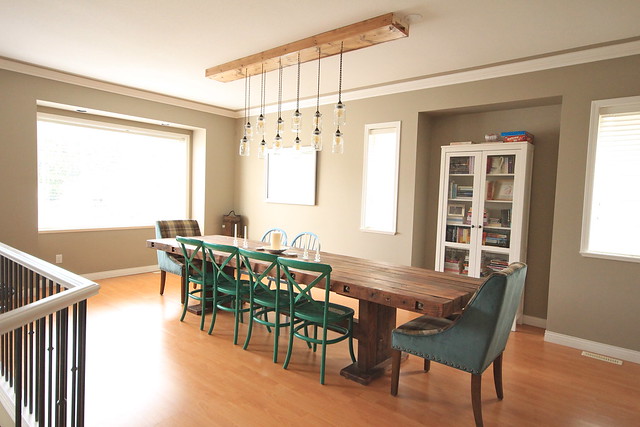
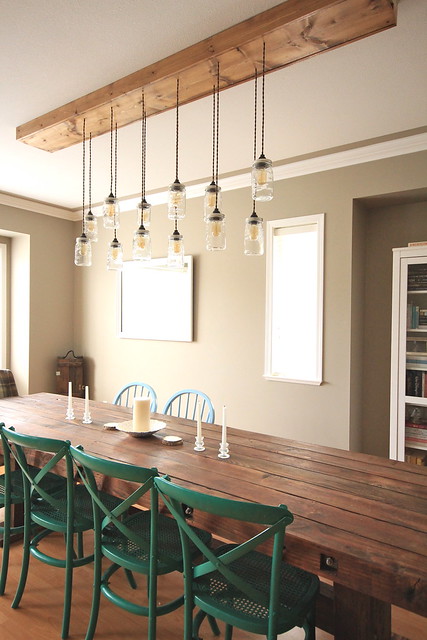
We are getting there! On the far wall we have hung a mirror that B has had since before we even started dating (it sat on the mantel in our home in Toronto). It may not be the forever solution, but for now it fills the wall and really bounces more light around in the space. We like it.
You'll notice I've also started to address our seating issue. Those four green chairs I grabbed at HomeSense for a great deal. I'd been eyeing them since November, but couldn't pull the trigger on them for $99.99 a piece. At the end of January I popped back in and was checking the clearance section, only to discover four were left at $36 each! Of course they had to come home and they are perfect. The two blue chairs on the opposite side of the table will be painted the same green colour in time.

By far, the biggest and best addition is the light fixture that B put together for us. Of course this style is all over Pinterest, but I wasn't in love with the idea until we went to Scotland and saw a huge light fixture made from Mason jars at the Super Dry store in Glasgow. So when we got back and needed a big idea for over the dining table, this seemed the best and most affordable solution. The whole thing cost us under $300 - not bad considering the impact it makes.
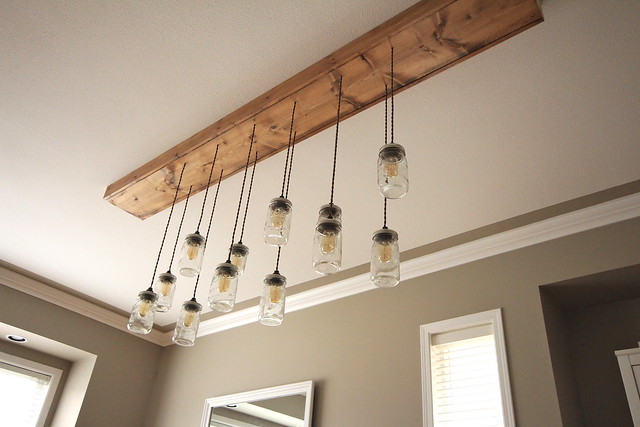
We bought the pine and the wiring and junction boxes from The Home Depot, using a gift card my parents gave us for Christmas. For the stain, we used leftover stain from the table. The woods are different (pine for the light fixture and douglas fir for the table), so the stain appears slightly different. I like that they don't match exactly, but have the same tone!
The jars I bought off of someone local for $8 (for all 12), which was a great snag. We bought the fabric covered wire and sockets from a Massachusetts based company called Sundial Wire - definitely recommend them if you are looking to do something like this! Finally, the amber coloured filament bulbs top off the whole project. We bought 16 for $5/each from Restoration Hardware when they were having their lighting sale in early January.
I feel like it makes the most impact when it's all lit up at night. The amber lights were the perfect choice, and we're happy with how much light 12, 30W bulbs give off. The perfect ambiance for dining!


There's still much to be done around here. B and I have agreed the next big thing will be the built-in in that nook currently occupied by the far too small bookcase. The good thing about the built-in is we will be able to build it slowly. Start with a lower cabinet and had uppers afterwards. Just something to add some extra storage and character to this slowly evolving room.
I'm just thrilled with how quickly we've been checking things off of our to-do list so far. The bedroom has had some progress as well, and I hope that today I can finally finish getting paint on our walls. It's a much slower process now that I have a two-year old underfoot at all times! She is one busy and curious little girl!
What have you been doing to keep yourselves busy? Anyone been hibernating inside and making big changes to their homes?
I LOVE the light fixture you guys made. Turned out so well & looks awesome in the space. The room is coming together great!
ReplyDeleteWow, that light fixture is STUNNING! You guys did a great job on DIY-ing it - I would never have known it wasn't store bought
ReplyDeleteWhat a score on those chairs! And your chandy turned out fabulous. Nice to have such a handy husband!
ReplyDeleteThat light fixture is amazing!! Great job, you guys.
ReplyDeleteThe room is really coming together! Those chairs are fabulous and your light fixture is amazing. Great job guys!
ReplyDeleteI love those green chairs, and I REALLY love that light fixture. Such an impressive project. My husband can barely use a hammer... you two put us to shame.
ReplyDeletelove the chairs! what a deal :) the light fixture works perfectly with the table.
ReplyDeleteThose chairs and the color are perfect! The light fixture looks amazing :)
ReplyDeleteLove the light fixture! As usual, you guys did an amazing job!!
ReplyDeleteKerry that light is amazing!, and I love the green chairs. Looking good!
ReplyDeleteThis comment has been removed by a blog administrator.
ReplyDeleteImpressive!!!!
ReplyDeleteLooks great! Thanks for sharing~
ReplyDeleteLovely blog.
This comment has been removed by a blog administrator.
ReplyDeleteThis comment has been removed by a blog administrator.
ReplyDeleteThis comment has been removed by a blog administrator.
ReplyDeleteThis comment has been removed by a blog administrator.
ReplyDeleteThis comment has been removed by a blog administrator.
ReplyDeleteThis comment has been removed by a blog administrator.
ReplyDelete