Thursday, February 25, 2010

The Perfect Pair

... besides me and B anyway... is obviously Chocolate and Peanut Butter. If you disagree, than this post is not for you. If you're on the same page, then read on - believe me, you'll thank me later!

One thing that B and I have in common, is our love of Chocolate and Peanut Butter... together! Mainly peanut butter cups. It thrills me that my man can appreciate such a genius combination. Therefore, as his birthday was approaching, I began my search for the perfect Chocolate Peanut Butter birthday cake. As I searched, I began to think, since we have no big celebration planned with other people, a cake would probably be a bit too much. So, I switched things up and decided to search for a cupcake recipe instead. I figured, this way we could enjoy them, and whatever we don't eat we could share with co-workers, neighbours and/or friends.

When I stumbled across this recipe, I knew it was the one. You can NEVER go wrong with a Barefoot Contessa recipe (am I right?). So, even though you could click right here, to get the recipe, I thought that I would go ahead and share it right on my blog. I must say, the icing is most definitely the best part of the whole thing - absolutely to die for. I also made two small adjustments that I'll share in my post as well.

Yeah.... I made that!!!

12 tablespoons (1 1/2 sticks) unsalted butter, at room temperature
2/3 cup granulated sugar
2/3 cup light brown sugar, packed2 extra-large eggs, at room temperature
2 teaspoons pure vanilla extract
1 cup buttermilk, shaken, at room temperature
1/2 cup sour cream, at room temperature
2 tablespoons brewed coffee (I opted out of this ingredient! I'm not a coffee drinker, so I figured even brewing one cup of coffe for 2 tbsp would be a huge waste...)
1 3/4 cups all-purpose flour
1 cup good cocoa powder
1 1/2 teaspoons baking soda
1/2 teaspoon kosher salt
Kathleen's Peanut Butter Icing, recipe follows
Chopped salted peanuts, to decorate, optional (Instead, I used mini peanut butter cups that we had in the freezer, chopped them up and sprinkled them on top!)


Preheat the oven to 350 degrees F. Line cupcake pans with paper liners.

In the bowl of an electric mixer fitted with a paddle attachment (though the instructions call for using the paddle attachment, I used my trusty old handheld mixer and it worked just fine) cream the butter and 2 sugars on high speed until light and fluffy, approximately 5 minutes. Lower the speed to medium, add the eggs 1 at a time, then add the vanilla and mix well. In a separate bowl, whisk together the buttermilk, sour cream, and coffee (I opted out of the coffee, it doesn't make much of a difference... thinking back, I wish I had substituted it with chocolate syrup - yum!). In another bowl, sift together the flour, cocoa, baking soda, and salt. On low speed, add the buttermilk mixture and the flour mixture alternately in thirds to the mixer bowl, beginning with the buttermilk mixture and ending with the flour mixture. Mix only until blended. Fold the batter with a rubber spatula to be sure it's completely blended.

Divide the batter among the cupcake pans (1 rounded standard ice cream scoop per cup is the right amount). Bake in the middle of the oven for 20 to 25 minutes, until a toothpick comes out clean. Cool for 10 minutes, remove from the pans, and allow to cool completely before frosting.

NOW, for the best part... the icing!

1 cup confectioners' sugar
1 cup creamy peanut butter
5 tablespoons unsalted butter, at room temperature
3/4 teaspoon pure vanilla extract
1/4 teaspoon kosher salt
1/3 cup heavy cream
Place the confectioners' sugar, peanut butter, butter, vanilla, and salt in the bowl of an electric mixer fitted with a paddle attachment. Mix on medium-low speed until creamy, scraping down the bowl with a rubber spatula as you work. Add the cream and beat on high speed until the mixture is light and smooth.


Frost each cupcake with Peanut Butter Icing and sprinkle with chopped peanuts (OR chopped up peanut butter cups - freezing them beforehand makes this easier to do), if desired.

Okay... I lied - this is the best part.... EAT AND ENJOY! :)


SHARE:

The Birthday Boy...

I know that I haven't been around much recently. There has been a lot going on, and I've been quite restless. I've had so much on my mind and just feeling like I haven't been able to sort it all out. Admist these feelings and thoughts, I've been planning for a pretty big event. Today the man that I love turns 28. He seems to think he's old. I, on the other hand, continue to think that he is perfect.


I consider myself so incredibly lucky to have a man in my life who not only tells me, but shows me every single day how much he loves me. Every day I appreciate the fact that he quit his job, packed up his belongings, and left behind his family & friends to move across borders to be with me.


I try every day to show him, not only how much I love him, but how happy he makes me. So today, I want to wish my B a very Happy Birthday - and say I am so incredibly happy that his parents brought him into the world 28 years ago today (and did they ever do a fine job raising such an incredible man!).


Happy 28th Birthday B! I love you... and look forward to spoiling you over your birthday weekend (and for years to come... of course!)

P.S. If you'd like to give B a little birthday gift why not head over here and vote for us to win a trip to Grand Cayman! :) Takes 2 seconds to register - and I promise they won't email you anything. If you've already voted thank you - and remember, you can vote once a day from your account up until March 30th! ;)
SHARE:

Tuesday, February 23, 2010

My Confession...

I have something to admit. Last Friday was my first time EVER setting foot inside of Anthropologie. Yup... first time EVER! It's not that I was avoiding it, I just had never made it to one... even though there is one about a 10 minute walk from my office. Well, let me tell you - I now know what I was missing out on. I could spend an entire day in that store just walking around admiring everything. Okay, so I know I'm probably the last person on the face of the planet to visit so I'll stop gushing and move onto sharing a few of the pieces I fell in love with on Friday.


I immediately fell in love with this Hello Goodbye door knob. I thought they were so sweet and would love them in our house... but couldn't think of the right room. Plus... the $55 price tag wasn't doing it for me right now.
My friend Kim, who I had been out shopping with, spotted these adorable measuring cups. They were so sweet! Couldn't imagine shelling out what they were asking for right now... and I can't imagine B would be too happy about me bringing them home. We already have a ton of mugs...
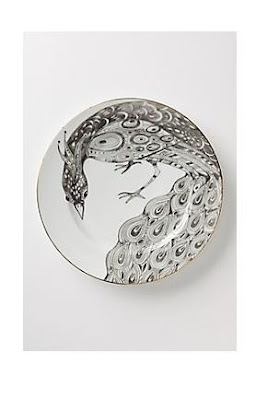
This peacock plate was gorgeous and I thought would be a great piece of artwork to hang in our kitchen. Only $24 - so I considered grabbing one... but with a couple birthday's and a baby shower coming up quickly, there isn't a whole lot of money in my budget for personal purchases... but I'll keep it in mind!


I thought that this little knob was just adorable... there isn't much else to say except I love it!

Just a few pieces for now - as I said, I loved everything. I hope to be blogging more soon, there has just been a lot on my plate recently outside of blog land, keeping me busy day and night. Lots of little projects happening, and hopefully some significant basement progress soon that I can update!
SHARE:

Friday, February 19, 2010

Baby Shower Planning

Aside from working on our renos, there is plenty of other things I have been busy with in the last little while. One project in particular, is planning a baby shower for my friend from University, V. Working with my best friend Taylor, we are trying to pull together a small baby shower, for mid March in Ottawa... on a very tight budget.

As soon as we agreed on a date, my first thought was on the cake. A friend of ours from University was married not too long ago, and his wonderful wife (who we also went to University with) makes beautiful cakes. I immediately suggested that we get her to create V's cake - and to make a long story short, Natalie at The Lush Cake, has agreed to make it. The cake was definitely our splurge item for the shower, but I know it will be well worth it!

Next on our list, was of course, the guest list and invites. After I spotted these beautiful invites in the Etsy shop of modernemotive, I was smitten.


Of course, working on a tight budget, I needed a solution that would cost approximately zero dollars. So I sent my inspiration photo over to my Mom, who worked diligently to create a similar look at no cost. We also lucked out that my Mom works for a printer, so we were able to get our 10 invites printed at no cost. Now that they've gone out in the mail - it's time to start thinking about decoration inspiration!

I know that I don't want to go the direction of store bought decorations that seem to dominate baby showers. Personally, I think they look kind of cheap, and are usually a one off thing that aren't worth the money. With that in mind, I'd prefer to go in the direction of things that can be reused after the shower.

Not too long ago, I'd spotted these adorable floral arrangements over at Life in the Fun Lane, when Holly had her daughter's first birthday party.


Again, it was love at first sight, and I think with an assortment of blue and white flowers, it would look lovely at our little shower. As a bonus, I would most definitely keep those mugs as vases in my own home. I've already hit the thrift store up, and stumbled across something similar to use for flowers, I'm pretty excited to share them with you later on!

I also love the idea of a candy bar for the guests. Glass bowls and jars surrounding the beautiful cake, filled with delicious, colourful candies - what could be better? In my searches for inspiration, I came across this lovely setting from the blog Striving 4 Perfection:


It beautifully captures my idea of the perfect candy bar (mind you, with such a small guest list, ours will not be quite as elaborate), and also incorporates a lovely pennant banner. I hope to create one myself using scrap material in the baby shower colours that Taylor picked out. As for glass jars and containers - we have a ton at home that I can use, or if necessary, I can pick up at a thrift store as well. I always have uses for those types of things around our home anyway!

That's where I am right now, as I begin my search for Baby Shower inspiration. This will be the first place Taylor will actually see all of these ideas - so I look forward to seeing what she has to say about how I plan to baby shower-ify her Ottawa apartment! ;)

Now I'd love to hear from all of you - what have been some of the best and worst things about baby showers you've been to? I want to make it not only enjoyable for our mother-to-be, but for all of our guests as well! Decorations, treats, games & prizes - what is a must, and what would be a bust?
SHARE:

Tuesday, February 16, 2010

Look At What I Got....


Isn't it sweet? I just found out today that I won this fantastic print via a giveaway over at My. Daily. Randomness. My fellow Canuck, Brittany, and her blog are most definitely worth checking out. Not only is she a designer who creates great prints like this (as well as some very cool digital scrapbooking kits), but she blogs about renovations on her first home, and shares delicious recipes and other fun, printable freebies! So swing on over and check her out!

Thanks again Brittany - now to find the perfect spot to hang it! (B is going to be so thrilled when I bring home something else to hang on the wall!!) 
SHARE:

Monday, February 15, 2010

Painting Tile

I want to preface this post by saying, I would not recommend painting tile as a permanent solution (or at least not using my process!). We just ran into this problem when we first moved in, in our upstairs bathroom. It's a temporary thing until we have the cash to renovate the whole bathroom (it needs it). SO, in the spirit of freshening up the kitchen (again until we have the money for a complete reno) - I find myself once again painting tile, and this time, I decided to share the process with you.

First things first - clean those tiles. Give 'em a good scrub. Different online articles that I found suggested different types of cleaner. We were lucky enough to stumble across this "Krud Kutter" at Home Depot on clearance not too long ago.


For about $7 we picked it up, knowing we would be using it for a variety of projects around the house. The best part - is that it's non-toxic and biodegradable!! Made me feel a little better about using this to clean. So I grabbed an old cloth we had laying around (or in this case, one of B's old socks) and got to town scrubbing all those tiles.  

After the tiles were scrubbed, I used some warm water to wash off any residue left behind by the cleaner and then let them dry. Once dry, I used some fine sand paper to rough up the tiles. Not only did this rough up the tiles a bit to help the primer stick better, but it also helped to clean the tougher clumps of grime or build-up that the cleaner couldn't get. Once this process was done, I used a warm damp cloth again to wipe up any dust from the tiles - don't want any dust or dirt getting caught in the primer.

After cleaning and sanding the tiles, it was time to pull out the primer.


Simple step here - just get that primer on the tile. This will give your final paint something to adhere to. I was able to just use some KILZ Latex Primer that we already had laying around the house. I got that on and it's suggested to let it dry for at least 24 hours. In my case it was a little longer... as I let the kitchen sit like this for almost a week before the final step:


After a week of staring at this, I woke up Friday morning and decided it was time to finish up this project. I pulled out the paint colour I had picked, and after two coats of paint, our kitchen now looks like this!


My kitchen re-fresh project isn't completely finished yet, so I don't want to share a complete look - but you can already see what a difference just a change of the backsplash makes.

So what do you think? Do you like the new look to our kitchen backsplash? Have you ever had to, or thought about painting tile? If so - what was your experience like? Would love to hear what other people think about this little project. So share away!
SHARE:

Monday, February 8, 2010

Kitchen Mini-Makeover

So I've been gone a lot longer than I would like. The home computer has been giving us more troubles lately - so I haven't been able to get on consistently, therefore I've pretty much just been avoiding it all together. But here you go - time to catch up and give you a taste of the new mini-makeover that is coming!

You may remember a while ago, I posted about painting the living room, and how badly it made me want to make a change in the kitchen? Well, less than a week after the living room was painted I'd had enough.

Most (if not all) of you have never seen what my kitchen was like when we bought the house. So, I now subject you to the yellow monster that was our kitchen.


Yes, ladies and gentleman, it was a LOT of yellow and don't even get me started on the placement of that fridge! Of course when we bought the house I was able to look past all of it because of the real wood cabinets (potential), the HUGE amount of storage space and of course, the sheer size of the kitchen.

My biggest issue with the colour of the kitchen, was that it was fully visible from the living room via a giant pass through (to the right of the picture - above the dishwasher). Though I do believe that yellow and grey can look fantastic together, this colour combo was just NOT doing it for me. So, only a week after we pulled out the sample cans of paint to test on the living room walls, I got to work on the kitchen. It turned out that the grey we decided not to use in the Living Room, was the perfect colour for our kitchen.

So I spent an entire Sunday painting away in the kitchen, lugging around a huge ladder, knocking those hanging lights all over the place, and blistering my little hands with the paint roller, but in the end it was worth it to say goodbye to that nasty yellow! If I was having better luck with the home computer, I would share an updated photo of the kitchen - but I'll have to leave it here for now. There are a few more projects I need to work on in there to get the kitchen to where I want it to be (until we can afford a real kitchen reno that is) - so I'll wait to share it until I'm a little further along in the "mini makeover" process. I'm looking forward to sharing a pretty fantastic before & after! :)
SHARE:
Related Posts with Thumbnails
© Life on Misneach Ridge
Blogger Designs by pipdig